When planning the construction of replacement interior panels for my 1975 MGB, I chose to use 5 mm plywood as an alternative to the 3 mm masonite that was used by the factory. This was done to permit better resistance to moisture and to better support mounting fasteners. Working from the rear of the cockpit forward, I discovered when I got to the door panels, that it would be necessary to replace the hexagonal window winder drive pieces, a component of the window regulator assembly with thicker parts to accommodate the thicker panel material. This article addresses the method I used to achieve this.
The original window winder drive hex is a stamped steel part, 1/8th inch thick with a one and one eight inch hexagonal. Located in the center of the hex is a thru slot .25 inches wide and .369 inches long with full round ends. The slot is sized to be a press fit on a male boss/hub on the regulator, concentric with the fastener/handle retainer.
The original part was removed from the regulator assembly by gently prying against the regulator body with a pair of close fitting screw drivers placed on opposite sides and maneuvered around the perimeter of the hex. Care should be taken to avoid damaging the male drive boss that protrudes from the regulator as to do so would make fitting a replacement more difficult.

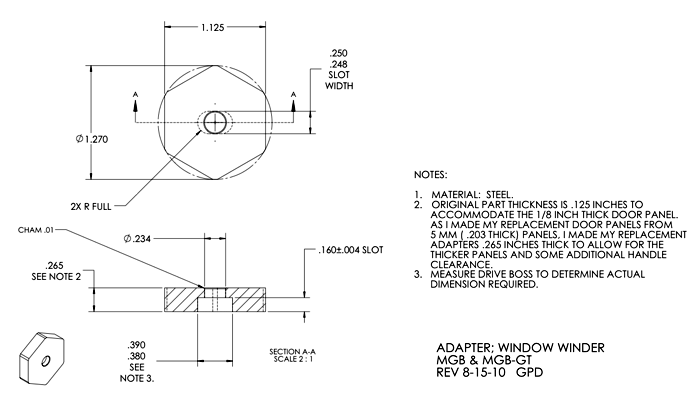
MGB Window Winder Adapter Drawing
Two, thicker replacement drive hexes were fabricated by first turning in the lathe, a steel rod to diameter 1.270 inches and length about 1.50 inches. A 15/64 inch diameter hole (.2344") was drilled on center to a depth of one inch. The turned rod was then milled to hex shape 1.120 + 0.00 - .005 inches to be a close fit into the winder handle. To accommodate my 5 mm. thick panels I chose to set the replacement part thickness at .256 inches thick. This would permit the handle to protrude a bit farther from the upholstered surface than the factory allowed to avoid marking the vinyl, the result of rotating - functioning the handle. Sections were parted off thicker than required and then milled and ground to size. With the hexes now made, the drive slots were addressed.
Slots were milled to size in a vertical milling machine starting on center and with a slightly undersize .248 inch diameter end mill using the plunge milling technique with ten thousands inch advances until a slot having a width of .369/.370 was produced to a depth of .16 inches plus a bit for clearing the drive boss. After the drive slots were produced, the nearly finished adapter was removed from the vise and deburred. Drive slots must be carefully made to facilitate a press fit onto the regulator hub. The press fit will assure that there will be no rock in the handle as it is rotating which may injure the upholstered surface of the panel.

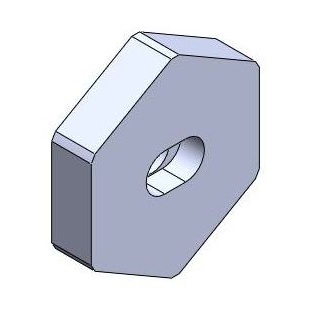
MGB Window Regulator Adapter Rendering
Carefully press the replacement hex onto the regulator hub as the original, keeping it square to the hub as you proceed. The handle retaining screw in my car was adequately long enough to hold the handle in place on the thicker drive hex. Check to be sure that the screw in your installation is long enough to engage at least one diameters length of screw threads to assure that it will stay tight.
Once installed and with the replacement interior panel in place and the handle mounted, the result was as expected. A drawing of the thicker hex adapter follows to be used as a guide to those who may wish to use the same method in their project. If you use a thicker panel in your project, be sure to shim out the interior door handle and lock assemblies in order to accommodate the thicker panel and to permit the installation of the interior handle bezels.
- Gary Dabrowski
August 25, 2010


Want to leave a comment or ask the owner a question?
Sign in or register a new account — it's free