Vent window assembly and window channels - How to remove from the door and fix it all up
By Kim de Bourbon, Keystone Region MG Club
Original published in MGB Driver, the magazine of the North American MGB Register
Reproduced by permission of author.
As with most MGB projects, I got into restoring my vent windows as a might as well. It all started when I was trying to fix the drivers window on my 1966 MGB. The window cranked up well enough, but had gotten almost impossible to crank down, even though gravity was on my side.
After removing the door cap, hardware and the many screws that hold the interior panel in place, I squirted half a can of lithium grease in the window winding regulator works, in an effort to improve the operation. Nothing made much difference, and the window was still hanging up hard in its downward travel.
Finally someone suggested the problem might be one of the window channels. Sure enough, once I figured out how to remove the back channel (latch side) from inside the door, the problem was obvious. The original metal-backed felt track inside the channel had succumbed to almost 40 years of use. The metal backing was rusty and broken in a couple of spots, with odd bits sticking out into the channel at angles so that the window could still go up, but got caught on the way back down.
Removing the back channel was easy. Undo the short Posidrive screw that holds the channel to the top of the inner door. Roll the window up, then reach into the bottom of the door with a 7/16ths nut driver or ratchet and undo the nut that holds a bolt through a bracket at the bottom. Once the channel is free, push the window glass back gently with one hand, then turn the channel so the groove is facing away from you. Wriggle the channel down and horizontal towards the front of the door, eventually pulling it out through the large hole at the bottom of the door. Dont try to pull the channel straight out the top of the door, as might seem logical. The brackets on the channel make this impossible.
Replacing the old felt channel strip is very easy. The original metal-backed strip was attached to the channel with three substantial staples. Its a matter of pulling those staples out from the back of the channel to free the old strip. (If the strip is in sad enough shape, you may be able to grab hold of one end with pliers and just yank it out.) Youll want to take care of any rust you find on the channel, of course, by sanding and using a rust treatment product.
The new flex channel which you will get to replace the old felt one is all rubber, so no worries about it rusting again. And all you need do is tuck it into place, and trim off any excess.
After putting the rehabbed window channel back in, I was rewarded with instant improvement in the window operation. Now, flush with the success of this small project, I started down that familiar road called might as well.
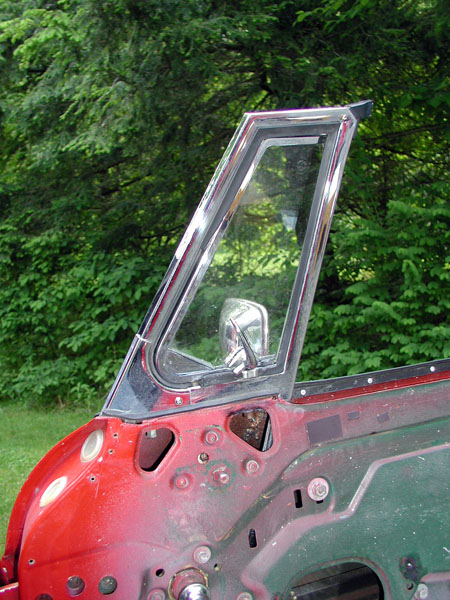
Completed MGB Vent Window Refurbish and working great!
I'd been looking at the rotting rubber of the vent window seal for a long time, especially when driving in heavy rains, when I needed to keep a towel handy to sop up the constant flow of water. Id just finished injecting some flowable silicone into the vent window frame, and expected that would help. But since here I was with the door panel off anyway, it seemed it should be easy to just lift out the swiveling vent window glass and replace the rubber seal that it fits into in the frame.
I soon found, however, that this was not going to be the case. The pivot pin is secured by a nut and a spring hidden inside the door, and nearly inaccessible. And I could get my fingers in there enough to realize that the pivot pin works was fused solid by rust.
No problem, though, since the whole vent window frame is easily removed from the door. First, look through the two small triangular holes in the inner door under the vent window on either side of the pivoting point, and remove the barrel nuts that secure two threaded studs.
The frame, which contains the front window channel as well, is held to the bottom of the door with the same kind of bracket arrangement as the back window channel. Just remove that 7/16ths nut. Then remove the two plastic caps (rain excluder plugs) from the top of the hinge edge of the door to gain access to two long bolts that hold the top of the frame to the door. You should then be able to lift the whole assembly straight out the top of the door, taking care that the window glass is out of the way, and being careful not to scratch your paint.
(NOTE: Its best to only have one window channel out of the door at the time, so that you are still able to crank the window up and down, as is necessary to maneuver the removal of the channel and vent frame.)
Once the vent window frame was out of the door, my problem became obvious. The pivot pin did swivel properly, but the nut and spring were solidly fused together by rust. Getting the nut off so I could remove the vent window and thus replace the seal in the frame was going to be a real challenge.
First I removed the top half of the vent window pin hinge, which is held in place by two screws on the outside of the frame.
I laid the frame out on the work bench (well, OK, it was the dining room table) on top of newspapers, and sprayed on a liberal coating of PB Blaster, my lubricant/rust breaker of choice. I had been advised to let the PB Blaster work its magic overnight, and that it might take a few days to loosen the nut. But I could see that even if the PB Blaster did its job, there was almost no way to get a purchase on the pivot pin to leverage against removing the nut since it, um, pivoted.
I called in my support staff. Charles seized ratchet wrench and pliers in an effort to give the nut a try. Oops. The pivot pin snapped clean off at the frame.
Well, there was no going back now. I consoled myself with the fact that even had we cut the nut off, the pivot pin was rusted and weak, and it probably would have been impossible to just put a new nut and spring on.
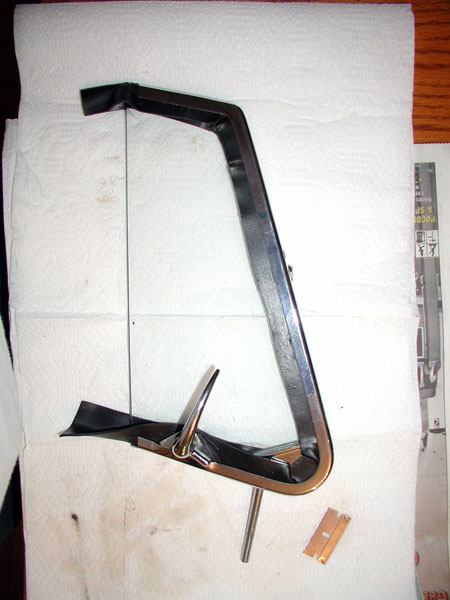
MGB Vent Window Disassembled
I ordered a new pivot pin and nut, and thought that at least now I would be forced to do the complete job right, including taking the glass out of its frame and reglazing it. (You must pull the glass out of its frame to replace the pivot pin, as the head of the pin goes between the glass and the inside of the frame.)
I was sure Id break the glass, but was pleased to find that prizing the glass out of the frame was not that difficult. (The frame has only three sides, after all, and is fairly flexible.) Patience was required, but the old rubber glazing wasnt in great shape, so it was pretty simple to use a very small screwdriver to scrape the old rubber and then pry the glass out. Ive since been told a dousing with silicone spray will help.
While waiting for the new hardware to arrive from Little British Car Co., I cleaned up the old rusty pivot pin works to see what was what, and found that there was a short brass tube above the spring. Hmm, the Moss Motors catalogue doesnt show any piece like that. I checked in the Victoria British catalogue, however, and yes, there it was, a distance piece. (It never hurts to consult both catalogues, as often one diagram will show something the other does not.) The VB book also showed two washers, one above the spring and one below. Good to know!
Once the parts arrived, it was a cinch to reassemble. (Of course, you want to clean the glass and polish up the chrome while youre at it.)
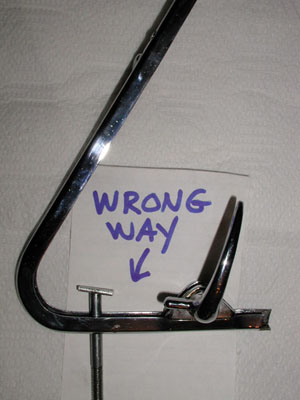
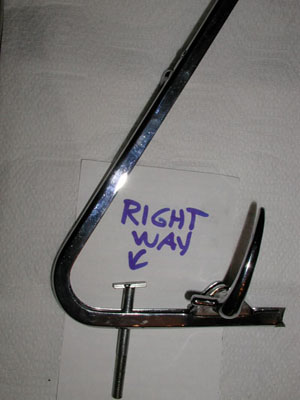
First, put the distance piece on the new pivot pin, then put the pin through the hole in the bottom of the outer vent window frame. Note that theres a slant to the head of the pivot pin make sure you put it in slanting the right way. (SEE PHOTOS) With the inside of the frame and handle facing you, the pivot pin head should be angling up toward the handle.
Put the triangular drain channel piece on the corner of the glass, and then form the new rubber glazing strip around the edge of the glass. Ease it all back into the frame, and press it in evenly to make sure it is snug. Note that the rubber glazing is a lot wider and longer than you need. Once you get the glass back in, just use a sharp razor blade to trim it.
Tuck the new rubber seal into the outer frame, and put the vent window back in place, with the pivot pin through the bottom.
Reassemble the pivot hinge on the top of the vent window. Put a new fuzzy liner in the big window channel, of course, while youre at it, and youll probably also want to put a new rubber seating seal under the frame before putting it back on the car.
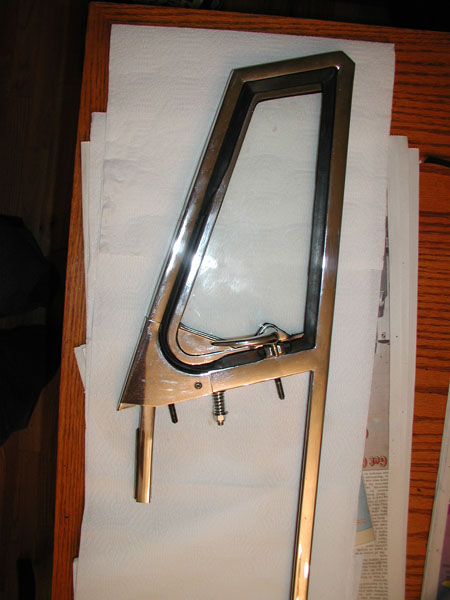
MGB Vent Restored and Re-Assembled
Do check this spot on your door while you have the vent window out, as its a weak area prone to rusting, and part of the structure that forms the infamous Crack of Doom.
Now put the whole thing back into the door. Reattach the bolts on the top, the nut on the bottom, and the two barrel bolts under the vent window, the plastic caps back over the holes, and youre done!
All in all, a very satisfying job, and not at all as difficult as I thought it would be.


place. there is a welded piece at the bottom of the channel (the one that bolts to the bottom of the door)
that gets hung up on the window mechanism. It looks like I need to twist the assembly so the bracket is
parallel. With the window glass in place, this doesn't seem possible. Am I missing something?
Thanks
Terry
article I have just completed the disassembly of the windows and replacement parts ordered.
Thanks
Wim
Want to leave a comment or ask the owner a question?
Sign in or register a new account — it's free