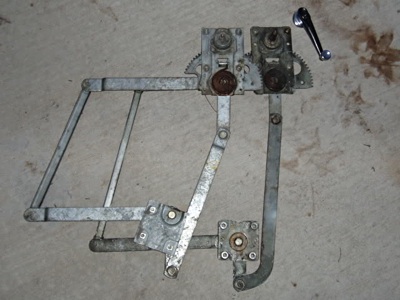
I found the shop manual woefully inadequate for this task and hope to share the results of my trial and error with others.
To get a decent repaint it is necessary that the outer rubber seal at the top of the door be replaced. This is pretty straightforward; just drill out the rivets and reinstall with a pop rivet gun, but remember to use short stainless rivets or you run the risk of denting your door skin from the inside out!
Some early MGBs have a removable window stop (the small metal 'box' in the door bottom that the lowered door glass rests on, originally topped with a horsehair pad). If you are so lucky, just unbolt that and lower the glass to uncover the rivets. Later cars had this door stop welded in place and the only solution is to remove the door glass.
The following is the procedure that I found, through trial and error, worked best on my 1974 convertible. Earlier or later cars may need a different approach.
MGB Door Glass Removal
There are 4 main assemblies involved in the door glass: the window itself, with its metal channel bonded on the bottom; the regulator assembly; the front channel which is part of the vent window assembly; and the rear channel. To remove the glass, follow this sequence:
- Wind the door glass down halfway with the handle.
- Unbolt the rear channel top and bottom and fish it out of the door.
- Remove the 4 regulator bolts from around the winder knob and the 3 short regulator bolts from the center of the door.
- Carefully push the winder knob mount on the regulator into the door and lower the regulator, with the glass attached.
- Push the glass as far back in the door as possible and tip the front edge of the glass up. Pull/slide the roller pins on the regulator out of the window channel (there is a slot in the middle for the front roller to fall through). This may require some wiggling around.
- Remove the glass from the door.
- Unbolt and remove the vent window assembly.
- Pull the regulator out of the holes in the inner door.

Comparison of Late and Early MGB Window Regulator assemblies
MGB Door Glass Replacement
The Compleat Official MGB notwithstanding, installation is NOT the reverse of disassembly!
Here is the sequence I found works best:
- Replace the rubber door seal with a new one, again using short stainless 1/8 rivets. Cover it with 2 layers of masking tape. I then lubricated the tape with KY jelly.
- Place a new bottom seal on the vent assembly, insert it into the door and install bolts loosely.
- Fish the rear track into the door and put it in place but do not install any fasteners.
- Fish the door glass with metal track attached down past the rubber seal, taking care not to tear your new seal. Straight down worked best for me.
- Push the glass into the front track and then fish the rear track into place on the back of the glass.
- Install the rear track fasteners but do not tighten.
- Slide the door glass up and down in its tracks until it slides freely but is tight enough to stay in place when you let go of it. Some white lithium spray grease in the tracks helps. You may need to shim the rear track with washers to get the right degree of friction.
- When the glass slides properly, tighten the front vent assembly and rear track bolts. Check and adjust window friction as needed.
- Fish the regulator (still adjusted halfway between open and closed) into the door.
- Slide the roller pins on the regulator back into the metal channel on the bottom of the door glass. Front roller goes through the slot in the middle of the channel; rear roller goes into the back of the channel.
- Moving the window up and down as needed, (here it helps to have an assistant with non-greasy hands), maneuver the regulator so the winder knob attachment on the regulator goes up through the proper hole while making sure the roller pins don't fall out (this may take a few tries).
- Attach the winder knob, and turn the knob until the mounting holes for the regulator bolts come into alignment. Start one bolt by the winder and one bolt in the center of the door, and then add the rest. Tighten partway and check to see that window winds up and down without binding.
- Tighten all bolts and ensure the winder still moves freely. Fiddle as required.
- Lubricate all the moving parts with white lithium grease spray.
- You will probably need to fabricate some kind of pad on the door stop to replace the old horsehair pad. I used some scrap carpeting.
- Reinstall the plastic moisture barrier and door panels and be on your way!


I found that I could not get the regulator in with the quarterlight fitted...could not get the winder piece past the leg of the quarterlight.
Other than that It was very helpfull. :-)
not have to remove the regulator
Yes, the door locks and latches and their associated rods have to be put in before the
glass. I rolled the masking tape over the edge of the new rubber so it would be
protected and then lubed it with KY jelly. Good luck!
Jack
Yes, the door locks and latches and their associated rods have to be put in before the
glass. I rolled the masking tape over the edge of the new rubber so it would be
protected and then lubed it with KY jelly. Good luck!
Jack
Want to leave a comment or ask the owner a question?
Sign in or register a new account — it's free