Assembling these doors can be a real puzzle because so many of the parts interfere with each other going in to that small space. Knowing the best sequence to do it in, and knowing the ideal way to rotate something while doing so, for the easiest job of getting it in there, all help. The following applies to all roll-up window Midgets/Sprites.
So, I jotted this down, hoping it will help others avoid a lot of frustration and "do-overs" while trying to get this difficult job done.
Step 1 - Door lock and handles:
- Key cylinder *see note at bottom
- Outside handle (with new gaskets, front and rear, the nut goes in front, screw in back)
- Door lock (make sure it is in the "open" position, and the short screw goes in the bottom hole). Bench test the lock before assembly to confirm it is fully clean inside and then use a very small amount of light grease to lube each moving point until everything moves freely and with minimal effort. Old locks can be awfully gummed up, but a cleaned and properly lubed one should move like silk from every lever.
- When installing the door lock, make sure the wire "lock lever" engages with the fork on the key cylinder and that the (inside handle) remote control lever engages with the slot on the lock. Lightly lube this contact point.
- Adjust the outside handle plunger so that it has 1/32" clearance to the lock lever and apply a little grease to the contact point.
- Inside handle base (called "remote control" ), leave the three screws loose
- Shift the remote control assembly (inside handle) rearward until the lever is against its stop, then tighten its three screws and lightly lube this contact point.
- Confirm the function of all levers is smooth and functions correctly.

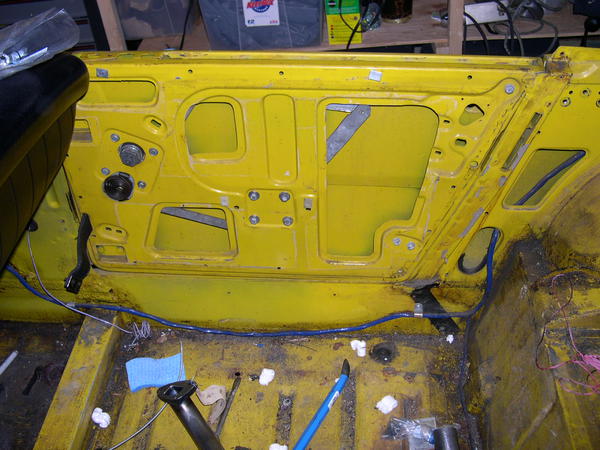
1979 MG Midget door inside view, stripped with window regulator installed
Step 2 - Window regulator, glass and quarter vent assembly:
- Outer weatherstrip (use 7 stainless steel clips)
- The "L" bracket in the front, lower corner of the door, that will hold the bottom of the quarter vent glass frame
- Install the glass down stop (located on the bottom of the door, in the middle). If yours is rusted away, you can buy a stainless steel replacement from Ashley Hinton (http://www.mgcars.org.uk/ah/).
- Loosely install the window regulator (should be wound up fully). Hang it by the "hex" drive on the edge of the hole that drive belongs in. Don't install any of the bolts yet.
- Glass (don't bother to insert the window regulator shoes into the glass bottom "track" until after the quarter vent is installed).
- Inner weatherstrip (with 7 metal clips), use a bent hack saw blade, the special tool sold by Moss, or other suitable pulling tool, for pulling the barbed metal clips up fully. If you have difficulty installing the clips, make sure the steel "bead" on the bottom of the weatherstrip is squished as thin as possible, and bend open the "lead-in" on each clip a little wider. Before installing the weatherstrip, trim it as needed to fit to the shape of the door (the part is supplied long).
- Loosely install the w/reg arm up stop (located above where the w/reg handle goes)
- Before you install your quarter vent assembly, inspect its lower pivot and seals. If the pivot looks badly corroded, or if the vent seal looks weathered, now is the time to replace them, before you proceed with the door assembly. To replace the pivot, you will also replace the glass packing (it is a strip of un-vulcanized rubber that presses between the glass and frame after it has been warmed by a hair dryer, the sun, or a heat gun). Make sure the pivot is installed facing the right way (it is angled), and after pressing the glass fully into its frame, trim the rubber packing with a razor blade.
- Install the quarter vent assembly (and its rubber glass run, and rubber seal that goes on the door top). Rotate it forward so the front structure can enter the door hole. Install the two bolts at the front, the bolt x the "L" bracket at the bottom, and the two long nuts at the top of the door.
- Assemble the glass to the window regulator by tilting the window regulator forwards a little and sliding the window regulator shoes into the channel simultaneously at the front end and the center "cut out".
- Bolt the w/reg to the door (8 bolts)
- Install the rear glass channel (with its rubber glass run). For access to fit this, temporarily remove the door latch and roll the window all of the way up.
- Adjust the quarter vent in/out so that its top is properly aligned to the top of the wind screen (this adjustment is done at the "L" bracket at the bottom of the door).
- Adjust the w/reg arm up stop so that the top of the glass when wound fully "up" is flush with the top of the qtr vent. This is important so the convertible top will seal well along this joint.
Step 3
Install the door "trim pad" (the vinyl wrapped portion of the door trim that your elbow rests on). Use a 5/16" ratcheting box end wrench (gear wrench) to tighten the fasteners because the workspace is small.
Note that the studs are in a channel so you can line them up with the holes in the door.
Step 4
Install the plastic water shield. If you don't have one, use a piece of stiff plastic (a garbage bag will do, but if the plastic you use is too flexible or "crinkly" it could make noise while driving, a plastic report cover from Office Depot is better, or just layered plastic shipping tape will work fine too, if you "shingle" the layers so that any water will shed back inside the door (hint: work from top to bottom so the overlapped layers of tape "shed" water away from the interior) - the whole point is to keep water away from your (cardboard) door trim).
Don't use duct tape because the adhesive will dry and fail, and the cloth fibers in it will absorb moisture and cause rust where it touches metal - duct tape is never useful for anything intended to last, it is strong and versatile, but is only temporary.
Step 5 - Door trim:
- Install trim
- Install inside handle escutcheon plate with its two incredibly small screws (make sure the locking lever engages with the lock lever, apply a bit of grease where these touch).
- Install the inside handle (with the plastic washer between it and the escutcheon plate)
- Install the pull handle and the window regulator handle
Step 6 - Repeat on the other side
Step 7 - Enjoy!
Notes about the key cylinder fitting kit:
Rather than use the OE spring clips, there is a very effective key cylinder fitting kit available.
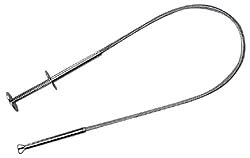
Note, though, if your car is a late model with the reinforcement "beams" for side impact, you won't use the steel ring or the resin ring that comes in the kit, their job is to protect the outer panel on the non-reinforced doors. You don't need them because the beam structure does that protection for you. Just install the "C" shaped piece and screw against the beam to tighten (note that the cross-car distance between the beam and the key cylinder's groove is small, so to avoid making installation of that "C" piece difficult, make sure those screws are all of the way backed off - which is tough because the screws only engage into it by about 3 threads). This job is easiest if you've got the door completely stripped (no inner or outer weatherstrip blocking your view, no glass, no latch). You can lower the "C" piece into position with one of those grippy tools:

Don't bother with a magnetic tool or you will be fighting the magnet sticking to everything else, rather than it helping you to install the part. Lower the "C" piece down from above, while you hold the key cylinder against the door with the other hand. Once you've dropped the "C" onto the key cylinder's groove, you can shift it around with something, like a long screwdriver, until it is fully seated, and oriented in such a way that you can access the screws to tighten them AND so that the key cylinder will rotate FULLY to lock and unlock the latch.
Check that there is no interference with your key cylinder's swing BEFORE you put the rest of the door together (install the door latch and try lock/unlocking it a few times confirming the lever never touches the "C" piece or those long screws). Note that the latch will only lock/unlock when it is in the "latched" position, not when the door is opened.
On an early door without that reinforcing beam, the key cylinder swing clearance x those screws are less of a concern (because they are screwed in more fully).


Use this guide and with a little patience you will have your fully disassembled doors back
together in no time. If you skip a step thinking you are smarter than the writer of this article,
you will be cursing a few paragraphs later because you did!
Use this guide and with a little patience you will have your fully disassembled doors back
together in no time. If you skip a step thinking you are smarter than the writer of this article,
you will be cursing a few paragraphs later because you did!
Nice write up
Want to leave a comment or ask the owner a question?
Sign in or register a new account — it's free