MGB REAR TELESCOPIC S/ABS INFORMATION
The most important part of converting your OEM lever type shock absorbers to the telescopic type is obtaining the correct "installed height". If this is incorrect and your new shocks have no built in bump stops, you could end up damaging them.
So, the first thing one should do is inquire as to whether, or not, the shocks you have purchased, or about to purchase, have this built in feature.
Normally telescopic shock absorbers are purchased as a kit, in this kit you will notice the upper shock mounting bracket has no provisions for any shock absorber "installed height" adjustments. Along with this, you are expected to remove and swap the lower mounting brackets from side to side.
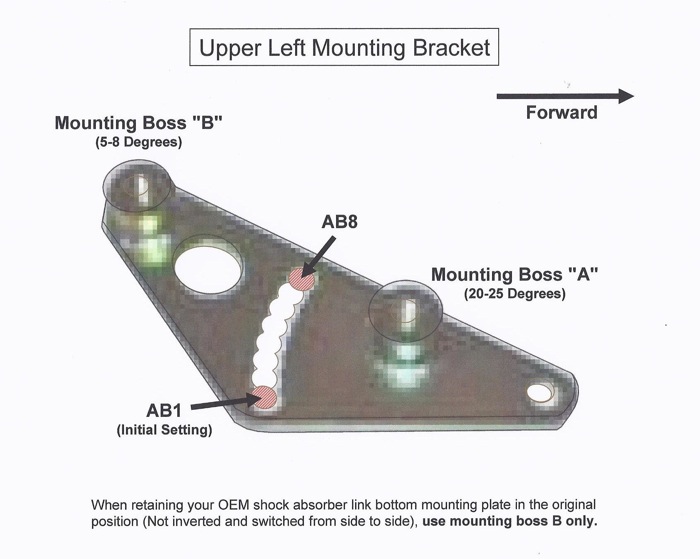
I now have an adjustable upper mounting bracket that allows you to keep your original lower mounting brackets in place and also goes a long way into solving correct shock "installed height" issues. (See mounting boss "B" shown below).
(To contact Doug about his mounting bracket, his contact information is on his profile here)
When this position is used it is very important to make sure that there is no interference between the shock body and the steel brake line.

If you have already changed over your lower mounting brackets from side to side, you will be required to use mounting boss "A"
Whether your telescopic shocks have internal bump stops or not, I recommend that that you fully extend and then compress the shock to determine its "working length" which should be in the region of around 6 inches. Before installation compress and mark the outer upper tubing lip relative to the lower tubing body. Mark in such a way that this mark can be seen during installation.
I recommend that before any final adjustments are made to the shock absorber "installed height" the vehicle should be on a ramp type lift, level on blocks or on level ground.
After you have fitted and partially tightened the telescopic shock along with the upper bracket (start with AB1 position) measure the distance between the upper tubing lip and the original mark you made on the lower shock body. We are looking for approximate equal amounts of bump and rebound.
With shock absorbers that have no internal bump stop provisions, it is extremely important that the OEM progressive bump stop be controlling full bump conditions.
Shock absorbers that have internal bump stops fitted may conflict with the OEM bump stop under bump conditions. The design of some of these internal bump stops can be flimsy, therefore I prefer to adjust the shock absorber "installed height" in such a way that the OEM bump stop is in control under these conditions.
With both types of shock absorber, we adjust the shock "installed height" by partially removing the bolt that controls adjustment, rotating the bracket up, or down, until the appropriate hole gives you minimal contact with the bump stop rubber, then reinserting the bolt. Now, allowing .250" to .375" for actual bump stop rubber compression, back out bolt, rotate bracket upwards and then insert bolt back into the hole immediately below.
Owners of vehicles that have higher than normal rear ride heights, which usually occur after the installation of new road springs, should think about running the original OEM shocks until the new springs settle.
Remember, telescopic shock absorber "installed heights" have a direct relationship with rear vehicle ride heights.


Want to leave a comment or ask the owner a question?
Sign in or register a new account — it's free