Delco Alternator Conversion, Part 1
by Larry A Hoy
This information came from all the helpful people on this list (too many to name, I'm a slow learner!), and my own personal experience when I converted my 1969 MGB to a Delco alternator.
Your first step will be to locate the Delco alternator. These are available "everywhere" for about $30.00, expect to pay about $15.00 more if you don't have a core to turn in. Many places will accept a Lucas alternator as a core but remember the Lucas core may be more valuable ($25.00?). The Delco alternator I used is a 63 amp internally regulated alternator. It fits 1971 through 1985 GM products. The person at the parts store may ask you what model the alternator fits, if this happens just name a GM product ,,,, how about "Camaro". It won't really matter what model you name, I'm pretty sure GM made only one internally regulated 63 amp alternator during that time period.
The mounting points on the Delco alternator are different than the Lucas alternator, so you will need to mount the Delco alternator in what might best be described as an upside down position. By doing this the small mounting ear on the Delco can be mounted to the front side of the water pump. This is a critical mounting point. It is very important to make sure there is NO movement (front to back) at this point or you WILL break the "ear" on the water pump. Here is the tricky part. The ear on the GM alternator is threaded with metric threads, that means the bolt supplied with the alternator is metric. These threads are very close to our standard course threads. What I did was used a standard bolt and screwed it into the metric threaded ear on the alternator, it doesn't matter if you screw up the threads on the alternator because you will never have to remove this bolt again. This bolt (which now is better described as a stud) will now slide into the mounting ear on the water pump.
Now you must fabricate a mounting bolt to connect this "stud" to. The length of the bolt you use will be unique to your installation, but remember it needs to be able to reach from the standard MG mounting bracket to the backside of the water pump ear. I used a grade five bolt (three "marks" on the head), I cut the head off of it and threaded it on the end that had the head on it. Now I have a bolt without a head threaded on both ends, and no threads in the center. Do not use "all thread", it is not graded and I have not had good success with this. On one end of this "bolt" you will install a standard nut, on the other end you will install a "long" nut, I don't know what these are called but they are about 1.5 inches long. You need to secure this long nut by jamming a lock nut with it. Now you will slide the end with the standard nut on it through the rear mounting bracket from the front side and screw the "long" nut on the bolt that is attached to the alternator. Now install another nut to the end of the "bolt" that extends through the back side of the rear mounting bracket. When you have completed the entire installation and have adjusted the belt tension it is important to tighten this "bolt" correctly. You will need to snug the long nut against the water pump ear, then adjust the nut that is on the front side of the MG rear mounting bracket so you have the "proper" tension between the water pump ear and the rear mounting bracket, then tighten the nut on the back side of this bracket. This will make sure their is no movement front to back on the water pump ear. If you are lucky enough to have a cast iron pump rather than the aluminum one this procedure is probably less critical.
I know this sounds very confusing, but in reality if you could see it, it is quite simple.
The opposite side mounting ear (large one) is attached the adjuster arm. The adjuster arm I used is a universal type; somewhat "J" shaped with two holes at the top end of the "J" and a long curved slot at the other end. This can be purchased at a local auto parts store; however JC Whitney sells them also, I believe their number is 2159Y. If you check out one of their catalogs you can see an illustration. You will need to cut 6" off the top of the "J" and drill a new mounting hole, this hole needs to be drilled as close to the "inside" of the curve as possible without sacrificing the integrity of the arm. The arm is then attached to the standard mounting point on the B.
On the back side of the alternator you can fabricate a bracket from 3/16" by 3/4" flat stock. Just make some minor bends, and drill two holes at each end. One end is mounted to the standard alternator bracket on your engine and the other to the standard mounting bolt on the back of the Delco alternator. This bracket helps to eliminate vibration that can contribute to breaking the ear on the water pump or the alternator.
Your B should have three wires plugged into the Lucas alternator; one large brown, one brown with a yellow tracer, and one small brown. Cut off the plug that is used for the Lucas (you might want to keep this plug in case you ever want to "undo" the conversion). The large brown wire is attached to the large lug on the back of the Delco alternator; you may want to use an eyelet style crimp terminal on the end of this wire. Buy the standard plug that plugs into the side of the Delco alternator (your parts store will have one of these) and wire the remaining two wires to it. The small brown wire with yellow tracer is attached to the #1 lug and the small brown wire is attached to the #2 lug (you will see these numbers on the back of the alternator).
This installation looks clean and proper (if you can call a Delco alternator on a B proper!)
The cost for this conversion is approximately (note these prices are many years old):
| Alternator | $30.00 (with core) |
| Plug | $2.00 |
| Bracket | $12.00 |
| Steel strap | $2.00 |
| Total | $46.00 |
This is kinda a "one size fits all" answer; so if any of this doesn't make sense, or you have questions or additions to this message please contact me. I will try to help you, and also revise this message so it will be of more help to others in the future.
Delco Alternator Conversion, Part 2
by Steve Bettencourt
As promised this is how I did the alt installation. It took about 2 hours of work this Saturday and 2 weeks of design :-). I'm posting it to the list for anyone else interested.
Way back when I first signed on the list I asked about testing a Lucas alternator so I wouldn't buy replacement parts wastefully. Vince had suggested a Delco alternator retrofit. There was encouragement from others on the list and it sounded like a good idea so I decided to look into it. So here's what happened.
Background:
I purchased a '79 B basket case late in the summer. When I got the car home and got it running I discovered the Lucas alternator had expired. I have a lot of work to do to reassemble and paint the car so I worked on other things while I thought about the alternator swap. It turned out NOT to be a drop-in and the car has A/C which makes the project a bit more difficult (not impossible) because the A/C compressor goes where the alt goes and the alt mount high.
Enter one '76 B parts car. I got that one home, flat towing it behind my Blazer. After an hour of work (cleaning the carb and dist) it too ran, and very well (better than the 79). So now I have a parts car that's worth repairing. "How does this have anything to do with the alternator?", you may ask. This. I pulled the '76's alt and put it on the 79 (with the plug from the 76). I had the Delco alt so as to not relegate the 76 to flower pot status (or spend money that could go to the 79) I decided to fit it. The 76 does not have A/C.
How I did it:
The key, as I discovered, to a reliable, strong and stable conversion is to use a double groove sheave on the alt. You could use a single but then extra spacers are required to move the unit forward to line up the belt.
- I removed the air pump so I could see the original mounting points. The rear one is a bolted on bracket and the front one is a boss on the water pump. The adjusting bracket attaches to the front motor plate below the water pump boss.
- The mounting position of the Delco alt will be with the large mounting lug high (on top) and the adjustment lug low (on bottom) which is usually opposite as mounted on a BAM (Big American Car)
- For the main (top) mounting location I made 2 tabs. 1 inch wide by 2 inches long by 1/4 inch thick (HRS bar) I tapped one 5/16-18 hole 1/2 in from one end and drilled a 3/8 hole 1/2 in from the other end (the holes need to be 1 inch apart on center). Same for both tabs.
- The end with the 3/8 holes needs to be radiused to remove the pointy corners so they won't contact the alt body or fan.
- Attach the taps to the front (as in "front of car") of each of the original tabs w/ 5/16 bolts. Position so they stick straight out to the passenger side (right side) of the engine. Put a nut on the exposed bolt threads to lock each tab in.
- Cut a piece of 3/8-16 threaded rod 5 inches long. This will be the new pivot for the Delco alt. Slide it thru the 3/8 holes on the tabs to be sure that the tabs are correctly adjusted. If necessary fix them now.
- Use four 3/8 nuts and flat washers and sandwich the large alt boss and tabs with the nuts and washers. Feed the nuts/washers as the rod is pushed thru the rear tab and alt. Sequence of the assembly from the front of the engine is: nut-washer-tab-alternator-washer-nut-exposed threaded rod-nut washer-tab-washer-nut. Snug but don't tighten it all up yet.
- I modified the original adjusting bracket by lengthening it 3 inches
with the extent ion at a 120 degree included angle. Basically it looks like
a wide, shallow "V". I also had to grind away some material from the top of
the slot to avoid contact with the fan. Bend as required to get the slot to
meet the alt tab.
(An after market or junkyard bracket can be substituted. It would need to be curved and about 6 inches long.) - Install the belt to the front groove. Adjust belt tightness and secure all fasteners. The nuts on the threaded rod clamp the tabs and the alternator to make a very stable package.
- Wiring- Cut a plug from a GM car in the bone yard. The big fat brown wire needs a 1/4 inch ring connector. Attach it to the BAT connection on back of the alt. The small brown wire goes to the #2 terminal (field) of the alt plug. (On mine it is a 14ga red wire.) The small brown wire with yellow tracer goes to the #1 terminal (indicator) of the alt plug. (18ga black on my plug.)
That's it. No other bracing is required. If you're ever out in East Nowhere and the alt takes a side trip you can easily get a replacement that will bolt right on.
Delco Alternator Conversion, Part 3
by Peter Cummins
I've enclosed my version of this alternator conversion in photo format. My version only requires a modification to the large mounting ear on the alt. Front portion of ear had to be removed to allow alt to be positioned forward so pulleys line up. Also had alt fitted with a dual pulley for additional forward reach. No change to the mounting points on the engine. I also had to use a generic "J" arm adjusting bracket, which needs to be shortened to fit. The long bolt can be any thread, since it uses its own nut and just serves as a mounting shaft. Hope these photos will be useful.
Delco part number for my alternator is 7127 (one wire)
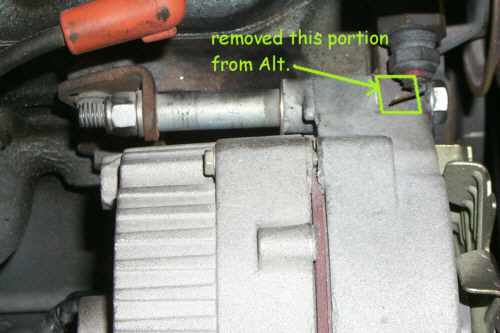
Portion of metal to remove from the Delco alternator mount, to align with MGB pulley
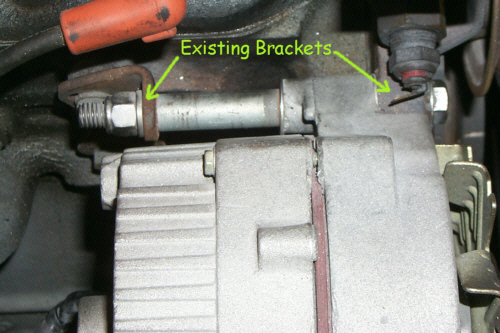
MGB Delco Alternator Conversion mounted to existing alternator brackets
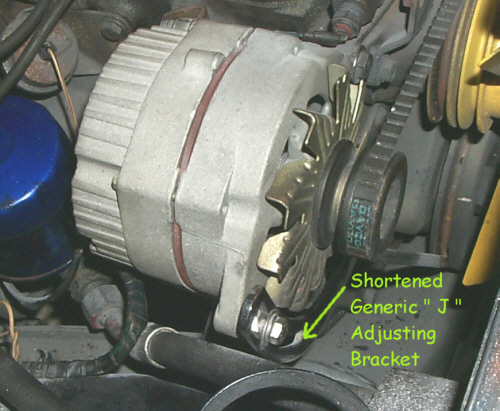
MGB Delco Alternator Conversion using generic J-bracket for adjusting belt tension
The only problem with this method of conversion is that if you need to replace the alternator, you have to perform "ear" surgery on that main mounting point all over again. Now on to the wiring.
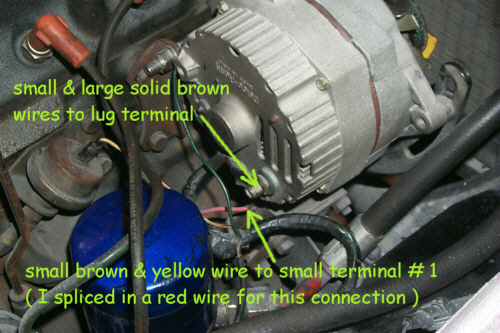
MGB Delco Alternator Conversion, wiring output and field terminals to existing loom
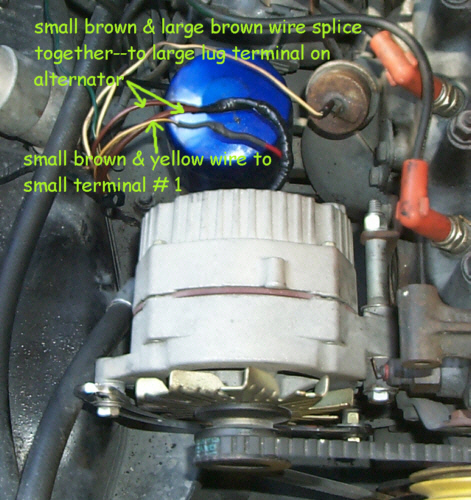
MGB Delco Alternator Conversion, wire identification and connections


the middle and avoided having to run a dual pulley on the alternator. 2.5" of spacer and a
3/8", 5" bolt and modified adjustment bracket did the trick. It's charging now :-)
and remembered reading about this. So I remembered I had a Delco alternator off of a sailboat
motor kicking around and went to my parts storage shed and sure enough it was there and the
exact style of casting so I am going to use it as my core (is is electrically shot - burned
windings) but nice to be able to plunk this down and say give me one just like it and no core
charge! Excellen article - Thank you!
Mike
thomasheckman@att.net
Want to leave a comment or ask the owner a question?
Sign in or register a new account — it's free