
First, read Section H of the Bentley Midget workshop manual.
These notes are meant as a supplement to the workshop manual. You can buy them on Amazon here:
If you have a huge freeplay between your ring and pinion, it is likely due to failed pinion bearings or failed thrust washers. The key question is this: the bearings and thrust washers are all replaceable, about $100 worth of parts. On the other hand, if the R&P teeth are worn, then you are probably best off replacing it rather than trying to repair this one. But, if the gear teeth all look very good (no dull spots, no chips, no scouring), it might be worth the effort.
If you want to find a shop to do this for you, google around for shops who do hot rods, or cars with RWD that get ratios changed for performance (in the US, this is easy: any shop that specializes in custom engine/driveline work on Mustangs, Camaros, etc.), they should be able to do the whole job, even setting up a new R&P (setting up a new R&P is substantially more involved than just replacing the bearings and thrust washers).
If you think your gears look good, and just need the bearings and washers replaced, then any good, local machinist ought to be able to do the remove / replace for you (and can check all of the lash, clearance, run-out and bearing pre-load for you, if you give them a copy of the pages out of the Bentley that describes the key values - frankly, most of the key info is universal to all differentials, and the stuff that isn't, is hand written (believe it or not) on the edge of your ring gear.
Or, you can do it yourself:
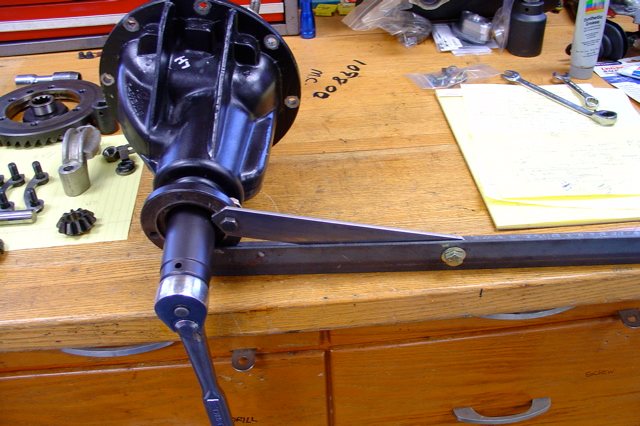
Universal leverage thingy, made from a length of 1.5 x 1.5" angle iron, flat stock, drilled holes, and some nuts/bolts
Disassemble the pumpkin (re-assembly torque shown in parenthesis):
- Note the RH/LH bearing cap locations to make sure you put them back correctly later.
- Remove bearing caps (65 ft-lb torque)
- Lift bearing cage out
- Remove crown wheel from the cage (60 ft-lb torque)
- Tap out the retaining pin (item 24 in Bentley) from the crown wheel side (left hand side). Use an 1/8" drill to clean out the end of the hole if needed. After re-installation of this pin when done, peen over the edge of this hole to prevent the pin from being able to come out by accident.
- Remove pinion pin, planet and sun gears, and their thrust washers (items 19 ~ 23 in Bentley). Be very careful to keep each part in the same position when you put them back together.
- Remove the pinion nut to remove the pinion gear, crush spacer, bearings, shim, seal, and dust cover (items 29 ~ 35)
The crush spacers supplied today are too strong, mine reached the specified 12in-lbs bearing preload at under 120ft-lbs (not the 140 ft-lbs the book says to go to). So, if you install a new crush spacer and go all the way up to 140, without checking the bearing load, and you got one of those strong spacers like I got (twice, since I overshot the first time) it'll overload things and quickly wear the bearings out.
This work can all be done with basic machine shop tools, if great care is taken to get everything back right where it came from, and if that new crush spacer is monitored very closely during the pinion nut torque:
- Dial indicator
- Hydraulic press (with various sized arbors for pressing)
- Bearing puller (for pulling the "inner" pinion bearing off of the pinion shaft)
- Seal puller (screwdriver, or small crow bar will do in a pinch)
- Ft-lb torque wrench
- Blueing ink (for checking R&P tooth alignment)
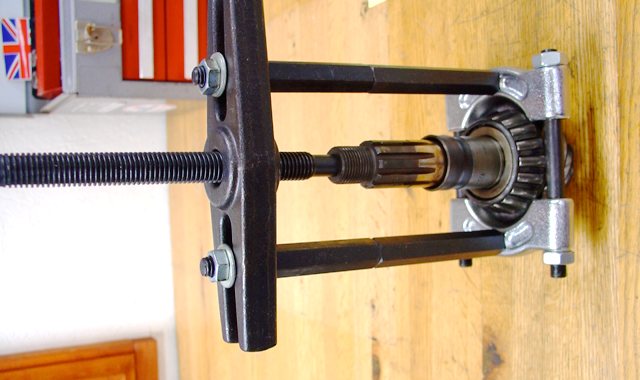
Bearing puller in operation
Last but not least:
- Clean and orderly work space to keep the parts in so they all go back in exactly the same place (like, the ring gear "clock" position relative to the cage, the planet and sun gears to each other, or the cage bearings on the right / left side).
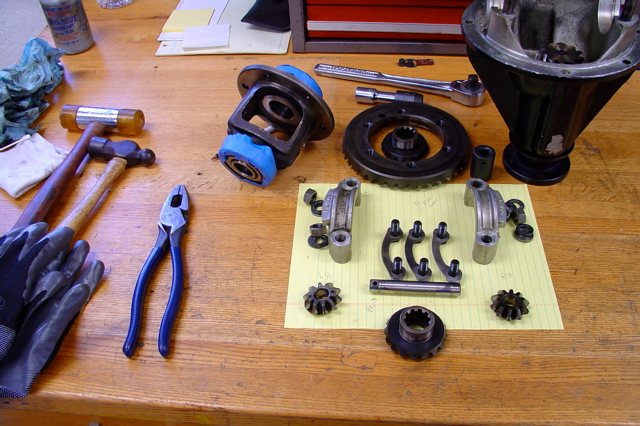
Ring and pinion gears ready for reassembly on a clean workbench
Oh, and the in-lb torque wrench. Typical in-lb torque wrenches only go down to 50 or so. Note that the bottom 15% of any torque wrench is not to be used, so you need a smaller tool. We need 11 ~ 13 in-lb, so you need a special one designed for that low range (ideally, a 6 ~ 15 in-lb torque wrench). I bought mine from Precision Instruments. You can also use a small oz. spring scale and a bit of ingenuity, but I was surprised at how very useful it was to be able to rotate my pinion 360° and measure "all of the way around". Another way to do it is with a known weight and a moment arm marked off like this:
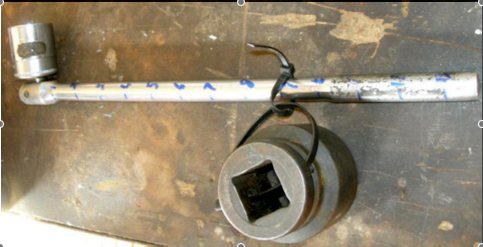
Homemade low-range torque wrench, moveable weight and marked breaker bar
This home made tool consists of a 2 ft breaker bar with a known weight hanging from it. Once the tool is on the pinion nut in a horizontal plane, you then move the weight along the bar. In the case of a 1lb weight, 12 inches from the socket, and the bar in a horizontal plane, the force applied to rotate the pinion is therefore 12 inch lbs (torque = force x distance). Note that the force applied to the pinion should be measured when the pinion is already rotating (to eliminate any sticktion, or initial resistance to movement).
Note that when the crush spacer gets close to being compressed, the bearing load increases quickly in a very few degrees of nut rotation. If you overshoot, get a new crush spacer and try again (once over compressed, a crush spacer is scrap).
Parts needed:
Pinion bearings, cup washers, thrust washers, pinion seal, crush spacer, crown wheel lock tabs (3), diff pin, and the spring pin that holds that cross pin in the cage *.
| Qty | Item | Part # | Price |
|---|---|---|---|
| 2 | Cup washers (0.035", 0.054") | 2A 7062 | $8 ea |
| 2 | Thrust washers (0.002", 0.003", 0.004", 0.01") | ATA 7039 | $3 ea |
| 1 | Pinion seal | 88G 320 | $3 |
| 1 | Crush spacer | BTA 532 | $17.50 |
| 3 | Crown wheel lock tab | ATA 7044 | $1.50 ea |
| 1 | Diff Pin | 2A 7016 | $36.35 |
| 1 | Pinion bearing (inner) | ATA 7166A | $26.25 |
| 1 | Pinion bearing (outer) | BTB 440 | $12.50 |
I got these parts from:
Kirk's Auto Refitters
1017 Mississippi Ave.
Davenport, IA 52803
Phone: 563-323-1017
Email: kirkbrit@yahoo.com
http://www.kirks-auto.com
I took my differential apart first, then measured the cup and thrust washer thickness so I'd order the right ones (note that there are 4 sizes of thrust, and 2 sizes of cup listed above). That was when I decided my diff bearings, ring & pinion, and the sun/planet gears were all fine. But the diff pin was worn a lot, so I replaced it, along with the bearings and thrust washers. The pinion bearings were not only severely worn, the color of their races was dull, dull, dull, because I had overtorqued the pinion nut when I replaced the seal some years ago - I had done it in the car and simply torqued to 140 ft-lbs, without checking anything.
Note that I did not replace the cage bearings, or disturb them, during this rebuild. They looked fine, and rolled smoothly, so I left them alone. These would have to be removed, and re-shimmed, if a new ring and pinion were being fitted, to set the ring gear R/L alignment, but when re-using a R&P, if they are in good condition, you could leave them undisturbed, I think.
* About that little spring pin, originally it was a 5/32 x 1" dowel pin. BMC service started replacing the solid pin with roll pins at some point. Unfortunately, none of the usual MG parts suppliers stock either one. Gainger sells these (spring steel, RC46, approximately 220 ksi tensile strength), Grainger part number 5EB34. Because it is a spring fit into the hole, it will have a natural resistance to movement/chafing, which might help minimize the wear that is often seen on OEM (dowel) pins after removal (there is not much load on this little pin, the driveline forces are taken by the steel diff cage, but it is very important because if the cross pin ever were to shift it could quickly destroy the whole differential).
The ring gear will have written on its perimeter what the backlash should be for that particular ring and pinion set, and that's what you use the dial indicator for, to confirm backlash and runout (the runout is 0.002" max). But if you just R & R thrust washers and bearings, and put everything back together in exactly the same orientation, it should be right when you put it back together (I checked anyway, and it was). This photo shows the three numbers that are hand etched into an MG ring gear: gear set number (which matches the pinion number), backlash for the set (in this case, 0.005") and shim pack for left/right alignment of the cage to the pinion (in this case, 2).
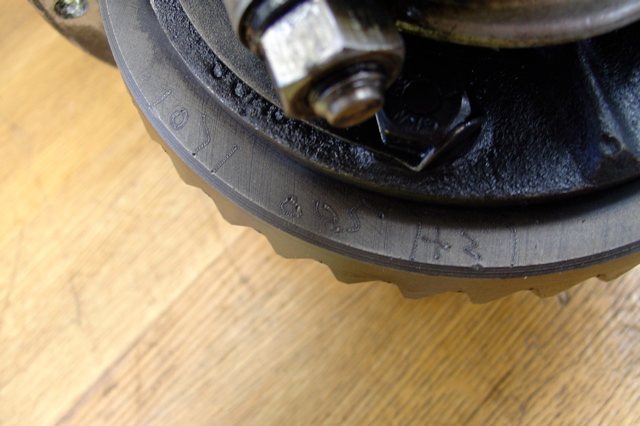
Backlash specs scribed on ring gear
By the way, 0.005" backlash feels, and sounds like a lot, when you've got everything cleaned off and you are rocking the ring gear back and forth against the pinion. I was surprised when I put a dial indicator on it and confirmed that it was only 0.005" that it was moving. If I had not access to a dial indicator I would have not easily known that it was correct, and proper, for it to feel as "loose" as it did to me, on the workbench. I think the gears make such a clear "ringing" tone when they touch as you wiggle them back and forth, is why it felt so large (it sounded, and felt more like 1/4" !)
Note: all of those fancy shop tools in the Bentley are just there to speed up the job, and for when you are starting from scratch with a new ring and pinion (what that third, shim pack number is for). Essentially, any shop that can do a Mustang rear end can set up one of ours, if you want to farm it out. If you do start with a new ring and pinion, the job is more involved and you must confirm the alignment between the two with bluing ink and some "reading the tea leaves". I searched for a good guide for doing this, and the very best one I could find was at:
http://www.differentials.com/install.html
scroll down, and see the images of the teeth, and their very clear description of how to read and interpret what they mean.
Or, you can just toss your whole pumpkin in the hopper and buy a used one, as there are supposed to be a lot floating around for low bucks (apparently, Midgets rust faster than their differentials wear). My ring and pinion looked like new, so I opted to give it a go (haven't driven on it yet, but it went together super well and I am optimistic). Even if it howls like a banshee, it will have been an interesting project and I was glad to give it a try.
Note: early rear ends use a rigid spacer with shims in place of the crush spacer. It is a more sure way to set up a diff, but takes longer to dial in, so they used a crush spacer in later mass production (and most modern RWD diffs are made the same way, with a one-time use crush spacer). If you have a solid spacer, it is re-usable.
Norm "what's the diff?" Kerr

")


A very useful piece - huge thanks for writing it. I'm about to purchase a 3.55:1 crown wheel and pinion and hope that you might know if it is a straight swap into the diff assembly/carrier on my UK spec 1977 Midget 1500. I'd hate to buy it and find it doesn't fit due to dimensional differences (of fixings for example). The vendor is in France and my French isn't good enough to explain my point in spite of Google translate!
Hope you can help!
Nick
and checking required than my simple, "remove and replace" project. If you are at all
concerned about being able to go that far, I suggest that you do two things: find a shop who
specializes in setting up differentials (hot rod shops, for instance), and make sure the French
vendor has a return policy if it doesn't fit your pumpkin.
I have an excellent machine shop near my workshop in East London if I run into trouble. Now I need to know how to say 'returns policy' in French!
best,
Nick
Want to leave a comment or ask the owner a question?
Sign in or register a new account — it's free