Commonly known as the "crack of doom" and common on many MGBs, this annoying flaw in the MGB door design develops at the top of the door close to the rear of the vent window, or directly underneath the side mirror. The crack then runs vertically down the door.
The repair involves welding, and should be done by someone proficient with a welder. It is important not to overheat the door skin to avoid warpage. It may be possible to use rivets or body metal adhesive as an alternative.
You will need:
- 20 gauge patch metal material
- MIG Welder and welding supplies
- 4 Cleco pins with Cleco pliers
- Weld through primer
- Sandpaper and/or grinder
- Compressed air to prevent welding heat from spreading
- Drill and bits
- Straight edge
Crack of Doom Repair Procedure
Step 1: Clean all paint from the area. I used a 2" Roloc sandpaper disc on an air angle grinder.
Step 2: Form a piece of 20 gauge sheet metal into a rectangular patch matching the contour of the outer door skin. The patch is roughly 2.5" x 1.5". Something a little thicker would also work, perhaps 18 or 16 gauge, but it has to be light enough to allow contouring to match the door skin's shape.
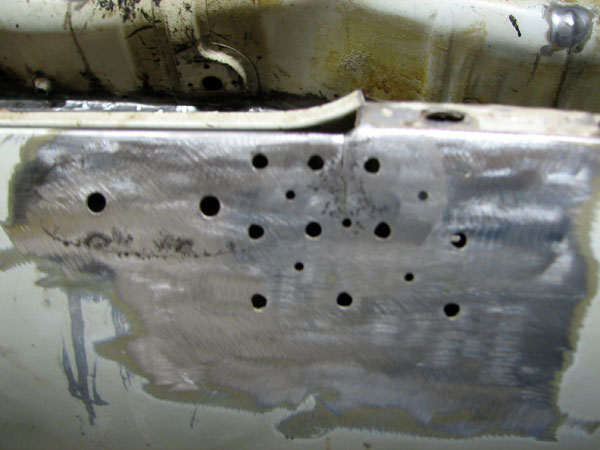
Step 3: Drill a 1/8" hole at the bottom of the crack, to prevent it from spreading in the future. This is known as "stop drilling" the crack, and will help prevent the crack from reappearing in the future.
Step 4: Plan out where to drill the plug weld holes. I used 10 plug welds spread out over the patch to distribute force over the area. Mark the plug weld locations with a marker.
Step 5: Using a 1/4" bit, drill the holes in the door skin.

Sanded MGB door, revealing "crack of doom", stop drill hole, and Cleco/weld plug holes
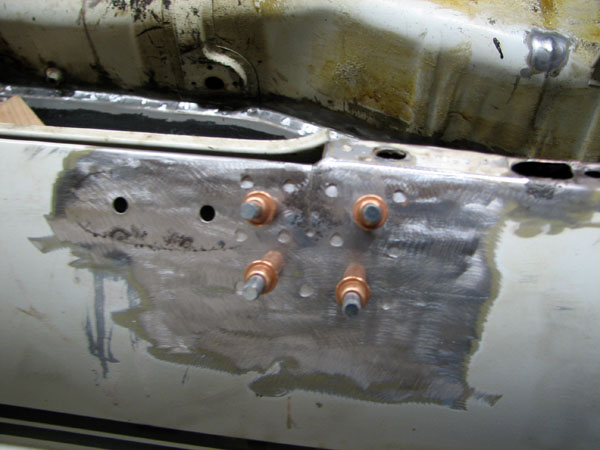
Step 6: Drill 4 holes of diameter 1/8" to hold the patch to the door skin with Cleco pins. The holes must be located far enough away from the plug weld holes so they don't interfere with the welding. Drill through both pieces of metal, with the patch on the outside of the door skin at this point still.
Step 7: Remove any rough edges from all metal surfaces with sandpaper. It is important that the patch presses firmly upon the inside of the door, with no gap. Therefore remove any shards of metal around the drill holes to prevent them from causing a gap.
Step 8: Paint the patch with weld through primer.
Step 9: Install the patch inside the door skin with the Cleco pins. Ensure there is little if any gap between the pieces of metal.

Crack of Doom patch panel installed with Cleco pins
Step 10: Ensure your MIG welder is well adjusted for this gauge of metal. I used some scrap to get it dialed in correctly.
Step 11: Weld the crack of doom up, starting at the drilled end and working up. Ensure that little heat spreads to the rest of the door skin. Excessive heat could cause the door skin to warp, which should be avoided. I took my time, cooling the area with compressed air between plug welds.
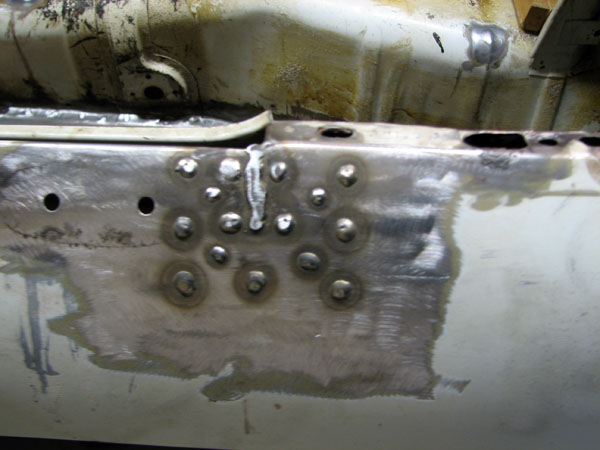
Step 12: Plug weld the patch in. Again, ensure that little heat spreads to the other areas of the door skin.
Step 13: Remove Cleco pins, and plug weld those holes.

Crack of Doom welded, patch panel plug welded
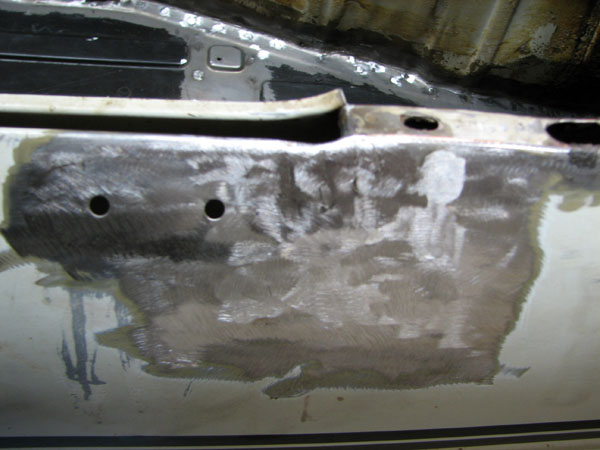
Step 14: Grind down the welds and check to ensure there are no high spots with a straightedge.

MGB door patch panel and crack repair, ground smooth and ready for primer
After this, it is ready for primer, filler, and paint. See the Tech Library for more articles covering those steps. Enjoy!


8/10 for method.
Want to leave a comment or ask the owner a question?
Sign in or register a new account — it's free