
I keep finding more photos I've taken, during various Spridget body work projects. The latest batch comes from my on again-off again restoration of a complete, un-molested (but rather rusty) MkI Midget.
I chose the aproach pictured to avoid some of the issues that crop up when using an entire rear fender repair panel. For this one, I used a section cut from an un-rusted '79 Midget carcass, which was given to me by my MG dealer friend after it was totalled in a frontal collision, when only a few months old.
BTW, part of this same '79 Midget was used to repair heavy collision damage on the Midget driven to victory in the '83 (?) SCCA F-Production Nat'l Championship (a.k.a. The Run-Offs). The car (a former Group 44 car, BTW) had sustained heavy damage to the left rear, in a race about a month or two before the Run-Offs. Anyway, another story for another time...
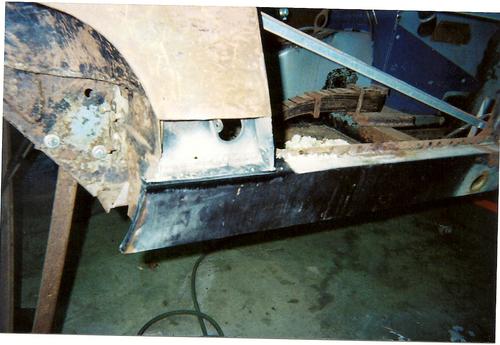
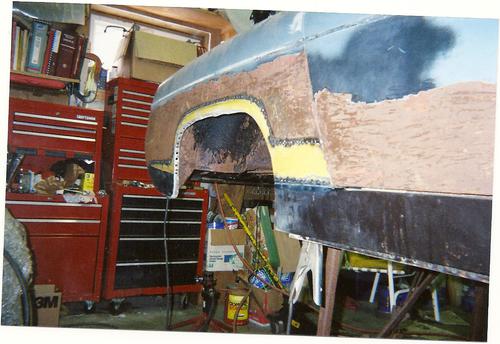
The main point, with this repair (other than preserving the front to rear "bow" of the original fender) is that the attachment welds between the outer sill and inner sill, at the extreme rear 8" or so, as well as the seam between the outer sill and the bottom of the rear fender are vital structural points and must be restored to original strength.
To do this, you need to provide a "window" for welding access. I do this by making two longitudinal cuts in the "dogleg" area of the rear fender insert. The first should be approximately 1/4" above the very bottom of that panel. The second will be 3" or 4" above the first cut.
However, to get the rear wheel well/arch alignment correctly matched-up with the outer sill and repair panel, the repair panel should first be fitted to the top of the outer sill and held in place by self-tapping, sheet metal screws (you'll need a large, flat, clean surface to lay the panels out on to accomplish this). If you are using one of the after-market patch panels, you'll want to shorten it (reduce the overall height) as much as you can, without making the future "window" (for welding access) too small.
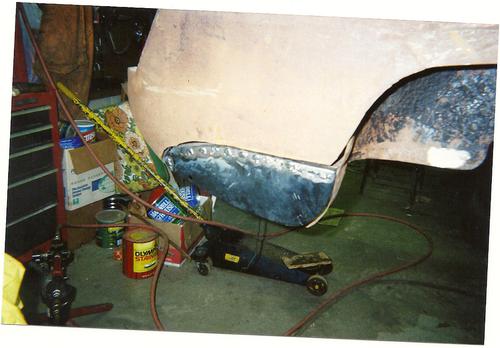
Then, with the repair panel screwed onto the new outer sill, you will fit the outer sill to the inner sill, holding it in place with clamps until you are satisfied with the way it fits. You'll need to nip a section of the original wheel arch away (maybe take a few "nibbles" on it) to allow the dogleg section to fully lay in place.
Next, when you are satisfied with the fit, mark your cut line on the original fender dogleg, using the repair panel as a guide. Run some self-tapping sheet metal screws in to mark the correct position of the outer sill on the inner sill, then take the panels off, again and make the longitudinal cuts on the doglegs (both original and repair section).
Weld the bottom piece of the repair section to the outer sill, re-mount the new outer sill and weld it on. Then, when it's time to "close the window" used for welding access, butt weld the other dogleg section into place, making sure that those weld seams don't "pucker" the panel out and make it a bitch to hide, when painting. Be advised that there is a nice, low crown from top to bottom, which an original "cut out" will have and which an after-market repair panel will NOT have. The pictures should tell you the rest.
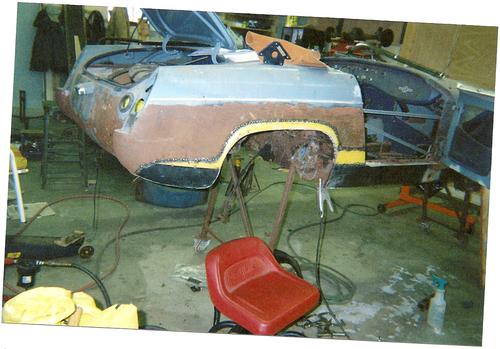
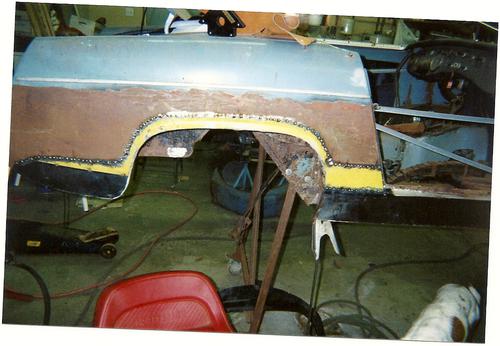
Note that the repair insert has not yet been welded to the inner fender. This is because I didn't get that far, yet. I did, however, cut the nasty, rusty remains of the inner fender away AFTER using it to help correctly locate the repair insert shown in the picture. The car is not mounted on my rotisserie and, as soon as I get two MGB projects out of the way, it and the '73 Midget will come back into the workshop for finishing. The '73 won't need much more than some re-doing of the new paint, followed by reassembly. THe '62 will need floors and some work in way of the rear spring mounts.
Also in the photos, you can see that I've rebuilt the trunk floor extension. For this, I used a new Heritage panel, from which I cut out what I needed. It can't be over-stressed that, on a Spridget, virtually EVERYTHING from the A-post back is a stressed structural member, so no half-assed lap patches, pop-rivets or glue and Bondo should be substituted for correct panel fit and good welding practices.
Oh yeah, one more thing: If you are rebuilding the A-post, at the same time you are replacing the sills, it makes a lot of sense to fit and weld the new A post pieces onto the outer sill, BEFORE welding the outer sill onto the car. And, although it very tempting to just use an after-market patch, to replace the rusty outer sheet metal of the A-post, you will get much better results by replacing the outer shell of the A-post from top to bottom. On my last one, I made the butt splice right at the windshield post opening, which minimized the welding and made it easier to cover up. Yes, it took a bit longer to do it that way, and did take more effort. But, I feel the results were well worth the extra effort. Just something to think about.

")


im getting ready to replace the sills on my car(76 midget) and have heard tons of talk about bracing,i wish someone would post proper bracing procedure so i dont screw myself.
im getting ready to replace the sills on my car(76 midget) and have heard tons of talk about bracing,i wish someone would post proper bracing procedure so i dont screw myself.
I've loaned my bracing out to a local MG club member, so I don't have access for photos, right now. Basically, I cut the attachment points from 4" x 4" x 1/4" angle (heavy stuff, but I get it cheap). The attachment points are then drilled to accept bolts going through to:
1.) the windshield mounting bolt holes
2.) the mounting holes for the convertible top mechanism (immediately behind the door openings).
3.) the bolt holes for the forward spring mounting plate.
Bolt the angle iron pieces into position, then cut 1" square tubing of maybe some 2" x 2" x 1/8" or 3/16" angle iron to run between the mounting points and weld it in. Then, you can weld some "clips" (with bolt holes pre-drilled), cut from scrap, onto the tubing or angles and then make up some cross bracing (it should be in an X configuration) and you're good to go.
I'm going to be doing some work on the Midget that is currently using the bracing I made up, in a few weeks, so I'll remember to take some photos to post on this forum, whil
Want to leave a comment or ask the owner a question?
Sign in or register a new account — it's free