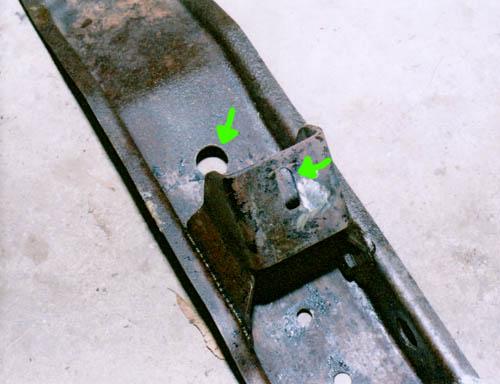
A common upgrade to the MGB gearbox crossmember is to remove some metal to enable it to be fitted to mounts already in place on the gearbox, rather than having to bolt the mounts to the cross member first.
This is highly advantageous as it is much easier to bolt the mounts and snubber to the gearbox when it is on the bench, and you can get to the bolts from all angles. Seeing how I seem to need to remove my engine and gearbox on a regular basis (some would comment on my driving style at this point), I decided that this mod was for me, and I took some photos once I'd done it so others can see how easy it is.
Please note that I didn't invent this mod, I have read about it in many places and other descriptions are better than mine I'm sure. I just offer this here for the sake of completeness.
Modification Procedure
Step 1: Make the holes for the studs on the rubber mounts oval (about 2.5 times as long as they are wide) so that it can be passed over the studs when the mounts are on the box.
Step 2: Drill two holes on axis with the two studs (in the regular position) in the main part of the cross member, big enough to get your 1/2" socket through (about 7/8"). These don't need to be oval of course, as your extension is narrower than the socket and you can tilt it over just fine once you've pushed the socket through. This picture shows a close-up of the oval stud hole in front, with the hole for the socket behind it.
(Alternatively, you could put your extension through the new hole and then attach the socket, reducing the size of the required hole)

MGB Transmission Crossmember, drilled for easy access to gearbox mounts
When you’ve finished the mods on both sides, you should end up with something that looks a little bit like this:

Modified MGB Transmission Crossmember, both sides drilled for wrench access to gearbox mounts
Step 3: With the mounts and snubber bolted to the box, drop the lump back in the car and leave the back of the gearbox sitting on the welded-in cross member (is this called a cruciform member?). This will force the engine and gearbox forwards slightly, but don't worry about that. Put a nut in your socket, and stick the spring washer to it with grease. Offer the cross member up to the box (which is sitting about 3" low) and poke the socket through to put the nut on. Do the same with the other nut and make sure it's snug against the mounts before you torque them up.
Step 4: Install your shift linkage and the wires to your switches (it's much harder to do this when the gearbox is in its normal position), then jack the gearbox up under its drain plug until the cross member is nearly touching the chassis. As it's just on the rubber mounts it's really easy to shove it around to get the bolts in the chassis. Put a114 chassis bolts in loose first before you torque them up so you don't get it together twisted, and then do them up however tight you see fit.
And lo, it's done! Don't forget to bolt your prop shaft back on!


Pay attention to mount fittings if you are doing an overdrive swap in
place of the 4 speed box.
Nice writeup
Want to leave a comment or ask the owner a question?
Sign in or register a new account — it's free