This article covers the simple adjustment on the back of the standard MGB fuel gauge, and how it operates.
First off, the adjustments can't be accessed with out removing the gauge lock bar on the rear of the gauge, behind the dash. It's easier then it seems, it's held on by a single thumb screw, and a lock washer. Even then, getting to it is hard, so its best to just remove the gauge and do the adjustment in your hand, and it's less likely that you will wipe out the adjustment slots anyhow.

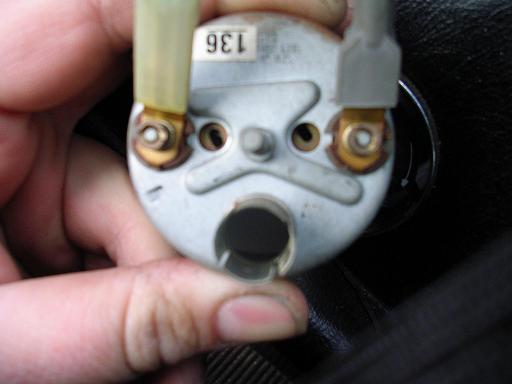
This shows the rear of the gauge, and the adjustment slots.
The slot behind the Full mark adjusts the "full" side of the needle's sweep,
and the slot behind the Empty mark does the same for the empty reading.
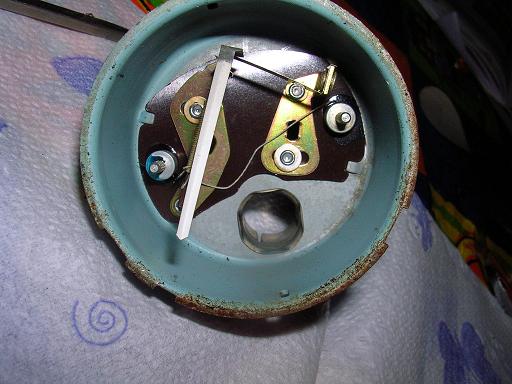
The photos show the operation of the gauge. The two slots are cut into one plate each. These plates are mounted to the case of the gauge, and the needle arms are part of them. Note that the left arm, the one with the power going to it, is hidden by the needle in the picture. As the left arm warms up from the wire wrapping on it (white wire), the bimetallic left arm expands, moving the needle. I believe the right arm acts as a support, and a ground.
You will notice that each plate has a solid mounting point, and a sliding one. This is your adjustment. When you use a tool to move the plates, don't expect them to spin, its more like they slide from left to right.
When you do your adjustment, make sure you do the Full side first, as doing the other side will throw it off, and you'd rather have the empty side accurate. When I did my adjustment, I had a full tank, and I simply shut off power to the gauge for the empty setting.
[Ed. Note- Please read this article for the exact resistance values and procedure to use for perfect calibration of your fuel gauge.]
While going through the calibration process its advisable to tap the glass a couple times at each setting. The bimetal has a way of not completing it full travel possibly due to age. You might be surprised to see the needle jump 1/8". When the gauge is in the car, bumps on the road will take care of this. Now I know why people were always tapping the gauges in old horror movies...

Inside the MGB fuel gauge: needle, spring, bi-metallic arm, and adjustment mechanism
Disassembly of the MGB Fuel Gauge
Note- I do not suggest disassembling the gauge, as it is easy to FUBAR the needle operation, but for those who want to do so, here's the procedure I used:
- Remove lock bar, and use a small screw driver to pull the face up slightly.
- Spin the face, until it is upside down. There is room in the face for this, but this is the dangerous part, if the needle somehow catches, you wont feel it, and you will mangle the needle. Just be easy with it, and take it slow, it should work.
- With the face upside down, you can pull the face slightly up, away from the gauge in the direction the needle is pointing. If done right, this will put a minimum of stress on the needle. It's impossible to remove the face without stressing the needle a little bit.
- Once the face is off you're done, unless you remove the needle and the plates, which I didn't do.


Im glad it helped.
tx,
leon
http://www.mgexp.com/article/fuel-sender-adjust.html
Want to leave a comment or ask the owner a question?
Sign in or register a new account — it's free