
I've recently converted my 1967 MGB/GT, Salisbury axle, from spline drive to bolt on (disc wheel).
For those that might want to make the conversion, below is a detailed procedure.
You will need the following parts to do the job:
- A set of front and rear original MGB 4 bolt hubs. Bolt pattern is 4"x 4.5".
These are NLA so you'll need to source a good used set.
Try eBay or the MG Experience Buy & Sell Forum - 2 x Grease caps. Moss part # 264-515 (if not with the used hubs)
- 4 x brake drum retaining screws. Moss part # 323-255. (if not with the used hubs)
- Your existing front bearing parts (if in good shape... if not... buy new).
- 8 x metric wheel lugs. 12mm x 1.5 (2.5" long)
- 8 x metric lug nuts (12mm x 1.5)
- 8 x standard lug nuts (1/2-20)
- 2 x rear wheel spacers.
- New cotter pins.
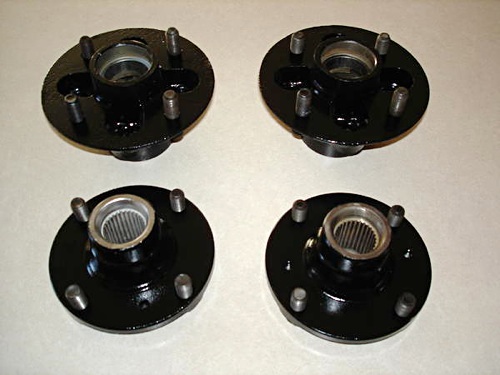
MGB Steel Wheel / Disc Wheel / Bolt On Hub Set
Rear Hubs Procedure
The original rear lugs will be too short and need to be removed. The metric size is 12mm x1.5 (2.5" long). You can buy either ARP 100-7708 or Moser 8255. Either will work and you can buy them from Summit Racing.
The metric size is the only lug that is a direct swap for the original. The original lugs need to be either hammered or pressed out. My small sledge hammer had no problem removing them. If you don't have a press you can "pull" the studs on using an opened end lug nut.
Tap the stud into place to get it started. Place the hub in a vice and turn the reversed lug nut (conical side facing away from the hub) until it makes contact with the hub face. Keep turning and it will pull the stud into place. Remove the nut.
The rear swap is straight forward. Just remove the cotter pin and axle shaft nut (1 5/16") and pull the wire wheel hub off. There is a split axle shaft collar behind the nut that comes out with the hub. You'll need this for the new hub.
It's a good idea to spray some PB blaster or a good penetrating lubricant on the nut before trying to remove it. Let it sit for about one hour before removing.
The torque spec for the axle shaft nut is 150 ft/lbs so you'll probably need a heavy duty breaker bar to remove it (I'm assuming you don't have an impact gun).
Note: Because the nut is recessed within the hub, some sockets will not fit the opening. I was able to find a six sided metric socket that fit (34mm). The metric size is slightly larger than 1 5/16" but it works fine.
Front Hubs Procedure
The front hubs can be used as is but the lug threads are 1/2"-20 which is the stock MGB size. This is OK but you'll need metric lug nuts for the rear and standard for the front. Summit racing sells both sizes of matching lug nuts.
If you want to use metric all around, just buy 16 studs and change out the fronts. The fronts will be a bit too long and will need to be cut back about a 1/2"... if you're using closed end lug nuts.
To remove the front hub:
- Remove the brake caliper off the rotor.
There's no need to remove any of the brake hydraulic lines or pads.
Just remove the caliper and hang it off to the side using wire or rope.
DO NOT let it hang from the rubber hose. Wedge a piece of wood between each set of brake pads. - Remove the internal grease cap (if fitted).
- Remove the cotter pin and axle nut (size is 1 1/8").
- Remove the keyed washer followed by the outer bearing (a few shims should come out with the outer bearing).
- Now slide the hub off (the rotor is bolted to the hub and will need to later be removed and bolted to the new hub).
- On the backside of the hub is a rubber oil seal that needs to be carefully pried off.
If it's in good condition it can be reused. If not, order a new pair from Moss (part #120-610) - Now remove the inner bearing followed by the spacer.
- Please note that there will also be a metal oil seal collar that fits between the rubber oil seal and the radius of the spindle.
When installing your existing bearings to the new bolt on hub, see your manual for the proper procedure. Use a new cotter pin. Fasten the rotor onto the hub before any bearing work.
Adding Wheel Spacers
Since the wire wheel axle is about 1.5" shorter than the bolt on, you'll need 2 spacers for the rear wheels. This allows your tires to clear the inner fender wall.
The size of the spacer depends on the tire size you're using AND the wheel offset. Figure somewhere between .375 & .500 inch. Bolt pattern is 4 x 4.5 (114.3mm)
Since my rear axle is slightly offset to the left, I used a 1/4" spacer for the left but needed to use a 1/2" spacer for the right. Using a 1/4" spacer on the right side positioned the tire too close to the inner fender wall. You can find spacers on eBay or buy them from Summit Racing.
I purchased Superlite 14 x 6 from Hap Waltrop (Acme Speed Shop) and they are sized for the MGB. Tires are 175/70R14. I bought this size because I was originally using wire wheels but will go with 185/70/14 in the future).
Good Luck!
Convert Your MGB Wire Wheels to Bolt-On Video
Here's a video for the same procedure on Youtube. Details may differ slightly from the procedure described above.

")


Thank you for the article. I note you opted for 14x6 Superlites. What offset do your wheels have? Superlites available in australia comewith either 1mm or 24mm offset - I am assuming the latter is the better choice for an MGB.
I don't know the offset of the wheels. I bought the Superlites from Hap Walthrop and since they were designed for the MGB, I didn't question the size. I've since sold the GT and no longer have the invoice from Hap which would have listed the offset.
You can email him and I'm sure he'll tell you the correct offset.
Here's his website....
http://www.acmespeedshop.com/wheels.html
Bruno
Thanks
I decided to change the wheel studs on my front hubs to match the metric threads so I would have the same lug nuts all the way around. The Moser part number for 12mm x 1.5 x 1 1/2 inch studs is 8254. I bought both sets (front and rear) from Summit Racing.
Rear wheel spacers were purchased from www.futofab.com.
to Bolt-on hub conversion
Thanks to Mike (a forum member, bit not active) for creating this video.
Want to leave a comment or ask the owner a question?
Sign in or register a new account — it's free