Installing a New Fold-Down-In-Place Convertible Top on an MGB
Preparation
Before beginning, you will need the following supplies and tools:
Supplies:
- Your new top,
- Small can (1 pint is more than plenty) of contact cement,
- Lacquer thinner (to release the old contact cement)
- or, if the previous installation used neoprene adhesive, gasket "release agent"
(which can be found at many auto parts stores), - Six 3/8" snaps also known as "common sense" fasteners
(available at many hardware stores, marine supply shops, fabric shops, or your top supplier), - Nine 1/8" dia. by 1/4" long aluminum pop rivets
(or, alternatively, #8 by 1/2" flat-head sheet metal screws), - Possibly two 1/8" dia. by 3/4" long pop rivets
(for the corners of the header bar if there are no existing screws there).
Tools:
- Stout pair of scissors and/or a sharp utility knife,
- Flat blade and Philips screwdrivers,
- A narrow putty knife or similar scraper,
- A drill with a 1/8 inch bit,
- An awl (or nail),
- A snap setting punch ("snap banger" which is an inexpensive formed steel cylinder and anvil, available where you buy the snaps)
- or, lacking that, a c-clamp or drift punch can be made to do,
- A small 1" brush for applying the solvent and the glue,
- A pop-rivet puller (if you use pop rivets instead of sheet metal screws),
- A piece of 80 or 100 grit sandpaper,
- A piece of chalk,
- If you are working in cold conditions, a hair dryer.
It may also be useful to have a pad and pencil at hand to make notes and reminders for reversing the removal process during the new installation.
Before you start, make sure the rear window is zipped into position, lay the new top over the old one to be sure it is the correct size, and note the proper configuration. Also note how the old top is attached to the folding frame and where any snaps are located.
Removing the old top
The first step is to remove the old top from the header bow.
Step 1 - Open the doors, fold top back to access the rubber seal on the header bow. Your seal may either be held in position by being slid into an aluminum channel or be glued into position. If it is held in place by an aluminum channel, slide the seal sideways out of the channel to expose the rivets that hold in place.
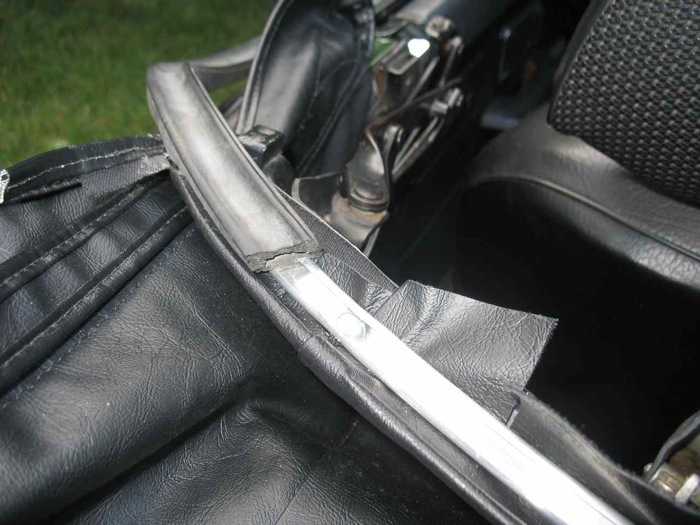
Removing rubber seal from soft top header bow (sliding off aluminum channel)
If your rubber seal is glued into position, you will need to peel it off. It was attached with contact cement or neoprene glue depending on the prior installer. Hopefully your predecessor did not glue it on excessively. Pull firmly and the seal should peel off but don't risk tearing it – it will be reinstalled after the new top is mounted. A putty knife might assist separation. If it has been over-glued or comes off with difficulty you can brush on small amounts of solvent as you peel. Stubborn adhesive can be softened with lacquer thinner for contact cement or gasket release agent for neoprene glue. Gasoline works too but please, be careful – solvents like these are very flammable (see Gasket photo).
Step 2 - When you get the rubber seal off you have to drill out the rivets holding the exposed aluminum retaining bar. Save this bar; it will be reused. When you pry it out after the rivets are gone, you will see that there is fabric held under it.
Before removing the fabric, take a few minutes to study how the old fabric is positioned, and held in place. Also note where it has been slit to eliminate wrinkles where the header bow curves. This fabric can now be peeled back and out. Again, glue release may have to be assisted with solvent and a putty knife (see Slits photo).
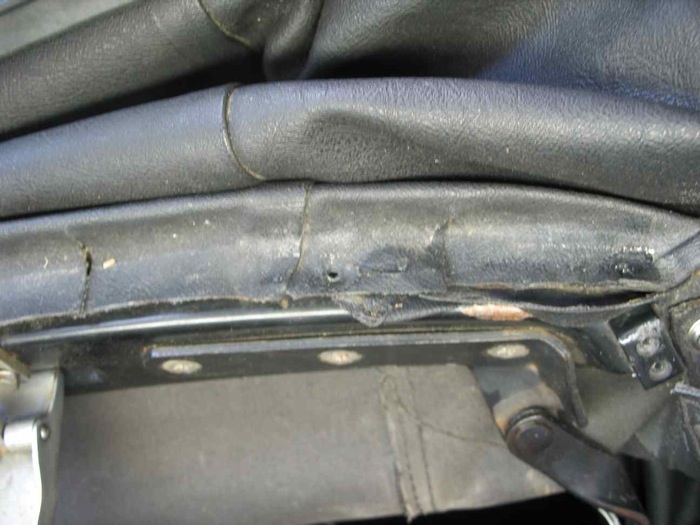
Two slits in header material to eliminate wrinkles in header bow curves.
Step 3 - The corners of the top are held down to the ends of the header bow with screws (or, possibly pop rivets). Unscrew and save the two screws and their decorative washers for installing the new top. If they are riveted in place, you will have to drill out the rivets, save the washers, and find some 1/8" x 3/4" long pop rivets to reinstall them. Again, take note as to how the old top was installed at the ends of the header bow.
Step 4 - Now peel the fabric off of the top of the header bow. Latching the header bow back to the top of the windshield may facilitate peeling off the top fabric. You may again need to soften the glue as described above.
Step 5 - Release the top from the rear rib of the folding frame by opening up the glued loop of fabric. If this does not open easily, you can simply cut it open to remove the old top.
Step 6 - Use some solvent to completely remove any old glue residue from the header bow and the rear rib. If necessary, sandpaper off any rust or imperfections to make it smooth and prime any areas that require it. This would be a good time to paint the frame that supports the top, if necessary, and lubricate all the pivot joints.
Installing the new soft top
Step 7 - Assure that the rear window is fully zipped shut. At this point the metal bar that resides in the pocket at the base of the rear window should be removed from the old window and inserted into the new top. Be careful about preserving the orientation (see Metal Bar photo).
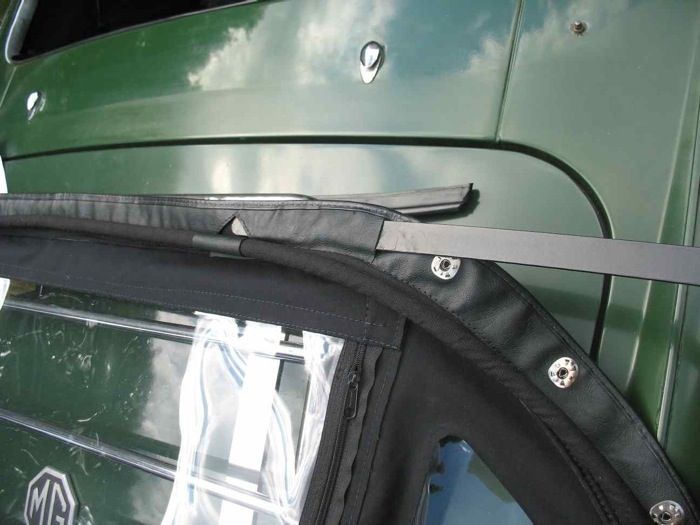
Inserting metal bar at base of rear window on new soft top.
Step 8 - Install the rear of the top by sliding the metal bar under the two anchors (making sure that the metal bar and not just the fabric is being held by the anchors). Then attach the two sliding tongue clips near each door jamb, and finally affix the top to the attachment studs per the original installation. Configurations may vary among the different MG-B tops.
Step 9 - With the new top attached at its rear, latch the header bow and mark the new top with chalk as follows:
Step 9a - Locate the center of the header bow by measuring and make a chalk mark on the bow at this spot. Locate the center of the new top by folding the fabric in half and mark the center with chalk (see Chalk photo).
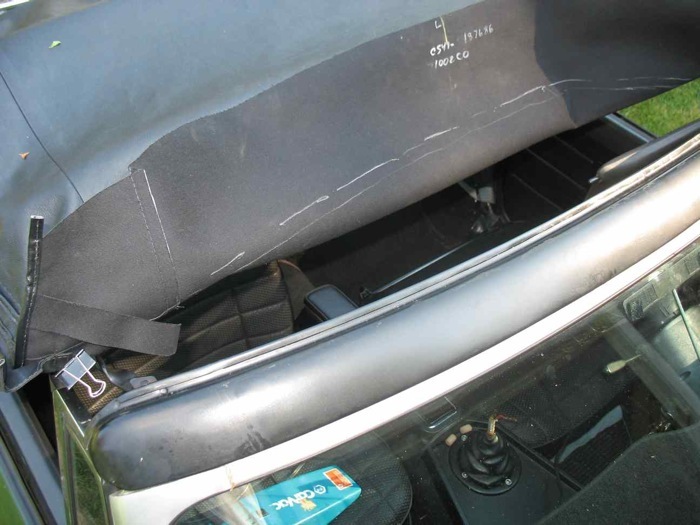
Marking center line of new soft top with chalk at header bow.
Step 9b - Firmly pull the top over the header bow and chalk a line on the underside of the top corresponding to the leading edge of the header bow. Lift it up and chalk a second line parallel to it and about a half inch behind the first line (the new top should be intentionally fitted very tight so that it almost cannot latch. The fabric will stretch in the sun (or if in a cold climate with a carefully applied hair drier).
Step 10 - Now apply contact cement along the top of the header bow 1/2" back from the rear edge and around the forward edge. Apply contact cement to the corresponding part of the underside of the top. Allow both applications to dry.
When the contact cement is dry the two sides will bond on contact. You need to be careful now since once you make any contact at all, the cement will bond. You may find it useful to use shielding newspaper so the top does not accidentally attach itself prematurely creating a mess. You may find it easier to apply contact cement to the bow and top in sections, starting only with a small middle section then working outward. But, using this method, you need to wait between each cement applications for both sides to dry.
Step 11 - When the contact cement is ready for adhesion, unlatch the header bow. Pull the center of the top to the bow aligning the center chalk lines. Press the top onto the center of the bow. Once the center of the top is attached, work outwards pressing the top in place.
It is important to coordinate this header bow attachment to maintain the alignment of the sides of the top with the tops of the side windows. As you bond the top to the header bow, stretch and pull to avoid any wrinkles. However, do not pull beyond the minus half inch guideline; otherwise the top will be too tight (see Wrapping photo).
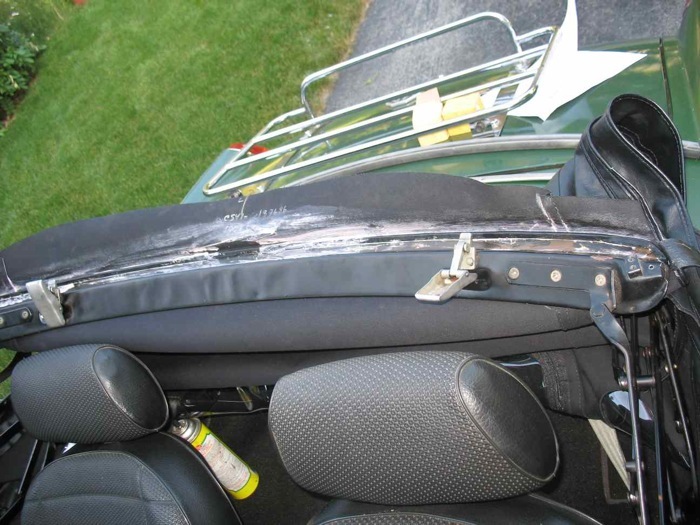
Wrapping and gluing new soft top to header bow.
Step 12 - When you get to the corners, fold over the corners of the new top and make a pilot hole in each corner with an awl. Use the screws and washers previously set aside to attach the corners or, if rivets were used, reattach the washers with 1/8" x 3/4" pop rivets.
Step 13 - Fold the frame and partially attached top to the back of the car. There should be a flap of excess fabric from the new top that will fold over the header bow and fit under the old aluminum channel. Since the outer corners of the header bow curve appreciably, a better fit can be obtained by cutting a few slits in the fabric that lies on the underside of the channel near the ends (refer back to the Slits photo). Coat both the area where the channel will lie and the corresponding part of the top with contact cement and let it dry.
Step 14 - When the cement has set up, wrap the fabric around the header bow and press into the groove where the aluminum channel will go. Then the channel should be put into position making sure to align its holes. Rivet down the channel with nine 1/8" x 1/4" pop rivets or fasten with #8 by 1/2" flat top sheet metal screws.
Step 15 - Slide the rubber header bow seal back into the channel. You may have to assist it with a screw driver and it may go better with two people sliding it, especially if you have used sheet metal screws rather than pop rivets (refer back to the Gasket photo). Alternatively, instead of sliding the seal into the channel, you can lay it into its final position and work the rubber into the channel with a screwdriver. If the fit is unacceptably loose, you can crimp the channel slightly to keep the seal centered on the header bow. If the rubber seal will not stay put, you may have to use some contact cement to hold it in place.
Step 16 - Cut off the excess top fabric.
Completing the soft top installation
Your old top may have four or six common sense fasteners (snaps), one for each rear corner of the top by the top of the door jamb, one for each strap holding the sides of the top to the rear rib of the frame, and one for each inside top corner of the windshield.
Step 17 - Examine the existing stud (male) part of the fasteners. If any old stud is deteriorated, it should be replaced at this time.
Step 18 - To locate the correct position of the female portion of each snap on the new top, rub chalk on the stud, pull the fabric taut past the stud and press the fabric onto it to transfer a location mark on the fabric. Punch a hole through the indicated location with an awl or nail. Then use the snap banger to set the snap into position (or you can use a c-clamp to press the two sections of the snap together). Make sure to apply the snaps in the right direction so they will mate with the stud. The snaps attaching to the top of the windshield (if any) should be quite tight to facilitate the seal between the side windows and the top. Place the snaps on the two straps that hold the top to the rear rib of the frame about 3 1/2" down from the sewn-on end of each strap. These straps should be loose. When they are installed, they should go between the outer bow support and the articulating frame member.
Step 19 - The final step involves attaching the retaining flap that holds the top to the rear rib inside the cabin. Wrap the fabric around the rib to form a loose tube and cut off any excess. Apply contact cement to both sides, allow it to set, and form the tube around the rib.
That should do it! You should keep in mind that while mounting the top to the bow in front, you should coordinate the wrinkle free spreading of the top with the attachments further back; specifically at the most forward snaps. (Tug and spread.) It is important that the top should be glued to the header bow shy of the windshield at first otherwise the top will end up being too loose (see Waiting for Sun photo). A day or two in the hot sun to fully stretch the top out is typical.
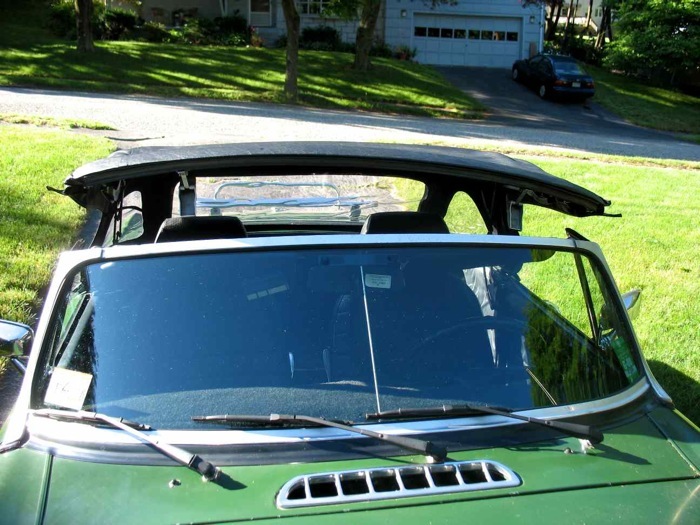
Completed soft top installation, waiting for sunshine to warm and fully stretch top material.


I used solvent-based contact cement I found at a home improvement store for installing laminate on counter tops. They also have water-based contact cement but I haven't tried it.
This is the same cement used in Step 13 as well.
step instructions on how to replace a soft top on a 76 MG? Ive looked
all over the internet and cant find one, hopefully you can assist me.
Thanks.
LM
how the bars are mounted so we can put the top on
Does this help?
Want to leave a comment or ask the owner a question?
Sign in or register a new account — it's free