
T-Series & Prewar Forum
[Solved] Suggestions Requested - Unable To Stop Basic Fuel Leak At Float Bowl To Carb Body Joint
Posted by AbingdonNerd


|
|
Topic Creator (OP)
Apr 11, 2024 06:59 AM
Top Contributor
Joined 1 year ago
1,201 Posts
|
Solved
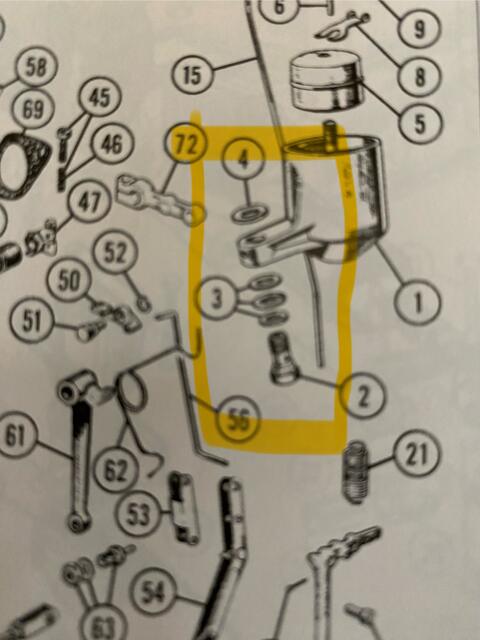
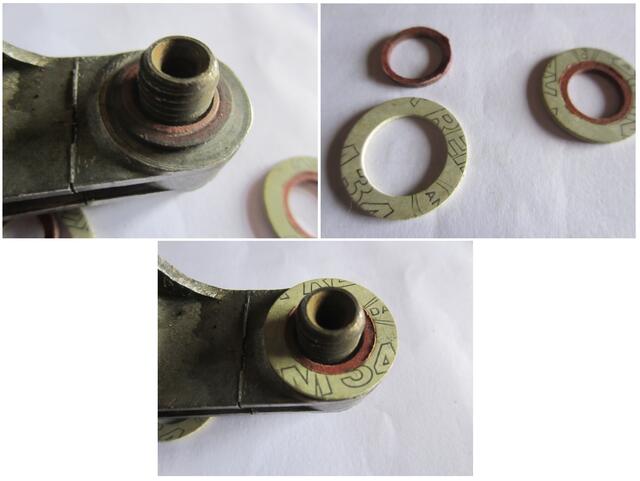
The joint between the float bowl arm and the lower carb body will not stop weeping. I have three new gaskets and the small brass washer in place. The mating surfaces of the arm (upper and lower) have been lapped smooth to promote a good seal. The carb body's lower mounting boss has also been properly dressed smooth.
I have tightened and loosened and tightened again - still weeping
I have replaced gasket/washer set with older, thicker washers from my used spares - still weeping
I will clean and dry the joint, replace washer set, pressurize system with pump, and check. It will be bone dry for 5-10 minutes. I will think all is well - I then check again at 20 minutes, and it is weeping. Argh!
I'm considering using a small amount of Seals-All on the joint faces - not too much though.
On the gaskets, I am placing them in the following order:
Lower face of carb body
Upper red fiber washer - with smaller inner diameter opening
Float Bowl Arm
Red fiber washer
Brass washer
Red fiber washer
Lower Bolt
I'm surprised and frustrated that I am running into this problem on such a basic joint. Any brilliant suggestions on solutions (or what I am doing wrong)? As I mention above, the aluminum joint faces are nice and flat and clean.
Jeffrey W. Delk
Hartwell. Georgia USA
1950 MGTD #2301
1954 MGTF 1500 #7673
1957 MGA
1971 MGB Tourer
Attachments:
image_123650291.JPG 35 KB

Alsorangebug
ALAN ROBERTS
|
Apr 11, 2024 10:20 AM
Joined 3 years ago
106 Posts
|
Jeffery
I'm no carburetor expert, but I am going through something similar. I have a TD and a Bugeye. If you look on Moss for the carburetor on the mark !, which just happens to be the same as my TD, you will notice that instead of fiber wishers and other :"hard" tom-foolery, a pair of "viton" rubber grommets are used. I'm not impressed with the surrounding washers, as I can't understand #36 ($5.39 each). By the way, I'm looking at the alternate version which looks like it uses the same bolt (#2 in TD and #35 in Bugeye). It has a different number, looking further, I can see the difference.
Well, now I know. I had the floats off my BE and couldn't get the viton gaskets to fit because the TD bolt is shouldered and the BE one isn't. My BE had TD bolts. Now your choice, that is unless you are building a concours car or a driver.
If its a driver, then bite the bullet, or see if someone has couple of BE #35's laying around use the viton solution use a good plane washer for #36 and by the way I bought 2 #32s (too large inside diameter in my mind, and look around in your local hardware store for a much less that $1.00 solution or possibly a copper washer instead.
Good luck with the leaks.
Al
AbingdonNerd thanked Alsorangebug for this post
 |
Apr 11, 2024 10:40 AM
Top Contributor
Joined 11 years ago
2,202 Posts
|
AbingdonNerd thanked Declan Burns for this post

LewPalmer
Lew Palmer
|
Apr 11, 2024 10:49 AM
Top Contributor
Joined 8 years ago
468 Posts
|
AbingdonNerd thanked LewPalmer for this post
|
hueyhoolihan
Huey Hoolihan
Antioch, CA, USA
Sign in to contact
|
Apr 11, 2024 10:49 AM
Top Contributor
Joined 2 years ago
1,176 Posts
|
i would want to be certain that the source of the leak has been established with accuracy. IOW, is it really leaking from the banjo connector at the bottom of the floatbowl, or is it coming from above or possibly being splashed onto the bowl body and its dripping down. it's not always as clear cut as it may appear.
next, i would be checking that the number of washers and materials from which they are made is correct. fiber, fiber, metal, fiber.
then i would double check that the bowl is sitting squarely in position before tightening the bolt. as i've recently had mine off, and i found that it can bind at a number of places on the body during assembly. i think i had to move it around in a number of positions and spent an inordinate amount of time getting it to set right. the side kept interfering with the end of the throttle shaft with the spring.
in a final act of desperation, i might consider the purchase of a new bolt and washers from the manufacturer (ha), if that hasn't been done already. IME, delicate surfaces on banjo bolts are not readily visible, and can be damaged. ...it doesn't take much.
Edited 1 time(s). Last edit at 2024-04-11 11:00 AM by hueyhoolihan.
AbingdonNerd thanked hueyhoolihan for this post
|
|
Topic Creator (OP)
Apr 11, 2024 02:47 PM
Top Contributor
Joined 1 year ago
1,201 Posts
|
Thanks for the suggestions guys. The leak is definitely at the joint for the bowl arm. Car has not been driven and carbs are nice and clean after having been reassembled with the SU Super Dry jet assemblies. Those haven’t leaked a bit!
I have lessened the leak by tightening and loosening and retightening the main bolt. We will see what this evening holds.
I like the idea of the Bugeye bolt and washer arrangement and will also consider the Dowdy washers.
The gaskets I’m using now are brand new and in good condition.
I’ll definitely be keeping an eye on it. Stay tuned - and thanks again for the suggestions.
Jeffrey W. Delk
Hartwell. Georgia USA
1950 MGTD #2301
1954 MGTF 1500 #7673
1957 MGA
1971 MGB Tourer
|
hueyhoolihan
Huey Hoolihan
Antioch, CA, USA
Sign in to contact
|
Apr 11, 2024 04:13 PM
Top Contributor
Joined 2 years ago
1,176 Posts
|

|
Apr 11, 2024 07:03 PM
Top Contributor
Joined 5 years ago
1,288 Posts
|
|
I had a banjo bolt with an invisible crack years ago. You have to tighten, and fractionally snug a few times over a few days to get them dry. Have you checked the faces with magnification? Any radial scratch will cause a leak. BTW- running pump just fills bowls, they are vented and don’t build pressure. There have been so many bad repro parts who knows about your washers. George
AbingdonNerd thanked GB3 for this post

MGTF1500 Ardeche France
Thierry SUCHIER
|
Apr 12, 2024 03:03 AM
Top Contributor
Joined 7 years ago
5,583 Posts
|
Jeffrey,
Here's how I assembled my joints.
Before, I sanded them very finely as well as the copper washer. Follow Lew's advice to anneal them before installation.
Red fiber washer
Brass washer
Red fiber washer
I didn't have the right size, so I added a smaller gasket on the inside. And I need a larger contact surface.
Best regards, Thierry
|
|
Topic Creator (OP)
Apr 12, 2024 04:01 AM
Top Contributor
Joined 1 year ago
1,201 Posts
|
This is an excellent point - and ties in with suggestion above about replacements.
I have leak reduced a great deal - from continuing to work the bolt back and forth. I should know today if it will finally seal. If it is still damp, I’ll pull and check bolt head surface and replace if any doubt.
Thanks.
Jeffrey W. Delk
Hartwell. Georgia USA
1950 MGTD #2301
1954 MGTF 1500 #7673
1957 MGA
1971 MGB Tourer
I have leak reduced a great deal - from continuing to work the bolt back and forth. I should know today if it will finally seal. If it is still damp, I’ll pull and check bolt head surface and replace if any doubt.
Thanks.
In reply to # 4783902 by GB3
I had a banjo bolt with an invisible crack years ago. You have to tighten, and fractionally snug a few times over a few days to get them dry. Have you checked the faces with magnification? Any radial scratch will cause a leak. BTW- running pump just fills bowls, they are vented and don’t build pressure. There have been so many bad repro parts who knows about your washers. George
Jeffrey W. Delk
Hartwell. Georgia USA
1950 MGTD #2301
1954 MGTF 1500 #7673
1957 MGA
1971 MGB Tourer
|
|
Topic Creator (OP)
Apr 12, 2024 04:03 AM
Top Contributor
Joined 1 year ago
1,201 Posts
|
Nice idea on the inner washer to compensate for the inner diameter - thanks for confirming the order too
Jeffrey W. Delk
Hartwell. Georgia USA
1950 MGTD #2301
1954 MGTF 1500 #7673
1957 MGA
1971 MGB Tourer
In reply to # 4783982 by MGTF1500 Ardeche France
Jeffrey,
Here's how I assembled my joints.
Before, I sanded them very finely as well as the copper washer. Follow Lew's advice to anneal them before installation.
Red fiber washer
Brass washer
Red fiber washer
I didn't have the right size, so I added a smaller gasket on the inside. And I need a larger contact surface.
Best regards, Thierry
Here's how I assembled my joints.
Before, I sanded them very finely as well as the copper washer. Follow Lew's advice to anneal them before installation.
Red fiber washer
Brass washer
Red fiber washer
I didn't have the right size, so I added a smaller gasket on the inside. And I need a larger contact surface.
Best regards, Thierry
Jeffrey W. Delk
Hartwell. Georgia USA
1950 MGTD #2301
1954 MGTF 1500 #7673
1957 MGA
1971 MGB Tourer
KYMG-TD thanked AbingdonNerd for this post

Lister Corvette
Robert Erickson
|
Apr 12, 2024 08:07 AM
Joined 5 years ago
29 Posts
|
I had the similar problem with the banjo fitting on my MGA. I finally used a very thin coat of Honda-bond gasket sealer on all washer surfaces. Yamaha makes a similar gasket sealer. I find that these motorcycle gasket sealers far superior than most automotive products. They are not cheap, but they work.
AbingdonNerd thanked Lister Corvette for this post
 Decatur, GA, USA
Sign in to contact
|
Apr 12, 2024 09:08 AM
Joined 15 years ago
146 Posts
|
The new red fiber washers appear to be extremely hard. On an MGA, similar washers are used on the banjo fittings where the fuel line connects to the bowl. After several failed attempts to stop the new washers from leaking, we roughened them a little bit by rubbing them on a piece of 100 grit sand paper and then soaking them for a few days in kerosene.
The way the bowl attached to the carburetor body on an MGA is a little different. However, not after I purchased new banjo bolts (the equivalent of #2 in your illustration) could I get it to stop leaking there. The new banjo bolts had just a tad more thread, I guess, and when bottomed out in the carburetor body the space for the bowl and the washers was measurable less by a few thou.
Good luck!
MGreetings,
Reinout
AbingdonNerd thanked Reinout for this post

TD4834
Bill Chasser
|
Apr 12, 2024 10:38 AM
Top Contributor
Joined 9 years ago
6,625 Posts
|
The fiber and brass washers use a banjo bolt to secure the bowl. The rubber isolators were not used until MGA production. To use the Viton rubber setup requires a using all the attaching pieces from the MGA including the mounting stud, two seals a convex washer , spring washer and nut. You can’t switch and match parts. The rubbers setup I find to be superior to the fiber setup.
Bill Chasser
TD-4834
TD-5779
TD/c-8151
TD/c-16920
TD-19408
TD-24060
TF-8200
Bill Chasser
TD-4834
TD-5779
TD/c-8151
TD/c-16920
TD-19408
TD-24060
TF-8200
AbingdonNerd thanked TD4834 for this post
|
RodM
Rod Murray
|
Apr 12, 2024 10:09 PM
Joined 15 years ago
54 Posts
|
I spent most of last year chasing what I thought were carb issues, after many many fruitless attempts at solving the persistent problems I finally contacted Dave Braun through his web site and based on his words was able to sort the problems down to two things... one, those washers and the order they are installed are vital in establishing the correct fuel hight in the jet. Mine didn't have the correct 1 above and 3 below the banjo bolt. Mine had a rubber washer below shaped like a hat. The result was a space much wider than the required 3 stacked washers.....the result of the wider rubber washer was a constant over rich mixture that no matter how I attempted to correct remained over rich. Two the second issue proved what many here have said in that many issues thought to be carb issues are really electrical.....my distributor had a lower bushing that was warped and as a result oil vapor could get up the shaft and coat the points causing the engine to run roughly..... I put the correct washer stack (1 above and 3 below on the banjo bolt) in place and had the dizzy rebuilt and my engine runs sweeter than it ever has! The moral of my story make sure the washer stack is correct and that the dizzy was uncontaminated.
Best regards
Rod Muuray 54 TF # 3006
Best regards
Rod Muuray 54 TF # 3006
AbingdonNerd thanked RodM for this post
Forums 
Having trouble posting or changing forum settings?
Read the Forum Help (FAQ) or contact the webmaster
