
MGB & GT Forum
Order of assembly sill replacement
Posted by 1971


|
Topic Creator (OP)
Apr 21, 2024 04:31 PM
Joined 2 years ago
6 Posts
|
|
Hello,
Replacing entire sill assembly and need guidance on what goes where. Chopped everything out 6 months ago and didn’t take good notes (other side is destroyed by POs body man in the 1990s).
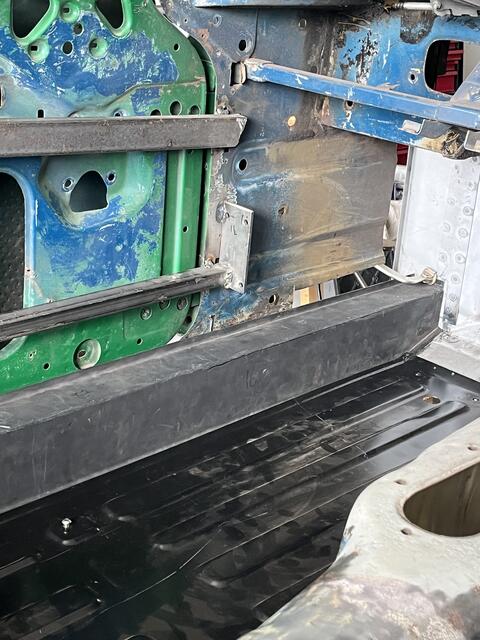
Behind the door where the sill curves up (see photo) does the outer sill sit in the pocket at the bottom of inner quarter panel (HZA587) beside membrane or does it sit outside of these pieces?
I’ve sent a pair of photos as references.
Also, didn’t take a good measurement where the inner sill sits on the firewall (another photo). Can someone measure their car at the farthest point forward and send the length from inner edge of sill to tunnel?
Thanks
Replacing entire sill assembly and need guidance on what goes where. Chopped everything out 6 months ago and didn’t take good notes (other side is destroyed by POs body man in the 1990s).
Behind the door where the sill curves up (see photo) does the outer sill sit in the pocket at the bottom of inner quarter panel (HZA587) beside membrane or does it sit outside of these pieces?
I’ve sent a pair of photos as references.
Also, didn’t take a good measurement where the inner sill sits on the firewall (another photo). Can someone measure their car at the farthest point forward and send the length from inner edge of sill to tunnel?
Thanks
Attachments:
IMG_4530.jpeg 63.7 KB
 |
Apr 21, 2024 06:37 PM
Top Contributor
Joined 7 years ago
687 Posts
|
Eric,with inner sill in place,install membrane then outer sill,just tach weld membrane and dry fit outer sill and check door gaps.Wings need to be off to fit outer sill,it goes up to the pillar.Do final welds after you are satisfied with gaps.Are you installing new jacking points also?
Attachments:
20200508_120306.jpg 45.7 KB
|
Apr 21, 2024 07:00 PM
Top Contributor
Joined 17 years ago
18,565 Posts
|
|
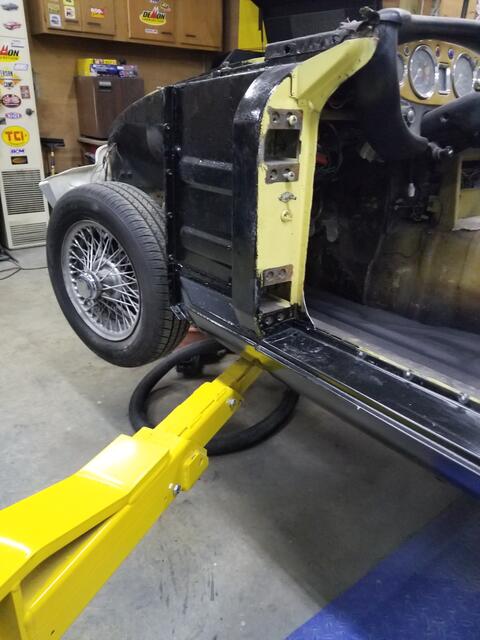
Did a search for this task and found this great image to show how the rear dogleg area is assembled. The panel you show in your phone pic is the outermost layer.
There is no real elegant way to weld the parts stack back in place. I drill a hole through the entire stack and get an assistant to hold a piece of copper over the outside over the hole. Then I do a spot weld from inside with the heat turned up quite high. This works ok most of the time, ( you want to practice this on the bench) but I still end up having to do some touch up from the outside if needed. I also do some stitch welding of the outer sill to the lower edge of the side panel you posted just cause it wont hurt.
Apropos of nothing asked in the original post, but i will mention that one of the best things I ever did to make this work easier was to buy a set of "cheater" lenses to put inside my welding helmet. They are like $10 and can change your welding world.
|
Topic Creator (OP)
Apr 21, 2024 07:21 PM
Joined 2 years ago
6 Posts
|
|
This is hugely helpful!!
Can you please measure the distance from edge of sill to inside of tunnel? The height is set by the castle rail but there is a chance I’ll fix the end of the inner sill too far out or too far in on the firewall.
Thanks again
Can you please measure the distance from edge of sill to inside of tunnel? The height is set by the castle rail but there is a chance I’ll fix the end of the inner sill too far out or too far in on the firewall.
Thanks again
|
Topic Creator (OP)
Apr 21, 2024 07:25 PM
Joined 2 years ago
6 Posts
|
|
Cool, my suspicion was that the quarter panel is outside, thanks!
Can I get you to measure the distance between the edge of the inner sill and the tunnel, along the firewall?
I didn’t take measurements and don’t want to attach the sill too far in or out on the firewall.
The height is determined by the castle rail.
My first complete redo. Thought I would try this site out and my questions are already answered!!
Huge help,
Thanks again.
|
Apr 21, 2024 09:18 PM
Top Contributor
Joined 17 years ago
18,565 Posts
|
|

|
Topic Creator (OP)
Apr 21, 2024 11:36 PM
Joined 2 years ago
6 Posts
|
|
|
Topic Creator (OP)
Apr 22, 2024 12:00 AM
Joined 2 years ago
6 Posts
|
|
Do you work on MGs as a hobby or do you have a business?
I picked mine up 3 and a half years ago with plans to wash the carpets, drive it for a year and sell it. When we lifted the carpets we could see the garage floor. I looked at my son and he looked back in horror. I said "I've always wanted to do a restoration". Here we are 3 years later and I'm starting to put stuff back on.
We've built a rotissarie and are trying to replace all the rust with good metal, hopefully get another 50 years out of this car.
Thanks for your help, I should have joined this group a couple of years ago!!
 |
Apr 22, 2024 03:37 AM
Top Contributor
Joined 13 years ago
32,729 Posts
|
If Peter mentioned this then ignore my post. If you lay the outer sills side by side you'll see a slight difference where they go under the guard which you may want to rectify before installation. This discrepancy has been discussed often and not that long ago.
Mk1: CKD 11/66 first registered 8/5/67; owned since 3/77. 18GB +40 balanced. Peter Burgess BVFR head. Piper 285. 123. FidanzaFW. 4synch c/r box. Lots more as I did a nut and bolt rebuild; finished 2015. Tartan Red.
GT: December '78. VW Golf guards, flush fit front and rear valances. Torana XU1 vents, frenched indicators & Mk1 rear lights. 'Worked' Rover V8 with Monsoon ECU for EFI. GM4L60E, Lokar tiptronic & Quick4 controller. Vintage Air A/C. FC IFS. CCE 4 link rear. Salisbury with Quaife. Jaguar Storm.
|
Apr 22, 2024 10:22 AM
Top Contributor
Joined 17 years ago
18,565 Posts
|
|


|
Topic Creator (OP)
Apr 22, 2024 02:15 PM
Joined 2 years ago
6 Posts
|
|
|
Apr 22, 2024 02:40 PM
Top Contributor
Joined 17 years ago
18,565 Posts
|
|
In reply to # 4788073 by 1971
Perfect thanks,
Should have her on the road in 3-20 years!!
Should have her on the road in 3-20 years!!
Nah...you are only like 60 hours of labour from where you are to this:

Should be driving by june!
By the way, if you have not bought floor pans yet, I can recommend the ones made by Royal Restorations just down the road from me. This was the first time I have ever used them after years of "Heritage or bust" and have to say they are well made.
|
1958woodie
Peter Max (New Member)
Sudbury, MA, USA
Sign in to contact
|
Apr 22, 2024 05:51 PM
Joined 13 days ago
6 Posts
|
about to get started on a 1972 MG B sill and floor replacement project and i am looking for any advice i can get! i would appreciate good advice but will listen to bad as well  somone has panel sealed street signs onto the floors and i have no idea as to how to get this stuff off without destroying the metal i need. thanks for all your help! peter max
somone has panel sealed street signs onto the floors and i have no idea as to how to get this stuff off without destroying the metal i need. thanks for all your help! peter max|
Apr 22, 2024 07:00 PM
Top Contributor
Joined 17 years ago
18,565 Posts
|
|
I have a build thread going on for the latest one I am doing, Might be some good ideas to pick up if you go through the thread.
https://grassrootsmotorsports.com/forum/build-projects-and-project-cars/i-am-on-the-fence-with-this-mgb-build/260096/page2/
If you do a search on this forum you will find that I have done a walkthrough or two on the subject matter. So have several others. The library has some prose on the subject matter. Google image searches for MGB sill repair or replacement will get you a ton of pics.
My three pieces of advice are to start your own build thread so that people can help when need be and second is to not try and do sill work on a rotisserie. If in doubt, come here and ask before you cut.
None of this is hard but is is a lot of uncomfortable work.
|
Apr 22, 2024 08:49 PM
Top Contributor
Joined 17 years ago
18,565 Posts
|
|
In reply to # 4787846 by MGB567
If Peter mentioned this then ignore my post. If you lay the outer sills side by side you'll see a slight difference where they go under the guard which you may want to rectify before installation. This discrepancy has been discussed often and not that long ago.
Since I am a visual learnerm here are some pics to explain what Barrie is saying
The LH side outer sill is too short. Best solution is to but it up where it belongs at the rear, This sill leave a gap up front that can be dressed with a hammer.

Leaving you with this issue where the outer sill swage does not line up with the leading edge of the door, Not ideal

So you cut, trim, grind, fit ,curve and weld a bit of flat-bar to fill the gap. I do a couple of spot-welds from the inside

MGB567 thanked NOHOME for this post
Forums 
Having trouble posting or changing forum settings?
Read the Forum Help (FAQ) or contact the webmaster
