
MG Engine Swaps Forum
My SBC 350 Project
Posted by KAmes


 Oakley, IL, USA
Sign in to contact
|
Topic Creator (OP)
Apr 21, 2024 10:28 PM
Joined 1 year ago
38 Posts
|
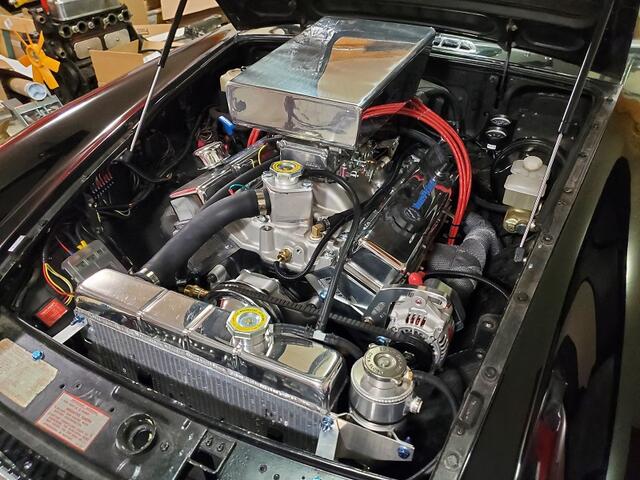
Here's my version of the small block chevy swap. This is the first time I've deliberately put the wrong engine in a car, so I tried to do it in the simplest fashion I could devise. I pulled many ideas from other threads here, thanks to everyone. As everyone says to get it all under the hood would require extensive modification that I wasn't willing to do, so I let my freak flag (scoop) fly. It took me ten weeks of occasional evenings and weekends, and an unknown amount of money (I don't want to know). Once you get over the scoop thing it becomes surprisingly simple. We have a Blueprint 350 small block and a rebuilt TH350 transmission. The only cutting on the car are two holes for the exhaust, an access hole in the passenger footwell for the transmission cooler fittings, and that massive hole in the hood. I did also cut back the drive shaft tunnel about an inch to prevent rubbing, it probably would not have been needed had I bought a trans with the long tail instead of short. I used a two inch driveshaft from Jegs. I used the Speedway front engine mount and modified the stock transmission mount. My homemade exhaust manifolds are a compromise to save the inner fenders and are finished through a single Borla muffler and out the back, all in stainless steel. I used a Mustang radiator with integrated trans cooler that fit between the frame rails. It's a tight fit but I did not cut any in front of the radiator, and the heater remains and works well. It was necessary to change the rear from stock 3.9 to 3.07 to make the car drivable with this transmission, that is a process but if I can muddle through it you can too. The steering feels heavy but new springs and a long overdue bushing refresh improved it immensely. I was able to adapt all the original dash gauges. It was a lot of fun to do, and it's silly fast!
Edited 1 time(s). Last edit at 2024-04-21 11:12 PM by KAmes.
Edited 1 time(s). Last edit at 2024-04-21 11:12 PM by KAmes.
Attachments:
20240421_203321.jpg 70.8 KB

Jim Blackwood
* BlownMGB-V8
Gunpowder Rd, Florence, KY, USA
Sign in to contact
|
Apr 22, 2024 09:16 AM
Top Contributor
Joined 17 years ago
8,014 Posts
|

Bankerdanny
Daniel Palmer
|
Apr 22, 2024 02:48 PM
Top Contributor
Joined 12 years ago
2,124 Posts
|
|
Oakley, IL, USA
Sign in to contact
|
Topic Creator (OP)
Apr 22, 2024 03:13 PM
Joined 1 year ago
38 Posts
|
In reply to # 4788079 by Bankerdanny
Nice work. If it works for you, it isn't the wrong engine.
I like that assessment! I chose this engine because I haven't much experience with muscle car stuff and there's so much aftermarket support for it. I have a long history with VWs, sort of the opposite end of the spectrum.|
Oakley, IL, USA
Sign in to contact
|
Topic Creator (OP)
Apr 22, 2024 08:19 PM
Joined 1 year ago
38 Posts
|

|
|
Apr 24, 2024 12:10 PM
Joined 17 years ago
280 Posts
|
|
Oakley, IL, USA
Sign in to contact
|
Topic Creator (OP)
Apr 24, 2024 01:57 PM
Joined 1 year ago
38 Posts
|
In reply to # 4788778 by hamondale
Nice that you're out in corn country instead of Chicago. That looks like a good road for testing. Maybe a quarter mile to those bins? Time to buy a spray can of parking lot striping paint and mark it off.
H
H
That made me laugh, then I started thinking...
|
Oakley, IL, USA
Sign in to contact
|
Topic Creator (OP)
Apr 26, 2024 07:55 PM
Joined 1 year ago
38 Posts
|
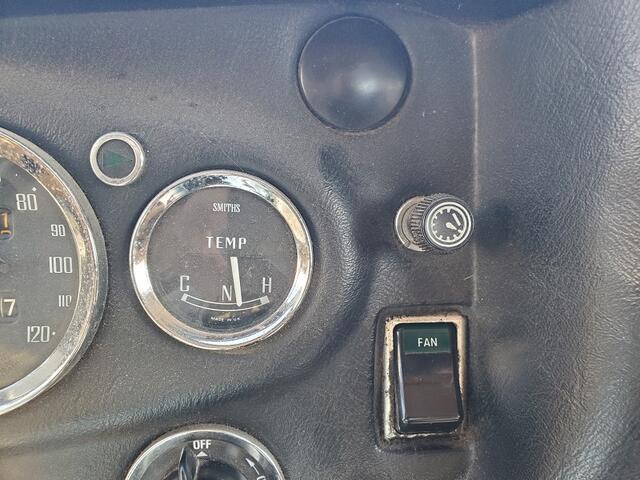
Since I went to some trouble to use my stock temperature dash gauge but it only has a "C", an "N", and "H" on it I wondered how hot hot is. I rigged up an autometer gauge temporarily under the hood but just good enough to leave it forever. The gauge position shown is about where my 18V engine would run, and happens to be the same with the new 350. This turns out to equal 170 autometer degrees. It is showing a bit warmer on long interstate runs, so I pulled the fan fuse and watched carefully as it idled. The edge of the shading by the "H" is 220 degrees, that's where I suspended the experiment. This gives me perspective on what I'm seeing and confidence engine temps are running fine. For lack of a proper bushing the stock sender is threaded into a 3/8 bushing (wrong size, right pitch) with an o-ring and marine JB weld. It's been problem free so far.
Edited 2 time(s). Last edit at 2024-04-26 08:11 PM by KAmes.
Edited 2 time(s). Last edit at 2024-04-26 08:11 PM by KAmes.
Attachments:
20240422_081034.jpg 54.4 KB
|
Oakley, IL, USA
Sign in to contact
|
Topic Creator (OP)
Apr 26, 2024 08:05 PM
Joined 1 year ago
38 Posts
|
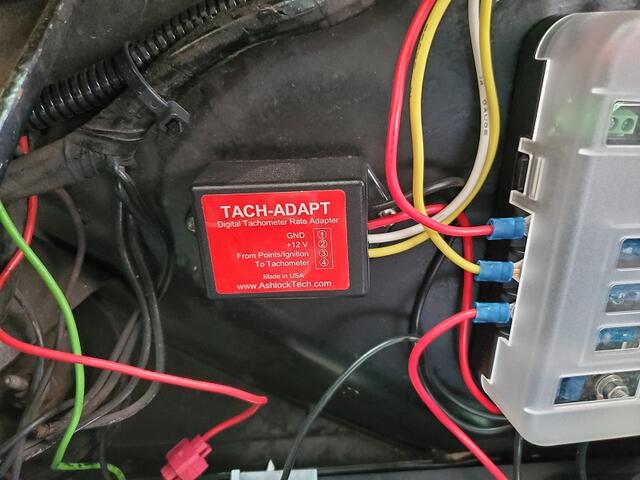
Keeping with the theme here's what I'm using for the 8 cylinder engine with 4 cylinder tachometer problem, purchased here:
https://www.pelicanparts.com/More_Info/PELTAV3.htm?pn=PEL-TA-V3
It works perfectly, I couldn't be happier.
https://www.pelicanparts.com/More_Info/PELTAV3.htm?pn=PEL-TA-V3
It works perfectly, I couldn't be happier.
Attachments:
20240422_135108.jpg 46.8 KB
Bankerdanny thanked KAmes for this post
|
Oakley, IL, USA
Sign in to contact
|
Topic Creator (OP)
Apr 26, 2024 08:16 PM
Joined 1 year ago
38 Posts
|
Rounding out the group the GM speedometer cable threaded straight onto the plastic counter thing by the heater. Maybe it would fit right onto the speedometer too but I didn't try that. Same with the oil pressure line, the autometer kit connected right up to the junction by the heater motor. Possibly everyone knows this but I wondered.
Edited 1 time(s). Last edit at 2024-04-26 08:24 PM by KAmes.
Edited 1 time(s). Last edit at 2024-04-26 08:24 PM by KAmes.
|
Bankerdanny
Daniel Palmer
|
Apr 29, 2024 01:51 PM
Top Contributor
Joined 12 years ago
2,124 Posts
|
In reply to # 4789726 by KAmes
Keeping with the theme here's what I'm using for the 8 cylinder engine with 4 cylinder tachometer problem, purchased here:
https://www.pelicanparts.com/More_Info/PELTAV3.htm?pn=PEL-TA-V3
It works perfectly, I couldn't be happier.
https://www.pelicanparts.com/More_Info/PELTAV3.htm?pn=PEL-TA-V3
It works perfectly, I couldn't be happier.
This is awesome. I was wondering how to keep my OEM tach when i finally get on with my V6 swap.
Endeavor to Persevere
"The problem with quotes on the Internet is that you never know if they're true" - Abraham Lincoln
|
Oakley, IL, USA
Sign in to contact
|
Topic Creator (OP)
Apr 29, 2024 06:19 PM
Joined 1 year ago
38 Posts
|
In reply to # 4790955 by Bankerdanny
This is awesome. I was wondering how to keep my OEM tach when i finally get on with my V6 swap.
In reply to # 4789726 by KAmes
Keeping with the theme here's what I'm using for the 8 cylinder engine with 4 cylinder tachometer problem, purchased here:
https://www.pelicanparts.com/More_Info/PELTAV3.htm?pn=PEL-TA-V3
It works perfectly, I couldn't be happier.
https://www.pelicanparts.com/More_Info/PELTAV3.htm?pn=PEL-TA-V3
It works perfectly, I couldn't be happier.
This is awesome. I was wondering how to keep my OEM tach when i finally get on with my V6 swap.
Cool, glad I could help. What V6 are you planning to use?
|
Oakley, IL, USA
Sign in to contact
|
Topic Creator (OP)
Apr 29, 2024 06:27 PM
Joined 1 year ago
38 Posts
|
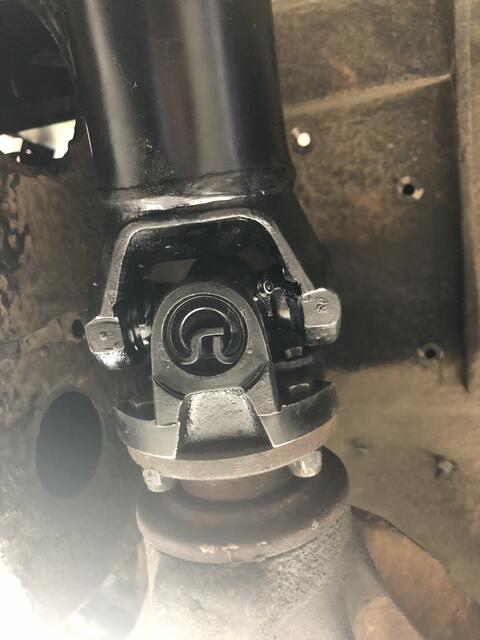
Another compatibility issue that I wondered about was what driveshaft flange matches the stock rear axle. This is the one I bought that fits, for 1310 U joints:
https://fortwayneclutch.com/product/1310-series-nissan-subaru-mg-2-25-male-pilot-driveshaft-flange-yoke-sku-n2-2-899-1/
Amazon also has it:
https://www.amazon.com/Neapco-N2-2-899-1-Driveshaft-Assembly/dp/B004A6ZR6C/ref=sr_1_1?crid=13RKG0P838HSR&keywords=N2-2-899-1&qid=1706241199&sprefix=n2-2-899-1%2Caps%2C1227&sr=8-1&ufe=app_do%3Aamzn1.fos.006c50ae-5d4c-4777-9bc0-4513d670b6bc
Edited 1 time(s). Last edit at 2024-04-29 06:29 PM by KAmes.

AFMM3
Kevin Seaman
|
Apr 30, 2024 05:58 AM
Top Contributor
Joined 4 years ago
150 Posts
|
|
Jim Blackwood
* BlownMGB-V8
Gunpowder Rd, Florence, KY, USA
Sign in to contact
|
Apr 30, 2024 07:46 AM
Top Contributor
Joined 17 years ago
8,014 Posts
|
Forums 
Having trouble posting or changing forum settings?
Read the Forum Help (FAQ) or contact the webmaster
