
MG Midget Forum
Who let the smoke out.
Posted by bim9bill


bim9bill
Bill Debevc
|
Topic Creator (OP)
Apr 26, 2015 06:28 PM
Joined 12 years ago
817 Posts
|
I let the smoke out from under the dash testing the headlights, or fan switch. Don't know which because I hit them both. Red Wires.
I am fairly sure it's in the headlights area, as that is where I touched the wires last. I cleaned them up a bit, no cutting, when I put the grill back on when I redid the head.
My plan is to figure where the short is and fix that. But I want to take the time to install relays now that I am missing with the wiring. Here is my question.
Should I just get a new harness and modify that one? $500.00-$600.00 all said and done with other parts relays, connectors such.
-Or-
Should I get new wire and repair? Unknown cost, but should be cheaper. "Here is my concern, Dude" Where else did it melt?
Extra points for guessing the movie reference.
Bill
Bill Debevc
http://CloudsCarsCameras.com
Photo Gallery: http://cloudscarscameras.com/car-photos/
Twitter @BillDebevc

Windrideror
Carl Rosenburg
|
Apr 26, 2015 06:41 PM
Joined 9 years ago
200 Posts
|
Where's my car, and Bill let the smoke out. Sorry to here that happened to you. I know you just got it up and running again after working on the head. Can't help or make recomendations on the wiring harness but $500-600 for a new one seams a lot. I would be inclined to see just how much is burnt and replace it as needed.

66jalopy
Phillip Jolliffe
|
Apr 26, 2015 07:44 PM
Joined 11 years ago
6,727 Posts
|
|
Sprite1956
Roger Parry-Jones
Melbourne, Victoria, Australia
Sign in to contact
|
Apr 26, 2015 08:42 PM
Joined 9 years ago
683 Posts
|
Bill,
I bought a Chinese headlight wiring harness with ceramic headlight plugs and relays for about $22 Australian to replace the one that's missing in my project BL Midget. I can't make that section of wiring cheaper than the supplied section. It does need to be shortened for installation and I'm going to be making up replacement sections for the parker/indicator lights. Compared to the headlight wiring, the park lights are a doddle. For about $75 I could have purchased headlight wiring loom section with integral HID or Zenon globes and rectifiers but I've already set aside a nice pair of halogens which will be fine. I am considering replacing the park/reverse/indicator globes with LED's which appear to be straight forward swap. The power drain, reliability and light output seems to be irresistible.
It'll be ages before I fit the wiring loom in to the car but I'm getting all the bits together in preparation. I'm replacing/remaking/simplifying/upgrading as I go. I'm less concerned about originality than reliability and neatness. Where bullet type connections remain I'll use them if they appear to be in good condition. Otherwise, MODERN connectors are being used.
At least, Dude, you know where your car is.
Good luck!
|
S1 Elan
Kurt. Appley
|
Apr 26, 2015 09:15 PM
Top Contributor
Joined 11 years ago
8,014 Posts
|
When working on wiring if you round up an inline fuse holder as is used on most radio installations and is easy to come by at any auto parts store you can protect the system quite easily. I use a hose clamp to clamp one end of the fuse holder to the battery post and just clamp it under the clamp bolt on you regular battery post clamp at the other end. You then have the whole system fused.
Saves the smoke while you get things sorted!!
Kurt.
Saves the smoke while you get things sorted!!
Kurt.
|
bim9bill
Bill Debevc
|
Topic Creator (OP)
Apr 26, 2015 09:37 PM
Joined 12 years ago
817 Posts
|
What AMP should I use for a whole system fuse?
Bill Debevc
http://CloudsCarsCameras.com
Photo Gallery: http://cloudscarscameras.com/car-photos/
Twitter @BillDebevc
Bill Debevc
http://CloudsCarsCameras.com
Photo Gallery: http://cloudscarscameras.com/car-photos/
Twitter @BillDebevc
|
Santee, CA, USA
Sign in to contact
1960 MG MGA 1600
1965 MG Midget MkII 1966 Austin-Healey Sprite "Sprite" 1966 Austin-Healey Sprite "Sprite" |
Apr 26, 2015 10:59 PM
Top Contributor
Joined 17 years ago
4,473 Posts
|
|
Sprite1956
Roger Parry-Jones
Melbourne, Victoria, Australia
Sign in to contact
|
Apr 27, 2015 02:26 AM
Joined 9 years ago
683 Posts
|
Bill,
The old fuse box uses 2x 30 amp fuses one for accessories when power is on and one for the charging and ignition circuit. Using an inline fuse for particular accessories (like lights) is calculated by how big an amperage draw you use. Standard sealed beam headlights are only 65 at high beam unless you've upgraded to, say H4 halogens.
Kurt's idea for protecting wiring while you are working on it is a good one which I'll implement myself. A momentary spark when positive power runs to earth could ruin your new accessories. I'll use a 10 amp fuse.
By the way, you mentioned red wires letting the smoke out. They probably belong to the after market radiator fan you fitted so start with tracing them. Disconnect the fan and see if you still have smoke.
|
S1 Elan
Kurt. Appley
|
Apr 27, 2015 08:40 AM
Top Contributor
Joined 11 years ago
8,014 Posts
|
Yes, as Bill noted, that is just for getting the car sorted out after wiring and I use a 10 amp fuse. Came up with it to sort out my Bug Eye.....the DPO had wired in 3 dead shorts! [cooked wires, cooked light switch, and shorted wiper motor!]
Kurt.
Kurt.
 Oregon, IL, USA
Sign in to contact
1952 MG TD "The "Abbey"
1960 Austin-Healey Bugeye Sprite 1960 Triumph TR3A "Patch's" 1961 MG MGA MkII & more |
Apr 29, 2015 05:04 PM
Joined 9 years ago
852 Posts
|
bim9bill thanked MGB777 for this post
|
bim9bill
Bill Debevc
|
Topic Creator (OP)
Apr 29, 2015 05:22 PM
Joined 12 years ago
817 Posts
|
Great idea Tim.
Bill Debevc
http://CloudsCarsCameras.com
Photo Gallery: http://cloudscarscameras.com/car-photos/
Twitter @BillDebevc
Bill Debevc
http://CloudsCarsCameras.com
Photo Gallery: http://cloudscarscameras.com/car-photos/
Twitter @BillDebevc
about 3 weeks and 2 days later...
|
bim9bill
Bill Debevc
|
Topic Creator (OP)
May 23, 2015 11:22 AM
Joined 12 years ago
817 Posts
|
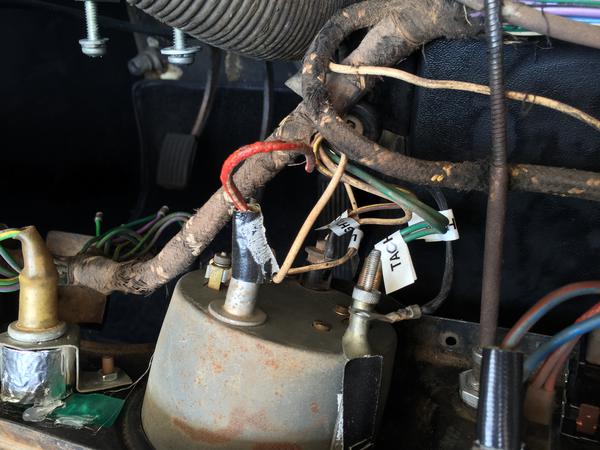
Finally had time today to take a look at the damage. I removed the steering wheel assembly and lowered the dash.
Here are the photos of the damage, looks like just the red/white wires were effected.
Now to study the wiring diagram, and determine the best route to take.
What are your thoughts?
Edit: added wire diagram
Bill Debevc
http://CloudsCarsCameras.com
Photo Gallery: http://cloudscarscameras.com/car-photos/
Twitter @BillDebevc
Edited 1 time(s). Last edit at 2015-05-23 11:56 AM by bim9bill.
Attachments:
IMG_1326.jpg 46.2 KB
|
S1 Elan
Kurt. Appley
|
May 23, 2015 02:54 PM
Top Contributor
Joined 11 years ago
8,014 Posts
|
Being a cheap skate I think I would try to find the short and then strip the cover to see how extensive the damage is. I don't like the look's of the spot where they have been chafing against the choke cable. I'd check that and anywhere else that look's similar.
BTW "Dude" I'm thinking your quote is from " The Big Lebowski"! Classic!!
Kurt
BTW "Dude" I'm thinking your quote is from " The Big Lebowski"!
Classic!!
Kurt
bim9bill thanked S1 Elan for this post
|
bim9bill
Bill Debevc
|
Topic Creator (OP)
May 24, 2015 02:33 PM
Joined 12 years ago
817 Posts
|
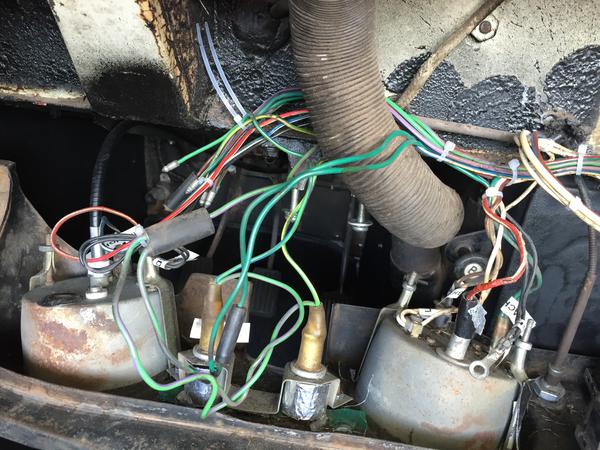
I started the cleanup process today.
First goal was to get the wrapping off and zip tie in place.
I did not want to remove any wires yet, as that would be a mess to get it back on again in the right place.
Next is to replace the Red / White wire everywhere its is burnt from end to end.
I am starting to think if they had zip-ties back then they would have used them everywhere.
Bill Debevc
http://CloudsCarsCameras.com
Photo Gallery: http://cloudscarscameras.com/car-photos/
Twitter @BillDebevc
Attachments:
IMG_1332.jpg 65.3 KB
|
Oregon, IL, USA
Sign in to contact
1952 MG TD "The "Abbey"
1960 Austin-Healey Bugeye Sprite 1960 Triumph TR3A "Patch's" 1961 MG MGA MkII & more |
May 24, 2015 02:40 PM
Joined 9 years ago
852 Posts
|
Forums 
Having trouble posting or changing forum settings?
Read the Forum Help (FAQ) or contact the webmaster
