
MGB & GT Forum
What's wrong with this picture?
Posted by GaTiger


 |
Topic Creator (OP)
Apr 16, 2014 10:20 PM
Joined 10 years ago
130 Posts
|
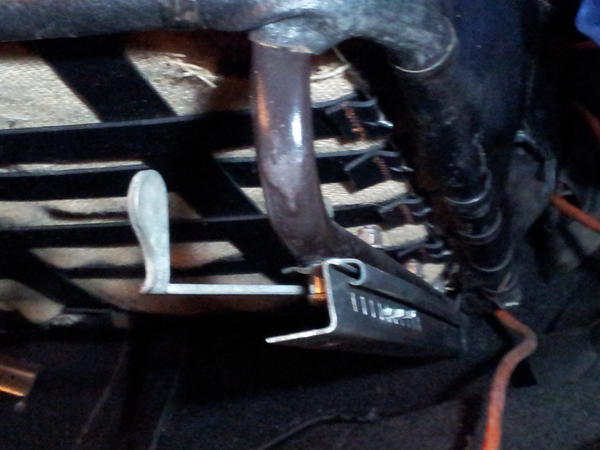
I'm having a bear of a time trying to re-install the seats on my 74B. In the attached picture you see the slide on my drivers seat. If the seat is not installed, I can kind of wiggle the bar that mounts to the floor and get it to move back and forth. Once it is on the car floor, when I push the "release" handle the big headed bolt allows very little room to disengage the teeth on the seat slide and I cannot move it to install the front bolts after installing the rear bolts to the floor.
I've finally decided I must have the slide assembled incorrectly. I had dinner this evening with a couple of my brothers that drive MG's. One drives a '66 and the other a '72. The brother with the '66 said he did not think his seat slide was working either. The one with the '72 lives a few hours away from where we were eating dinner so we could not look at it but he said he did remember his coming of the track one time and it was a real hassle to fix it.
Any suggestions out there.
I've done a bunch of browsing on the internet but cannot find a picture in enough detail to solve the riddle.
I'm sure it is something simple but it has baffled and frustrated me. The weather in Atlanta is beautiful and I am eager to get on the road.
Dean Stewart
74B
Attachments:
seatslide.jpg 34.4 KB
 |
Apr 16, 2014 10:27 PM
Joined 16 years ago
3,155 Posts
|
The nuts that mount the track to the seat frame should be on the top side of the frame, and the beveled-headed machine screw it mates to should nestle up close to the track, allowing room for the adjustment handle to come all the way to the outside of the frame.
Or the nut is on top, and you're using a hex headed bolt, instead of the bevel-headed machine screw (a Pozi #3, I think).
Documenting my project in my journal at https://www.mgexp.com/home#journal
Edited 1 time(s). Last edit at 2014-04-16 10:29 PM by Steve Lyle.
Or the nut is on top, and you're using a hex headed bolt, instead of the bevel-headed machine screw (a Pozi #3, I think).
Documenting my project in my journal at https://www.mgexp.com/home#journal
Edited 1 time(s). Last edit at 2014-04-16 10:29 PM by Steve Lyle.
|
|
Topic Creator (OP)
Apr 16, 2014 10:42 PM
Joined 10 years ago
130 Posts
|
Thanks Steve for the feedback, After I got your response and took a look at your journal. I cannot wait to read it in detail.
I've got two sons that are Mechanical Engineers. I'm going to ask why they cannot help me make my B look like yours
Very impressive.
I've got two sons that are Mechanical Engineers. I'm going to ask why they cannot help me make my B look like yours
Very impressive.
|
|
Topic Creator (OP)
Apr 16, 2014 10:48 PM
Joined 10 years ago
130 Posts
|
|
|
Apr 16, 2014 10:51 PM
Joined 16 years ago
3,155 Posts
|
I hear ya, I regret not taking more 'before' pics, too.
On the flip side of that, how would you know if the 'before' was how it left the factory, or not? No telling what's been done to these cars over the years.
Documenting my project in my journal at https://www.mgexp.com/home#journal
On the flip side of that, how would you know if the 'before' was how it left the factory, or not? No telling what's been done to these cars over the years.
Documenting my project in my journal at https://www.mgexp.com/home#journal
 A tiny Island off the coast of Washington State, N.W., USA
Sign in to contact
1957 Land Rover Series I "EYEYIYI"
1957 Land Rover Series I "OVRLND" 1971 MG MGB 1971 MG MGB "Bedouin 2" & more |
Apr 16, 2014 11:27 PM
Top Contributor
Joined 12 years ago
28,878 Posts
|
the other to do's
LNDRVR4X4.COM
Home of Project "INCARN8'
1957 Series 1 Land Rover electric VEHICLE CONVERSION
FIXITUPCHAP.COM
FIXITUPCHAP INCORPORATED
RD3 Radar/ Electronic Warfare Technician
VIETNAM 1969-1972
 |
Apr 17, 2014 01:56 AM
Joined 10 years ago
120 Posts
|
If your having problems getting everything to line up, put the tracks on and secure them with a zip tie. I literally worked for three hours and could not get it and then saw this trick somewhere and 15 minutes later it was done. I sprayed it with garage door lube which works dry so it won't collect crud in the track or at least not so quick.

 |
Apr 17, 2014 11:16 AM
Joined 14 years ago
1,324 Posts
|
Just had my seats out this weekend. To your original question, everything looks OK in your photo from what I can see. Do you have the proper wooden strips and spacers for the holes between the seat rails and the floor? It will make a difference in how well the seat slides when installed. FWIW, I replaced with flat aluminum stock, which works fine.
Note the original cap screws/bolts used to bolt the seat to the floor do seem to have a slightly shallower head than the usual h/w store variety, but I don't think it makes any difference.
One thing I did that makes installation easier is to fed the rear bolts up from the bottom (under the car), so that when placing the seat into the car, I simply position the rail over the bolts sticking up through the carpet. You can then fiddle with the front bolts after sliding the seat back (a ratcheting wrench like the one shown in the Twist video is a real time-saver), and once they're in, you can either re-install the rear bolts from the top down, or simply place nuts over them. Note if using nuts, just make sure the bolt does not stick up too high or it will prevent the seat from sliding back. FWIW, the original bolts probably won;t work with nuts this way, as they have a extra unthreaded tip on them (that helps positioning from the top-down) that will stick up too high.
Bob
 |
Apr 17, 2014 01:56 PM
Joined 18 years ago
8,982 Posts
|
zip ties are the way to go.
Also, put a light coat of bearing grease on those rails and move it back and forth before you put it in the car. Makes a world of difference too.
1974-1/2 Roadster, "Bumble Bee", Corvette Yellow - in shambles, wire wheels
1976 Roadster, "Virus", Sandglow - "driver" condition (stock + 32/36 Weber DGEV, cast iron header, 25D distributor), bolt on wheels, ON the road!
|
|
Topic Creator (OP)
Apr 17, 2014 02:26 PM
Joined 10 years ago
130 Posts
|
Just got back after launching this last night and passing emails with Steve.
Dennis -- The zip ties are a good idea since the rails do drop off all the time. I'd made headless bolts to make a jig for setting the seats based on someones suggestion on this site. That was necessitated by the fact I'd added soundproofing and new carpets. That was a big help. Also used the bolts to jig a re-install of the chrome ring around the gear shift. I think John Twist lubed the tracks for holding the rails in place besides lubing the track for protection.
Ron -- What you see hanging down is not the "stop" but the spacers. I took the stop off in anticipation of sliding the seat waaaaay back. I'm not really sure of the purpose of the spacers. I think that was my critical error. I had the spacers down instead of up.
Bob -- I did have all the original pieces, so that was not a problem. I did buy longer bolts for the floor mount since I'd added thickness with the sound proofing and new carpet.
Time to give it a try.
Thanks everyone.
Dean S.
 |
Apr 18, 2014 10:51 PM
Top Contributor
Joined 18 years ago
8,133 Posts
|
My methods after doing this a few times (and no way could I do it as fast as John Twist).
1. Use zip ties, as noted above, to hold the tracks on the seat.
2. Install headless bolts into the holes to help you locate the seats (two may be enough instead of four), and once the seat rails have been remounted onto them, remove one at a time and install the headed bolts. As also noted above, you could also install bolts from the bottom (but only two seat bolt holes go all the way through; the other two go into a cross member, I believe), then remove those two bolts once the other two bolts are installed.
These two tips saved me hours of difficulty.
Drew Maddock, So. Calif. USofA
Forums 
Having trouble posting or changing forum settings?
Read the Forum Help (FAQ) or contact the webmaster
