
MGB & GT Forum
Tail light ground..
Posted by Ahmed


 |
Topic Creator (OP)
Aug 17, 2017 11:31 AM
Top Contributor
Joined 17 years ago
5,161 Posts
|
I am refurbishing a tail light assembly, and came to realize that there is no dedicated ground wire to the metal base and therefore to the lamps. I think the designer was hoping to pick up the ground through the mounting nuts. Which is in itself "NUTS"!! since the mounting nuts have a plastic/rubber washer under them (from the factory) so as not to mar the paint when installed, so how do you expect to have solid metal contact for grounding with paint and a plastic washer in the way? Unless I am missing something, this is some poor electrical design.
Since I have never assembled or refurbished a tail light assembly before, I could be mistaken, but as it is now, I see a potential intermittent ground problem waiting to happen.
I will instead run a dedicated ground wire from the metal base with either a bullet connector or a serrated ring at the end and ground properly to the body or the tail harness. That way, there is no second guessing if there is ground or not.
My 1958 MGA is not a car, it's a CAREER..!! ...
 Great White North, QC, Canada
Sign in to contact
|
Aug 17, 2017 11:52 AM
Top Contributor
Joined 12 years ago
26,297 Posts
|
Ahmed
My car and all that I have seen use the funky 'barbed nut' to cut through the thin soft washer and paint to achieve the earth to chassis.
We read here so often about tail light issues and often these nuts have gone AWOL due to some owner using hardware store fasteners.
Certainly adding a dedicated earth wire will solve this 'questionable' earth technique provided by the factory.
B
Life's most persistent and urgent question is, "What are you doing for others?"
Edited 1 time(s). Last edit at 2017-08-17 11:53 AM by riley1489.
Attachments:
BH_light fastener.JPG 18.3 KB
|
|
Topic Creator (OP)
Aug 17, 2017 12:20 PM
Top Contributor
Joined 17 years ago
5,161 Posts
|
Bruce,
Thanks for the photos.
I have the same "barbed nuts" but to be honest, the use of this kind of nuts to get ground is wishful thinking from the factory at best.
A separate ground wire is the way to go IMO. I will be doing this just for peace of mind.
My 1958 MGA is not a car, it's a CAREER..!! ...
Thanks for the photos.
I have the same "barbed nuts" but to be honest, the use of this kind of nuts to get ground is wishful thinking from the factory at best.
A separate ground wire is the way to go IMO. I will be doing this just for peace of mind.
In reply to # 3575008 by riley1489
Ahmed
My car and all that I have seen use the funky 'barbed nut' to cut through the thin soft washer and paint to achieve the earth to chassis.
We read here so often about tail light issues and often these nuts have gone AWOL due to some owner using hardware store fasteners.
Certainly adding a dedicated earth wire will solve this 'questionable' earth technique provided by the factory.
B
My 1958 MGA is not a car, it's a CAREER..!! ...
|
Great White North, QC, Canada
Sign in to contact
|
Aug 17, 2017 01:05 PM
Top Contributor
Joined 12 years ago
26,297 Posts
|
In reply to # 3575020 by Ahmed
I have the same "barbed nuts" but to be honest, the use of this kind of nuts to get ground is wishful thinking from the factory at best.
A separate ground wire is the way to go IMO. I will be doing this just for peace of mind.
A separate ground wire is the way to go IMO. I will be doing this just for peace of mind.
Ahmed
Too funny, the second picture is my actual car.

Complete with weld burn, left over 40+ year factory paint etc. and somehow I have had 100% success with these tail light earth .
FWIW my license plate lights also work; The lamp fasteners to the over rider, over rider fastener to bumper blade iron, to bumper mounting bracket fastener to the rear side member where the bumper fastens, Yikes what a path to earth. Seems to work though.
I do agree for peace of mind and sound engineering a dedicated earth is the way to go.
B
Life's most persistent and urgent question is, "What are you doing for others?"
 |
Aug 17, 2017 02:46 PM
Top Contributor
Joined 24 years ago
25,964 Posts
|
On my car, I added a short black wire to each reflector using a poprivit. I then made a good ground point and connected the two together with the barrel connector so that it looks like factory work. I did the same to the side light and used a common ground point for both on each side
|
Great White North, QC, Canada
Sign in to contact
|
Aug 17, 2017 03:19 PM
Top Contributor
Joined 12 years ago
26,297 Posts
|
In reply to # 3575084 by Gerry
I did the same to the side light and used a common ground point for both on each side
Gerry
My side marker lights have the earth wire as part of the bulb holder/light fixture, I think this is visible in my photo, that connector/cluster of Black wire.
B
Life's most persistent and urgent question is, "What are you doing for others?"
 |
Aug 18, 2017 03:26 AM
Joined 9 years ago
1,123 Posts
|
Rick Astley, in his book, recommends soldering a ground wire to the lamp body to go under a sturdy body nut (not the standard lamp nuts as they are anything but sturdy).
He also recommends putting relays in for the brake lights and rear indicators with the main power for the relays coming from the battery.
Cheers Rob
He also recommends putting relays in for the brake lights and rear indicators with the main power for the relays coming from the battery.
Cheers Rob
|
|
Topic Creator (OP)
Aug 22, 2017 11:02 AM
Top Contributor
Joined 17 years ago
5,161 Posts
|
A follow up on my thread. I soldered a black ground wire to the housing of the flasher light bulb. If you noticed, I run it along with the wire through the rubber boot for protection, and also looks original. I installed a bullet terminal at the other end, which gets connected to the 4-way female bullet ground (already on the harness) along with the side marker.
I will do the same thing to the front flasher/parking light assembly since I saw the same design flaw there.
Hopefully, this will alleviate some of Lucas intermittent fault madness..
My 1958 MGA is not a car, it's a CAREER..!! ...
Edited 1 time(s). Last edit at 2017-08-22 11:03 AM by Ahmed.
I will do the same thing to the front flasher/parking light assembly since I saw the same design flaw there.
Hopefully, this will alleviate some of Lucas intermittent fault madness..
My 1958 MGA is not a car, it's a CAREER..!! ...
Edited 1 time(s). Last edit at 2017-08-22 11:03 AM by Ahmed.
Attachments:
20170820_182929.jpg 30 KB

 |
Aug 22, 2017 12:44 PM
Joined 18 years ago
8,982 Posts
|
exactly the right way to do. On my '76, did the same thing, and the ground wires already had an open female bullet to plug right into. Make sure if you're black wires ground to the body at the license plate holder, make sure the metal is good and clean there, and a dab of dielectric grease too!
1974-1/2 Roadster, "Bumble Bee", Corvette Yellow - in shambles, wire wheels
1976 Roadster, "Virus", Sandglow - "driver" condition (stock + 32/36 Weber DGEV, cast iron header, 25D distributor), bolt on wheels, ON the road!
1974-1/2 Roadster, "Bumble Bee", Corvette Yellow - in shambles, wire wheels
1976 Roadster, "Virus", Sandglow - "driver" condition (stock + 32/36 Weber DGEV, cast iron header, 25D distributor), bolt on wheels, ON the road!
|
|
Topic Creator (OP)
Aug 22, 2017 01:02 PM
Top Contributor
Joined 17 years ago
5,161 Posts
|
Thanks William
I'll run the ground lug to the trunk/boot lock instead. There are two welded nuts there which give permanent ground.
I know the factory grounded through the license plate holder, but I think the lock assembly looks more robust as far as ground goes.
My 1958 MGA is not a car, it's a CAREER..!! ...
I'll run the ground lug to the trunk/boot lock instead. There are two welded nuts there which give permanent ground.
I know the factory grounded through the license plate holder, but I think the lock assembly looks more robust as far as ground goes.
In reply to # 3578116 by BumbleB74
exactly the right way to do. On my '76, did the same thing, and the ground wires already had an open female bullet to plug right into. Make sure if you're black wires ground to the body at the license plate holder, make sure the metal is good and clean there, and a dab of dielectric grease too!
My 1958 MGA is not a car, it's a CAREER..!! ...
 |
Aug 22, 2017 05:39 PM
Joined 17 years ago
2,059 Posts
|
about 6 months and 2 weeks later...
 |
Mar 5, 2018 04:07 PM
Joined 6 years ago
18 Posts
|
So I'm reviving this thread hopefully to gain some confirmation about what I did...thanks in advance! My tail lights are not mounting correctly. I did fix the ground - thanks for all the help on that one.
a) Ahmed in his first post mentioned the plastic/rubber spacers that were used (from the factory?) on the tail light studs. My problem is that when I took the lights off to replace the gaskets, the left tail light assy had these spacers under the nut (trunk side), but the right tail light assy had these spacers fitted on the die-cast light housing. Where are these plastic spacers supposed to go?
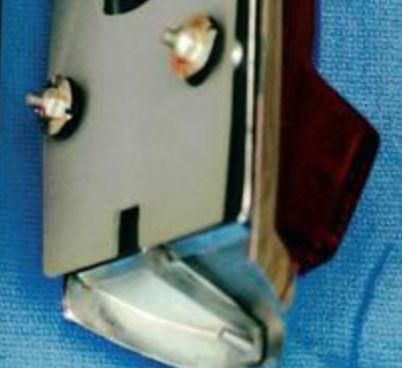
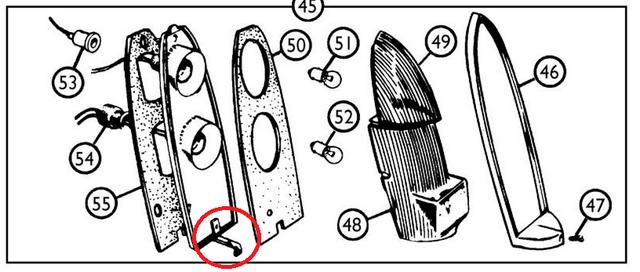
b) I'm befuddled by the way the lens frame mounting tab is secured to the light housing. See the circled item in the picture. The narrow metal tab is held to the housing by a small screw. I have a coarse threaded metal screw in both of my lights that is threading into both housing and metal strip meaning that it cannot really be tightened, AND it seems to be too long - causing the light housing to remain too high off the body. Yes, I can unscrew it or replace it with a shorter one, but what is supposed to be there?
Thanks again!
Bob
a) Ahmed in his first post mentioned the plastic/rubber spacers that were used (from the factory?) on the tail light studs. My problem is that when I took the lights off to replace the gaskets, the left tail light assy had these spacers under the nut (trunk side), but the right tail light assy had these spacers fitted on the die-cast light housing. Where are these plastic spacers supposed to go?
b) I'm befuddled by the way the lens frame mounting tab is secured to the light housing. See the circled item in the picture. The narrow metal tab is held to the housing by a small screw. I have a coarse threaded metal screw in both of my lights that is threading into both housing and metal strip meaning that it cannot really be tightened, AND it seems to be too long - causing the light housing to remain too high off the body. Yes, I can unscrew it or replace it with a shorter one, but what is supposed to be there?
Thanks again!
Bob
Attachments:
Moss tail light assy.jpg 37.2 KB

Donthuis
Don van Riet
|
Mar 6, 2018 01:11 PM
Top Contributor
Joined 10 years ago
13,336 Posts
|

My guess is the circled tab can just as well be popriveted to this lamp assembly, the screw 47 will still be able to hold the plastic cover to the assembly, chromed ring around it and all. The 47 screw has a strange thread, the same is the case with similar screws holding the plastic covers to the reardriving lights by passing through them and into captive nuts behind the metal.
PS The rear driving light screws one can not do without, but for item 47 a small selftapping screw also fits the hole in the tab..
And when using a pop rivet protect the assembly from splitting by using a small washer over the rivet end on the inner side
Edited 2 time(s). Last edit at 2018-03-06 01:15 PM by Donthuis.
PS The rear driving light screws one can not do without, but for item 47 a small selftapping screw also fits the hole in the tab..
And when using a pop rivet protect the assembly from splitting by using a small washer over the rivet end on the inner side
In reply to # 3691801 by AlmstRet
So I'm reviving this thread hopefully to gain some confirmation about what I did...thanks in advance! My tail lights are not mounting correctly. I did fix the ground - thanks for all the help on that one.
a) Ahmed in his first post mentioned the plastic/rubber spacers that were used (from the factory?) on the tail light studs. My problem is that when I took the lights off to replace the gaskets, the left tail light assy had these spacers under the nut (trunk side), but the right tail light assy had these spacers fitted on the die-cast light housing. Where are these plastic spacers supposed to go?
b) I'm befuddled by the way the lens frame mounting tab is secured to the light housing. See the circled item in the picture. The narrow metal tab is held to the housing by a small screw. I have a coarse threaded metal screw in both of my lights that is threading into both housing and metal strip meaning that it cannot really be tightened, AND it seems to be too long - causing the light housing to remain too high off the body. Yes, I can unscrew it or replace it with a shorter one, but what is supposed to be there?
Thanks again!
Bob
Edited 2 time(s). Last edit at 2018-03-06 01:15 PM by Donthuis.
 |
Mar 6, 2018 01:29 PM
Top Contributor
Joined 18 years ago
17,646 Posts
|
Ahmed,
I did have ground issues and solved exactly as you have. On the other end of the grounds I crimped on a OEM style bullet and inserted into the tubes with the other ground wires in that area. As noted, I could have also put loops and combined with the other ground point on the rear panel.
My grounding failure was caused by corrosion between the light fixture can and where it is crimped onto the pot metal base. Soldering a ground wire to the fixture bypasses that corrosion point.

Cruisedon66
Pete W
|
Mar 6, 2018 01:35 PM
Joined 13 years ago
1,104 Posts
|
Ahmed,
You got the right idea!
I made a length of wire with ring connectors at each end.
Connect one end under the tail light mounting nuts. The other end at the side marker nut.
Then I ran a separate wire with ring connectors on each end from the licence plate groundnuts to the tail light nuts.
So using 4 lengths of wire I was able to connect both tail light grounds, Side markers lights to the licence plate ground.
At the front of the car near the hood latch, there are unused bolt holes (along the hood latch support) I attached a ring terminal there for the headlight, turn signal & side marker.
If you use a short bolt from the bottom to secure the ring terminals, it won't be see from the top when the hood is open.
I had my front grill off at the time, so it was easier to install. But still not hard with grill on.
Edited 1 time(s). Last edit at 2018-03-06 01:38 PM by Cruisedon66.
Forums 
Having trouble posting or changing forum settings?
Read the Forum Help (FAQ) or contact the webmaster
