
MGA Forum
Panel beating - help!
Posted by A on a shoe string


A on a shoe string
Peter Stevenson
|
Topic Creator (OP)
Mar 19, 2018 02:33 PM
Joined 6 years ago
652 Posts
|
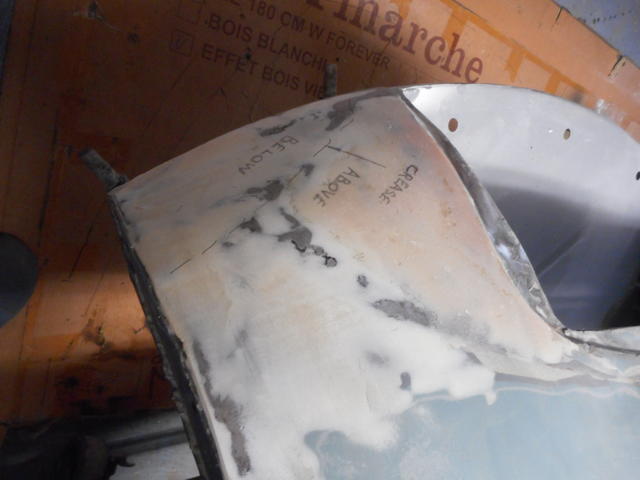
Not sure how well this is going to work, but let's give it a try. Having done an engineering apprenticeship of machining and fitting things and an engineering career which often involved getting my hands dirty, I approached classic car welding and panel beating with an attitude of 'how hard can it be?' Leaving aside welding (so many variables!), panel beating...Photo one is of the left corner of the front apron, I bashed it till I thought the remaining flaws would be made good with a skim of filler. Having done two skims of filler, a light crease is still visible even in matt primer. I know that when the gloss goes on it's going to glare at me..
Photo 2 is the panel tools I have to hand. In an attempt to make your valued responses easier to describe, the crease is marked ABOVE and BELOW, the hammers are numbered 1 thru 4 and the dollies A thru F. Can anyone tell me what hammer you would use where, and with what dolly where please (or at least start with)? Having read the book and watched the YouTubes, copying what they do results in a lot of noise, many dings and metal resolutely refusing to go where I want it to.
Ironically, I had to make an 8" x 8" repair patch with double curvature for the other side and it went somewhat better. It would be handy to have consistent (preferably good) results.
The next post is likely be a photo of success or the above tools in the bin.
Many thanks, Pete
 |
Mar 19, 2018 04:05 PM
Joined 9 years ago
3,100 Posts
|
You're over-thinking this. Support from behind, tap from the front.
Guide coat is our friend, I do no body work without it. Search Youtube for "guide coat sanding".
Work the area to a pleasing shape and allow for 1/32" to 1/8" of bondo. As you panel-sand the bondo, be prepared to tap the high spots that emerge. This is the stage you've reached.
After applying a final THIN layer, sand it gently AND STOP SANDING WHEN YOU SEE METAL. Most people don't understand that the primer will go on next over a surface that will be NEARLY 100% Bondo. If you see metal, it is too high, you've sanded too much Bondo away and left a metal island.
Smear a 1/16" coating and sand again.
You're very close.
The Flat Earth Society has members from all corners of the globe.
'30 Model A Ford Town Sedan
'48 MGTC Q Special
'53 XK120SE OTS
'58 MGA roadster
'66 Series 1, 4.2 Jag E-Type OTS
 |
Mar 20, 2018 07:57 AM
Top Contributor
Joined 12 years ago
6,725 Posts
|
 |
Mar 20, 2018 09:48 AM
Top Contributor
Joined 11 years ago
8,264 Posts
|
sometimes metal stretches and no amount of beating on it will take the waves or creases out. i also don't see a shrinking hammer in your set....it has lots of dimples in it to draw the metal in.
If it has stretched your choice is to heat it and then quench it with a wet rag or use a shrinking disc or try a shrinking hammer.
good luck bob
If it has stretched your choice is to heat it and then quench it with a wet rag or use a shrinking disc or try a shrinking hammer.
good luck bob
|
|
Mar 20, 2018 05:55 PM
Joined 9 years ago
3,100 Posts
|
In reply to # 3700521 by bobs77vet
sometimes metal stretches and no amount of beating on it will take the waves or creases out. i also don't see a shrinking hammer in your set....it has lots of dimples in it to draw the metal in.
If it has stretched your choice is to heat it and then quench it with a wet rag or use a shrinking disc or try a shrinking hammer.
good luck bob
If it has stretched your choice is to heat it and then quench it with a wet rag or use a shrinking disc or try a shrinking hammer.
good luck bob
Or cut a slot and pull it's edges together and weld the wound closed.
The Flat Earth Society has members from all corners of the globe.
'30 Model A Ford Town Sedan
'48 MGTC Q Special
'53 XK120SE OTS
'58 MGA roadster
'66 Series 1, 4.2 Jag E-Type OTS
|
A on a shoe string
Peter Stevenson
|
Topic Creator (OP)
Mar 21, 2018 05:43 AM
Joined 6 years ago
652 Posts
|
Thanks for the responses and encouragement. Must confess I hesitate about heating it to red heat and quenching for fear of creating worse distortion elsewhere. Ditto slicing it open and welding it back together, I struggle to get a neat butt weld on body steel thickness (I generally resort to cheating with joggling repair pieces and doing plug welds, and/or a series of generous tacks along both sides of the joggle). Correct, I don’t have shrinking hammer, something to shopping for.
We’re off to the U.K. soon so won’t be able to attack it till we return. Part of the U.K. mission will be buying many spares, consumables from Amazon (so much cheaper in U.K.). If I manage a finished apron shape I’m not ashamed of, I’ll post a photo.
Pete
Edited 1 time(s). Last edit at 2018-03-22 03:35 AM by A on a shoe string.
 |
Mar 21, 2018 04:16 PM
Joined 15 years ago
1,457 Posts
|
 Berwick, NS, Canada
Sign in to contact
|
Mar 22, 2018 06:34 AM
Top Contributor
Joined 13 years ago
14,759 Posts
|
You've got low spots all around your high spots. Bring up the low spots and hammer down the high spots. Your dollies all look to have much higher crowns than the panel. It would be a lot easier if you had one with the same crown as the panel area you are working on. D/E looks to be the closest.
I would never hit a high spot with a pick hammer.
Practice shrinking with heat and welding on scrap sheet metal... until you know what you're doing.
Adrian
Home built Eaton M62 Supercharger with 8psi boost, 8:1 compression, custom "supercharger" cam from Schneider Cams, Mikuni HSR48 Carburetor, custom ground high ratio "stock" rocker arms, Maxspeeding rods with Teflon wrist pin buttons, custom aluminum cold air intake, CB Performance computerized ignition, Fidanza 9 pound flywheel, 1.44 exhaust valves in 48cc chamber head, matched manifolds, 2 1/4" exhaust system.
|
|
Mar 22, 2018 11:34 AM
Top Contributor
Joined 12 years ago
6,725 Posts
|
Peter there is a good series on you tube called Trevs Blog. The has a tips and tips series that can help you understand metal bumping and finishing.
Also a man called Restolad has a good series on metal finishing.
Also watch Peter Tommasini’s videos on you tube.
As Adrian said practice welding on scrap until you get proficient at it.
It was taught to me that if you weld metal and the metal warps, it is the fault of the weld, and not the metal.
So don’t beat the metal, planish the weld.
 |
Mar 22, 2018 06:00 PM
Joined 18 years ago
44,198 Posts
|
OK Adrian, then don't...but I would and will and have.....and I have gotten my fair share of dead straight panels...
In reply to # 3701798 by pinkyponk
You've got low spots all around your high spots. Bring up the low spots and hammer down the high spots. Your dollies all look to have much higher crowns than the panel. It would be a lot easier if you had one with the same crown as the panel area you are working on. D/E looks to be the closest.
I would never hit a high spot with a pick hammer.
Practice shrinking with heat and welding on scrap sheet metal... until you know what you're doing.
Adrian
I would never hit a high spot with a pick hammer.
Practice shrinking with heat and welding on scrap sheet metal... until you know what you're doing.
Adrian
|
Berwick, NS, Canada
Sign in to contact
|
Mar 22, 2018 07:38 PM
Top Contributor
Joined 13 years ago
14,759 Posts
|
In reply to # 3700085 by wyatt
...take your pick hammer and tap down the high spots all along the crease, just below the plane you just want a shallow valley, all while supporting it from behind...then fill
Why would you shoot for a shallow valley? Why not just hammer the panel to its correct shape? A flat faced hammer and a dolly that matches the shape of the panel will make this easier to achieve.
Adrian
Home built Eaton M62 Supercharger with 8psi boost, 8:1 compression, custom "supercharger" cam from Schneider Cams, Mikuni HSR48 Carburetor, custom ground high ratio "stock" rocker arms, Maxspeeding rods with Teflon wrist pin buttons, custom aluminum cold air intake, CB Performance computerized ignition, Fidanza 9 pound flywheel, 1.44 exhaust valves in 48cc chamber head, matched manifolds, 2 1/4" exhaust system.
|
|
Mar 22, 2018 09:09 PM
Joined 18 years ago
44,198 Posts
|
....as he mentioned he's already "bashed" it into non submission, it may be non achievable to him or anybody else, as it may be moving into the stretched realm, so sink it fill it contour and level it....look at the photo, it has several high spots at right angles to his crease...obviously from some crash damage, if he doesnt pick them lower he is going to have copious amounts of filler to cover the high spots that are going nowhere with a body hammer and dolly alone his grille opening alone which looks like he has a 1/16 to 1/8th height already...adding more bondo over high metal is not gonna get it right, nor is beating the hell out of the metal, sooner or later more bondo will be the rule to build a workable surface where as sinking and filling would have got it done better and faster, making mountains out of mole hills is not the answer here.
imho....
imho....
|
Berwick, NS, Canada
Sign in to contact
|
Mar 22, 2018 09:46 PM
Top Contributor
Joined 13 years ago
14,759 Posts
|
Bashing dents below the surface and filling with bondo is bad. Peter needs to get all the filler off his panel first. Then he needs to work the panel to the correct contour with a flat hammer(hammer 2 in the photo) and a dolly the same curve as his panel. He needs to determine, as he goes along, if he has any high spots that need shrinking. I would bring up the low area by the grill opening with a plastic dead blow mallet from behind. Hold a dolly on the high spot to control the area.
I see a large amount of low spots and a small amount of high spots in the photo. I'm of the opinion that the panel will go back to the correct shape with very little shrinking required... and then require much less filler than is on it now.
Peter, if you do not know how to shrink sheet metal take a piece of scrap and give it a bash with a ball peen hammer. Now make it flat. I've had good results with a high heat propane torch. Heat the centre of the bump to just barely visible red (it will hump up alarmingly) and hit it with your flat hammer right in the middle, with a dolly behind it... Now quickly quench it with a spray bottle of water. Observe what happens. Try again. Keep at it until you can do it. Watch some more videos etc. You can do it.
Also, when beginning to remove crash damage/dents from sheet metal do not bash the panel to rough shape with a steel hammer. Use a flat faced plastic or hard rubber mallet. A steel hammer with stretch the panel as you are roughing the dent out. Do not go to steel hammers until you have done all you can with the plastic hammer. I like a dead blow urethane hammer for this sort of work.
Adrian
Home built Eaton M62 Supercharger with 8psi boost, 8:1 compression, custom "supercharger" cam from Schneider Cams, Mikuni HSR48 Carburetor, custom ground high ratio "stock" rocker arms, Maxspeeding rods with Teflon wrist pin buttons, custom aluminum cold air intake, CB Performance computerized ignition, Fidanza 9 pound flywheel, 1.44 exhaust valves in 48cc chamber head, matched manifolds, 2 1/4" exhaust system.
Edited 2 time(s). Last edit at 2018-03-22 09:48 PM by pinkyponk.
Forums 
Having trouble posting or changing forum settings?
Read the Forum Help (FAQ) or contact the webmaster
