
MGB & GT Forum
Dog leg repair
Posted by Gordon Lewis


 |
Topic Creator (OP)
Oct 1, 2014 11:21 PM
Joined 10 years ago
436 Posts
|
I had a hole in the dog leg passenger side about a quarter size. After judicious use of a screwdriver it is now along the length of the dogleg. The sill inside was also rotten. The sill under the door is sound. If the sill is repaired, is a "back section" available to go under the dog leg?
The inner sill is sound but just the outer under the dogleg wAs rotten.
Thanks
The inner sill is sound but just the outer under the dogleg wAs rotten.
Thanks
 |
Oct 1, 2014 11:53 PM
Joined 15 years ago
4,348 Posts
|
You must have a fairly good body.
My 1977 MGB had the same rust hole, when I purchased it in 1985. I installed the available repair panel, available at Moss and other sources.
http://www.mossmotors.com/Shop/ViewProducts.aspx?PlateIndexID=29037#35
Be sure you order or buy the one for the side of your car that has the hole.
And, someone pointed me towards this book, still available, which made my repairs still in great shape, 27 years, and 77,000 miles later:
"MG Restoration Manual, 2nd Edition" by Lindsay Porter
Roger N. Tanner
Professional Engineer, Retired
mikehipsher thanked rntanner for this post
|
|
Topic Creator (OP)
Oct 1, 2014 11:58 PM
Joined 10 years ago
436 Posts
|
|
Oct 2, 2014 05:44 AM
Top Contributor
Joined 17 years ago
18,557 Posts
|
|
To answer your question.
NO there is not a partial sill repair panel. Either buy a sill and trim what you need, or make a repair section based on your skill level. I tend to buy the sill and cut; have tossed several new sills with a bite taken out of the back 10 inches.
If you have not already cut out the dogleg section, I advocate for leaving the as much of the old edges in place around the door and wheel well. People tend to get a bit cut happy when doing this for the first time.
Post a pic.
Pete
 |
Oct 2, 2014 06:37 AM
Joined 12 years ago
690 Posts
|
 |
Oct 2, 2014 06:49 AM
Top Contributor
Joined 15 years ago
5,593 Posts
|
Gordon,
I assume you're referring to the front dog leg. If so, consider buying the full panel that goes up to the trim strip. That's an easier welding job than butt welding the shorter panel. If you do use the short version, I'd recommend using a backer plate to avoid warping. My friend welded in a piece of scrap to fix the inner sill hole that seems to come as a matched set with the outer damage.
Have fun! We finally did both dog legs and some other repairs on our roadster last summer. With a new paint job, it's finally a presentable (and shiny) car after 28 years of ownership!
Steve
 |
Oct 2, 2014 06:54 AM
Joined 13 years ago
50 Posts
|
|
Oct 2, 2014 09:11 AM
Top Contributor
Joined 17 years ago
18,557 Posts
|
|
|
Oct 2, 2014 11:11 AM
Joined 9 years ago
71 Posts
|
|
Good advice so far- Another suggestion would be to buy a pneumatic flanging/punch tool (harbor freight about $30.00). Trim, Fit & the Mark the edge of your replacement panel on the existing dogleg so that you can leave about 3/8 extra below the mark/edge for the patch panel when you final trim the existing dogleg. Punch holes about every 1 - 1 1/2 inches along that 3/8 strip. Flange the repair panel to fit behind the existing body part and temporarily fit/attach new metal in place with a few sheet metal screws, clamps and/or special fasteners. You then have a welding area/seam that is 2 thicknesses to plug weld (fill in the punched holes with weld and grind off flat). Skip around and use low settings and you will not distort. You can if you like add some tacks on the seam between/below the holes and grind. Makes for an nice even joint when filled as the metal surfaces are the same level given the offset of the flange.
There are several way to do this and others may have better suggestions, but as a less than expert welder this technique worked fine for me.
Best, Bob K
There are several way to do this and others may have better suggestions, but as a less than expert welder this technique worked fine for me.
Best, Bob K
|
|
Oct 2, 2014 12:03 PM
Joined 12 years ago
690 Posts
|
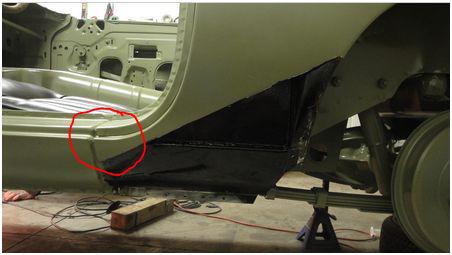
Yep - I have done the flanging trick and the butt weld on the drivers side, the passenger side is going to be butt welded as I learned about not cutting too much out right off on the drivers side (thanks Peter and all here), this is the result of the drivers side after HOURS of fitting, hammering, tacking, removing, re-fitting, etc., and several drinks later!!!!  on a long winter day!
The fit around the door was worked on by closing the door, measuring, opening, re-adjusting, etc., I had to go into the pillar a bit to get rid of some bad sections and am overall pretty happy with the repair...
on a long winter day!
The fit around the door was worked on by closing the door, measuring, opening, re-adjusting, etc., I had to go into the pillar a bit to get rid of some bad sections and am overall pretty happy with the repair...
Attachments:
P1210085.JPG 44.4 KB
 |
Oct 2, 2014 01:56 PM
Joined 16 years ago
8,331 Posts
|
about 4 weeks and 2 hours later...
|
|
Topic Creator (OP)
Oct 30, 2014 04:14 PM
Joined 10 years ago
436 Posts
|
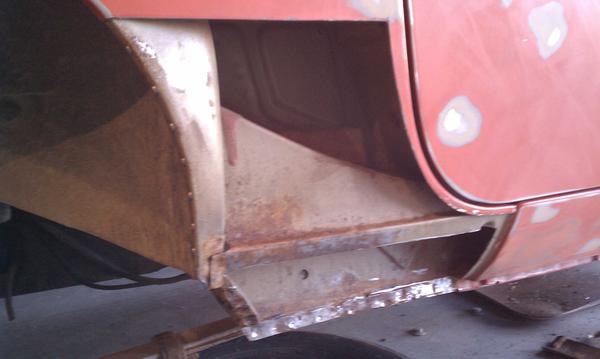
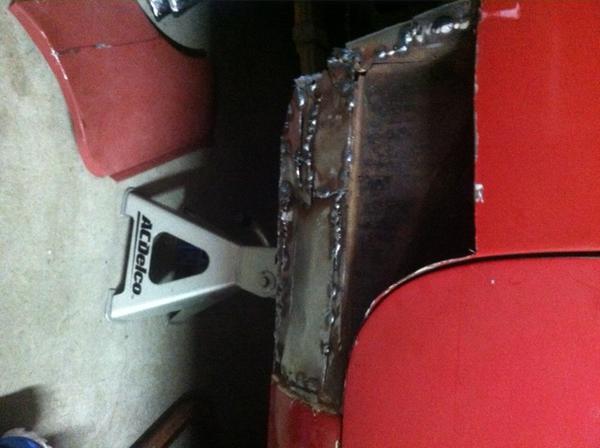
here is a pic of my progress so far. Welding is ugly as I did not have a sill panel and just made up a repair from different pieces.
I was not able to save the wheel arch as I had to remove the triangle at the back of the sill that was rusted.
I have the dogleg repair fitting pretty well, but there is a space between the triangle piece at the back of the sill and the wheel arch. Should I make up a piece to fill this in?
It looks like a "factory rust trap planned obsolescence" between the rear wing and sill.
Thanks for any tips
Attachments:
photo (3).JPG 31 KB
 |
Oct 30, 2014 10:01 PM
Joined 18 years ago
5,017 Posts
|
|
|
Topic Creator (OP)
Oct 30, 2014 10:15 PM
Joined 10 years ago
436 Posts
|
|
Oct 31, 2014 10:41 AM
Top Contributor
Joined 16 years ago
1,088 Posts
|
|
Forums 
Having trouble posting or changing forum settings?
Read the Forum Help (FAQ) or contact the webmaster
