
[Ed. Note - my 66 MGB has a different kind of rheostat, I'm not sure what year they switched over to this "printed ciruit" design. I opened mine and cleaned the wire "loops" and "no resistance area" with a pink eraser and had quite good results. You can easily bypass the rheostat entirely by simply attaching all of the red wires to terminals on the same side of the rheostat. -Skye]
Like so many other MG owners, I discovered that my dashboard light dimmer switch wouldn't turn. Not on just one, but two of my MGBs.
Since this item is about $70, I decided to see if I could fix it. According to my local British car parts house the Queen of England personally makes these for Lucas in her spare time. Since she is the Queen and can only make a few each month, the price has to be high.
The basic technique of rebuilding the switch is easy but you must take your time. Required supplies would include a six pack of beer and a small screw.
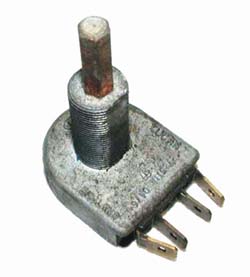
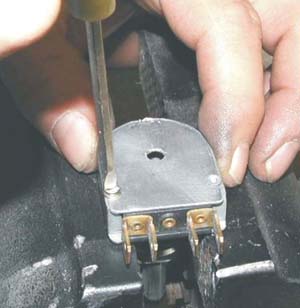
Typical Well-Used MGB Dimmer Switch
Dimmer Switch Disassembly
This is a factory sealed unit so at least one of the seals will have to be drilled out or filed off. I use a 5/32 drill bit to cut off the spread top of the stud and while still in the vise I use 3/32 bit to make a screw hole to reattach the cover when I'm finished. While looking for a small screwdriver it would be a good time to get the first beer.
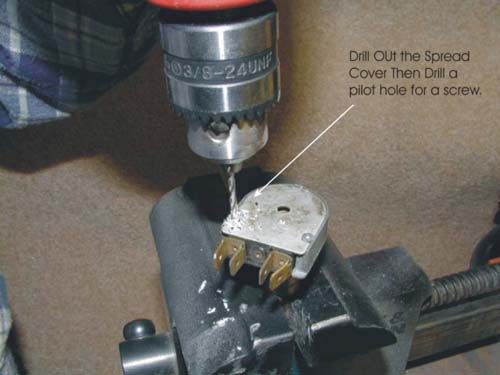
Drilling out studs to open factory sealed MGB Dimmer Switch
Carefully pry the cover off, first near the stud you drilled the opposite side. Again, carefully pull the cover off toward the terminal end of the switch. Leave the bent tab alone. If you try to pull it up and later bend it back it will only break off.
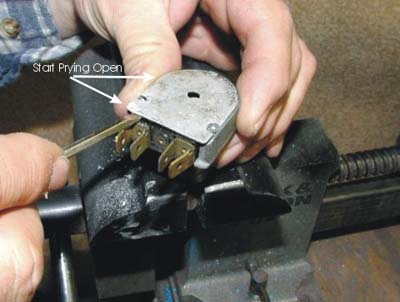
Prying cover off MGB Dimmer Switch, starting on drilled side
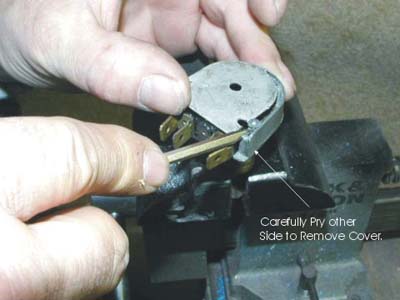
Prying cover off MGB Dimmer Switch, opposite side
With the cover off you will see most of how the switch works. There are no springs or other tricky fits. At this time stop and look at what you have. Now would be a good time to get another beer and just stare at the switch.
You will need to note the location of the stop tab on the disk. Note which side is on the top of the conductor contact finger block. And note the general condition of the electric traces on the disk and the cover plate. Do not try to do any rubbing on the electric traces. (They will tear off.)
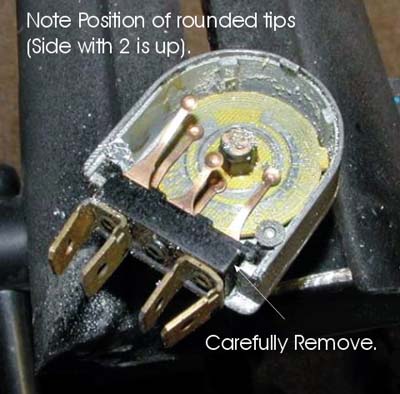
Cover removed, note position of contacts, then remove terminals
If you are finished with your beer and you have noted how everything fits together. Get another beer and stare at it some more.
If any of the traces of circuitry on either the cover or circuit disk are coming loose, try to carefully push them back into position. Some of the traces can be torn or missing and the switch may still mostly work. Substantial amounts of traces missing and the switch will not function and the lights on the dash may not work.
Note 1: If this is the case, see if you can find another used unit and combine the parts from both. I was able to obtain a dozen from my local MG place that were in a junk pile for a couple bucks each.
Very carefully & slowly pry up the disk off the hex shaped spindle. The spindle is actually another disk with the hex part sticking up in the middle. Do not slip your screwdriver or other pry device very far under the circuit disk. You will crack the spindle. When the circuit disk is removed it is better to just leave the spindle disk alone. On one fourth of the units I have taken apart the spindle disk has shattered. (See Note 1 above.)
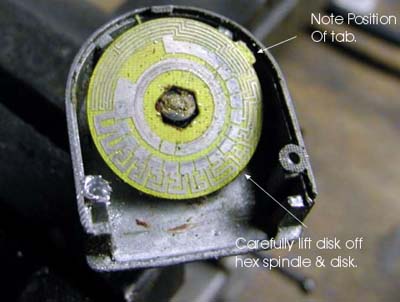
Carefully remove resistor disc from hex shaft, noting position of tab
You should now have the switch down to its component parts. If the spindle disk is broken into two or three parts you may be able to super glue it back together. If it is shattered into many pieces forget it you will not be able to rebuild this switch. (There is a flat in the spindle hole that locks on the main shaft of the knob. Too many breaks mean you will never get it to fit and stay.) (See Note 1 above.)
If all the parts seem in pretty good shape you are in luck. The thing will probably work when you put it back together. Often you will see something like the broken spindle shafts and loose traces shown in this picture.
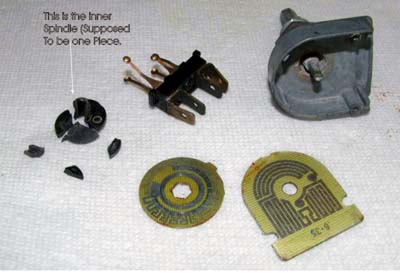
MGB Dimmer Switch components, broken inner spindle
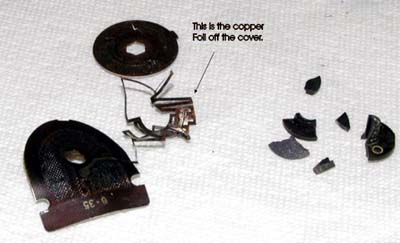
MGB Dimmer Switch components, peeling resistor traces
Since I cannot stand greasy, rusty parts at this point I usually polish the outside of the case with a wire brush on a bench grinder. Now put a small amount of oil on the knob end of the main shaft. Get a 1/4" wrench or nut driver and turn the main shaft until it moves freely. On stubborn units I have used my cordless drill to spin the shaft till it moves freely. The more you spin the main shaft the looser it will get. Use your judgement on how freely you want this to move and proceed accordingly.
Carefully clean any old grease, bits of metal from drilling, and trash out of the inside of the unit. Once again don't try to do anything to the electric traces. They are too fragile to mess with. If the five finger buttons on the connector block are dirty or discolored; you can lightly polish the tips. Do not use sandpaper (it will leave scratches that will rub off the electric traces).
Dimmer Switch Reassembly
Now is a good time for the next beer. If you can still focus your eyes and hold a small screwdriver you can proceed with the next step.
Reassemble the thing. Slowly slide the cover back into place and put a small screw into the hole you made previously.
Reassembly of MGB Dimmer Switch, with small screw
Hook the unit back to the wiring harness and check function before reinstalling into the dash. If it works right and you can still walk now would be a good time to finish off that six pack. You can put the switch back in the dash tomorrow.
Finished product, MGB Dimmer Switch like new

")


I'll put this to use.
Desert Dan
it is dark out, I can just see that they are all lit
)
Want to leave a comment or ask the owner a question?
Sign in or register a new account — it's free