
MG Midget Forum
need bodywork help
Posted by kalexander


kalexander
Kurtis Alexander
|
Topic Creator (OP)
Jul 22, 2014 06:15 PM
Joined 12 years ago
255 Posts
|
Hey all, I've undertaken a large project for educational purposes. I picked up a 73 body which has a wide variety of issues. No floor pans, rusty frame rails in the interior, rusty drivers side rocker panel and lower a-post, and rusted through battery shelf.
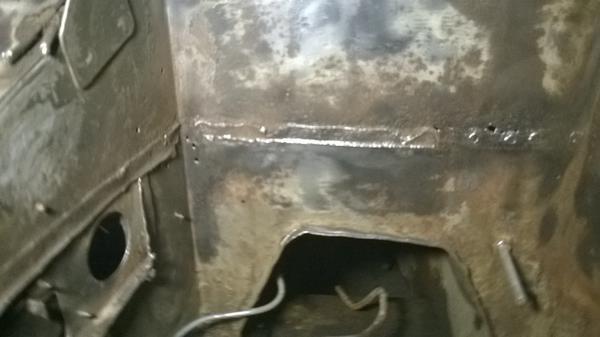
I've started by taking off the batter shelf, I took off the bulk of it with a cutting wheel, but I'm not sure how to get off the bits that remain welded to the car, as seen in the picture. Do I drill out the spot welds? I can't really see them and am not sure where to drill. If I could drill out the spot welds and the thing would just fall off, that would beat going through cutting wheels, if I knew how.
I've also noticed a very small hole in the frame rail. It was well covered in road grime and the metal around it seems good, no pitting or rust. Not sure how to fix it.
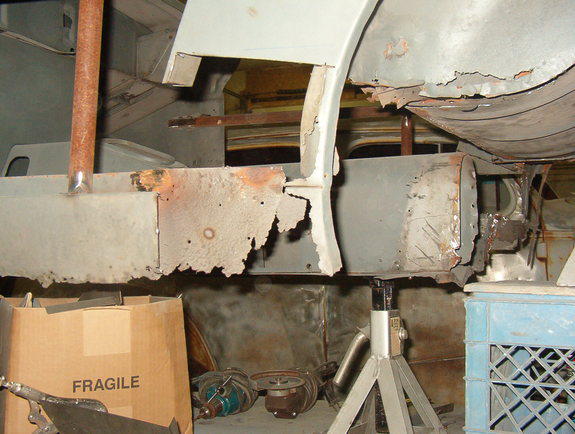
Also included is a picture of the passenger footwell just to give an idea of the state of the car. I might finish it, I might just use it as learning tool. All the quarter panels, doors, and hood are in near perfect shape, so parts of the car will get reused, for now I am working on it because I am less afraid to mess it up than my daily driver. The car had a hood scoop bolted to it when I got it, turns out it's a ford OEM hood scoop from a Mustang Cobra II that's worth a bit, hopefully the learning car will pay for itself.
Hopefully you guys can help with the learning bit though, there isn't enough beer in the world for me to figure this out by myself.
I've started by taking off the batter shelf, I took off the bulk of it with a cutting wheel, but I'm not sure how to get off the bits that remain welded to the car, as seen in the picture. Do I drill out the spot welds? I can't really see them and am not sure where to drill. If I could drill out the spot welds and the thing would just fall off, that would beat going through cutting wheels, if I knew how.
I've also noticed a very small hole in the frame rail. It was well covered in road grime and the metal around it seems good, no pitting or rust. Not sure how to fix it.
Also included is a picture of the passenger footwell just to give an idea of the state of the car. I might finish it, I might just use it as learning tool. All the quarter panels, doors, and hood are in near perfect shape, so parts of the car will get reused, for now I am working on it because I am less afraid to mess it up than my daily driver. The car had a hood scoop bolted to it when I got it, turns out it's a ford OEM hood scoop from a Mustang Cobra II that's worth a bit, hopefully the learning car will pay for itself.
Hopefully you guys can help with the learning bit though, there isn't enough beer in the world for me to figure this out by myself.
Attachments:
WP_20140722_001.jpg 23.8 KB
|
Jul 22, 2014 07:04 PM
Top Contributor
Joined 17 years ago
18,541 Posts
|
|
For what you are about to spend on cutting wheels and other consumables required to restore that car, you can buy a ready-to-drive MG Midget.
I'm serious.
If you are hell-bent on restoring this particular car, then I am more than willing to help. I have a little bit of experience in the subject. I have been where you are at and seen it to the bitter end. I fully understand the need to climb a mountain just cause it's there.
Peter
I'm serious.
If you are hell-bent on restoring this particular car, then I am more than willing to help. I have a little bit of experience in the subject. I have been where you are at and seen it to the bitter end. I fully understand the need to climb a mountain just cause it's there.
Peter
Attachments:
22036630020_large.jpg 52.9 KB
|
kalexander
Kurtis Alexander
|
Topic Creator (OP)
Jul 22, 2014 07:19 PM
Joined 12 years ago
255 Posts
|
Thanks. I do realize this car isn't the best candidate. I'm not sure I will actually restore it. I have another in considerably better shape that will end up getting that treatment. Due to my inexperience, I'm a bit nervous to cut into my other car, so I want to learn on this one. Already, I'm figuring out that cutting a battery shelf out of a car isn't as simple as it sounded.
In reply to # 2749171 by NOHOME
For what you are about to spend on cutting wheels and other consumables required to restore that car, you can buy a ready-to-drive MG Midget.
I'm serious.
If you are hell-bent on restoring this particular car, then I am more than willing to help. I have a little bit of experience in the subject. I have been where you are at and seen it to the bitter end. I fully understand the need to climb a mountain just cause it's there.
Peter
I'm serious.
If you are hell-bent on restoring this particular car, then I am more than willing to help. I have a little bit of experience in the subject. I have been where you are at and seen it to the bitter end. I fully understand the need to climb a mountain just cause it's there.
Peter
 |
Jul 22, 2014 07:31 PM
Top Contributor
Joined 12 years ago
6,695 Posts
|
|
kalexander
Kurtis Alexander
|
Topic Creator (OP)
Jul 22, 2014 07:40 PM
Joined 12 years ago
255 Posts
|
Not to worry, I won't, not unless I have a sudden multi-year loss of sanity. In the meantime though, once all the good parts are stripped away, it becomes a learning tool. My original question remains, how do I get the bits of metal from the battery shelf off, you can see them in the first picture. Not to worry about the practicality of the effort, consider this an exercise.
In reply to # 2749195 by Rick Fawthrop
Don't restore the car.

rumb
robert unfug
|
Jul 22, 2014 07:53 PM
Joined 10 years ago
457 Posts
|
combination of spot weld cutter and cutoff discs or cold chisel. just find something that works for you.
basically any rusted area, cut out larger to good metal and then weld in a patch panel.
and your right, the battery shelf is a bugger of a place to start due to the corners and lack of access.
basically any rusted area, cut out larger to good metal and then weld in a patch panel.
and your right, the battery shelf is a bugger of a place to start due to the corners and lack of access.
|
Jul 22, 2014 07:56 PM
Top Contributor
Joined 12 years ago
14,642 Posts
|
|
You have to find the spot welds and drill them out. I know that's not what you wanted to hear, but that's how they were put together.
In reply to # 2749204 by kalexander
Not to worry, I won't, not unless I have a sudden multi-year loss of sanity. In the meantime though, once all the good parts are stripped away, it becomes a learning tool. My original question remains, how do I get the bits of metal from the battery shelf off, you can see them in the first picture. Not to worry about the practicality of the effort, consider this an exercise.
In reply to # 2749195 by Rick Fawthrop
Don't restore the car.

79powerwagon
Eric L
|
Jul 22, 2014 08:00 PM
Joined 10 years ago
1,331 Posts
|
It's a perfect medium to practice your welding, hammer-n-dolly-ing, and even painting if you like! We all should be so lucky to have access to a junker of the same model we want to restore!
Go for it! Just understand that all the money spent is gone, no returns. But you WILL have an inexpensive education (relatively speaking) and HUGE bragging rights!
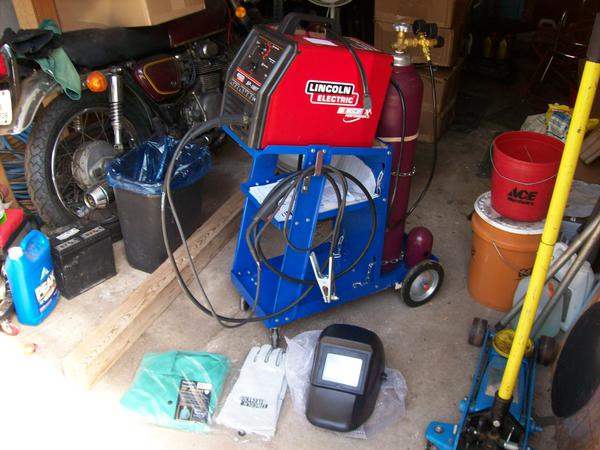
several years back, I did the same thing essentially, and bought this to learn with! It's long gone now, but I'm considering getting another!
Go for it! Just understand that all the money spent is gone, no returns. But you WILL have an inexpensive education (relatively speaking) and HUGE bragging rights!
several years back, I did the same thing essentially, and bought this to learn with! It's long gone now, but I'm considering getting another!
Attachments:
100_0328.jpg 49.4 KB
|
kalexander
Kurtis Alexander
|
Topic Creator (OP)
Jul 22, 2014 08:19 PM
Joined 12 years ago
255 Posts
|
Thanks for the support Eric. So far I got my monies worth out of the car in parts, what remains will be worth as much in scrap either way. It is a bit sad though, some how the all the rear panels in this car are in perfect condition, despite the other issues. I might be able to reuse some of it later.
Rick, you are right that I was hoping there was an easier way, but I'll take what I can get. How big of a bit do I need to use to get the whole spot weld? Are they fairly uniform in size? I do find that if I use a paint strip wheel on the metal strip for a while, the welds seem to stand out a bit. They are probably harder than the surrounding metal.
Rick, you are right that I was hoping there was an easier way, but I'll take what I can get. How big of a bit do I need to use to get the whole spot weld? Are they fairly uniform in size? I do find that if I use a paint strip wheel on the metal strip for a while, the welds seem to stand out a bit. They are probably harder than the surrounding metal.
|
Jul 22, 2014 08:29 PM
Top Contributor
Joined 12 years ago
14,642 Posts
|
|
The spot welds are usually uniform in size. I just try a couple of bits until I find the right size. Eastwood seems to like 3/8" - they have a bunch of bits in that size for drilling spot welds. Even Harbor Freight has a specialty bit cheap. 
http://t.harborfreight.com/catalogsearch/result?q=spot+weld+drill+bit
http://t.harborfreight.com/catalogsearch/result?q=spot+weld+drill+bit
|
Jul 22, 2014 08:52 PM
Top Contributor
Joined 17 years ago
18,541 Posts
|
|
I long ago gave up on spot weld cutters. Buy some good 1/8" drill bits (I buy them by the dozen from a machine shop supply establishment )
Drill the 1/8" hole through the top panel. Really just a deep dimple.
Now, use a 5/16" inch drill bit that you reground to have a flatter tip. Its not hard to do on the grinding wheel.
Now use the flat tip drill bit to chase down the 1/8" pit that you made. You will feel it stop when it hits the bottom. That should be enough to remove the welded spot.
I use a scotchbrite pad on the air die grinder to locate spot welds. In a heavily rusted area, they can be hard to find. Trust me,after you do a few thousand, they get easier to spot. Keep in mind that once you find a few, they tend to have the same spacing between them.
You can also just use a grinding stone or wheel and grind out the spotweld. A lot of people like this method over the drill.
In any case, you will need a thin chisel to do the final separation. I use a wood chisel. If the underlying piece of petal is thicker than the one you are removing, an air chissel comes in handy.
 |
Jul 23, 2014 07:11 AM
Joined 11 years ago
666 Posts
|
|
kalexander
Kurtis Alexander
|
Topic Creator (OP)
Jul 23, 2014 09:14 AM
Joined 12 years ago
255 Posts
|
Roger, I've thought about that, with as good as the extremities are on the car, it would be nice to try and save it. There is a guy I work with who has a tube frame Chevy Nova he did that way, it looks great. He just gutted the car completely and reused only the external panels. I'd love to try that someday.
In reply to # 2749526 by mimssandi
I got a race car that looked like that. They just pop riveted in really thin aluminum panels and relied on the roll cage to keep the car together. Might be cheaper to go that route.

owensdad74
Brian Morse
Ann Arbor, MI, USA
Sign in to contact
|
Jul 23, 2014 04:04 PM
Joined 12 years ago
2,470 Posts
|
And I would advise against asking what the weld spacing should be after you have drilled them out and welded in new material.
Long story, and for once it isn't about me!
"And then I remembered what they said about old British Engines, if there ain't no oil under 'em, there ain't no oil in 'em." Tow Mater
Long story, and for once it isn't about me!
In reply to # 2749242 by refisk
The spot welds are usually uniform in size. I just try a couple of bits until I find the right size. Eastwood seems to like 3/8" - they have a bunch of bits in that size for drilling spot welds. Even Harbor Freight has a specialty bit cheap.
http://t.harborfreight.com/catalogsearch/result?q=spot+weld+drill+bit
http://t.harborfreight.com/catalogsearch/result?q=spot+weld+drill+bit
"And then I remembered what they said about old British Engines, if there ain't no oil under 'em, there ain't no oil in 'em." Tow Mater

littlecars
David Bassett
Nashville, TN, USA
Sign in to contact
1963 Chevrolet Corvair "Cheeto!"
1965 Chevrolet Corvair "Ski Team Transport SOLD!" 1965 MG Midget MkII "Buffoon --- SOLD!!!" 1966 MG Midget MkII "Swiss Cheese...SCRAPPED" & more |
Jul 23, 2014 04:48 PM
Top Contributor
Joined 12 years ago
8,388 Posts
|
In reply to # 2749242 by refisk
The spot welds are usually uniform in size. I just try a couple of bits until I find the right size. Eastwood seems to like 3/8" - they have a bunch of bits in that size for drilling spot welds. Even Harbor Freight has a specialty bit cheap.
http://t.harborfreight.com/catalogsearch/result?q=spot+weld+drill+bit
http://t.harborfreight.com/catalogsearch/result?q=spot+weld+drill+bit
x2 Rick. The Eastwood catalog has a multitude of restoration supplies and the bits designed for spot welds make easy work of the rows of welds on an automobile.
Some of Eastwood's stuff seems to sell for inflated prices compared to other auto suppliers, but these bits can't often be found at your corner hardware store or Grainger.
Forums 
Having trouble posting or changing forum settings?
Read the Forum Help (FAQ) or contact the webmaster
