
T-Series & Prewar Forum
To remove the Radiator on a TF
Posted by Eddie Buckley


|
|
Topic Creator (OP)
Sep 29, 2016 06:11 AM
Joined 8 years ago
399 Posts
|
Sorry to return to this subject. I made a meal of replacing my Rad slats some of which have now come loose. I 'm trying to get the time/ energy/space to remove the wings/side sheets etc. Before I start I looked at the WSM. page 94 sect DD.
The section makes no mention of removing the side sheets or wings. The relevant bits are:-
1) "remove the 2 set bolts screwing into captive nuts in the radiator grill at each side, accessible below the wings. " These are not accessible below the wings but just might be accessible from the engine compartment?????
2) "Unscrew and remove the nuts below the radiator securing it to the front cross-member" Again this might just be possible but they are close to the rack.
3) " the shell and raditor block will then come away together"
In my case all the bolts mentioned above are newly replaced and should come out without difficulty.
If the Radiator comes out without the shell presumably I can gain enough access to refix the slats....?
Anyone done this ? can it be done or not????
Eddie
|
Buckdendave
David Hill
|
Sep 29, 2016 07:30 AM
Top Contributor
Joined 10 years ago
3,971 Posts
|
 |
Sep 29, 2016 07:48 AM
Top Contributor
Joined 16 years ago
15,543 Posts
|
In reply to # 3363939 by Eddie Buckley
1) "remove the 2 set bolts screwing into captive nuts in the radiator grill at each side, accessible below the wings. " These are not accessible below the wings but just might be accessible from the engine compartment?????
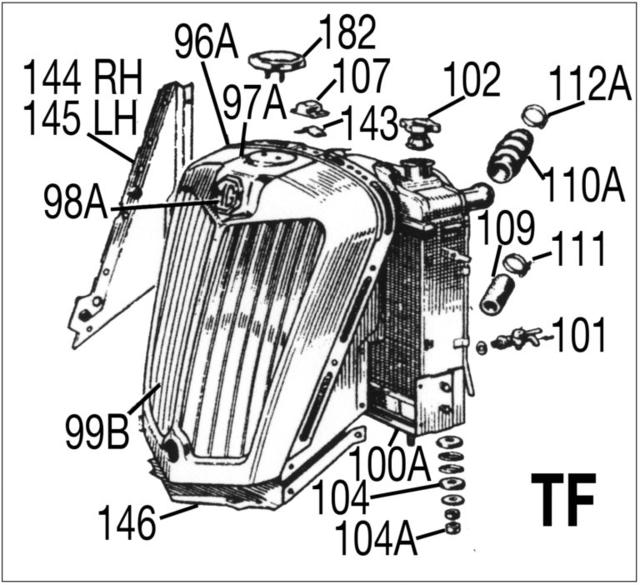
A better description might be" inside the wings". There are two bolts.....assuming everything is correct..... that pass through the wing, side panel and grille shell into the radiator side plate assembly...... part 144 and 145 in this image.
You can not remove the shell from the radiator unless you remove the shell along with the radiator due to the fact that there are several hidden fixing screws that secure the shell the side plates that are not accessible as they are covered by the side panels. The lower radiator mounting studs are a pain but the nuts can be removed with patience and a little blood shed. Once you have the entire assembly out of the car you can remove the shell from the radiator. I would suggest that you loosen the side panel bolts and the wing cross brace bolts, as they will be squeezing the radiator assembly. It will make the installation much easier.
2) "Unscrew and remove the nuts below the radiator securing it to the front cross-member" Again this might just be possible but they are close to the rack.
3) " the shell and raditor block will then come away together"
In my case all the bolts mentioned above are newly replaced and should come out without difficulty.
If the Radiator comes out without the shell presumably I can gain enough access to refix the slats....?
Anyone done this ? can it be done or not????
Eddie
1) "remove the 2 set bolts screwing into captive nuts in the radiator grill at each side, accessible below the wings. " These are not accessible below the wings but just might be accessible from the engine compartment?????
A better description might be" inside the wings". There are two bolts.....assuming everything is correct..... that pass through the wing, side panel and grille shell into the radiator side plate assembly...... part 144 and 145 in this image.
You can not remove the shell from the radiator unless you remove the shell along with the radiator due to the fact that there are several hidden fixing screws that secure the shell the side plates that are not accessible as they are covered by the side panels. The lower radiator mounting studs are a pain but the nuts can be removed with patience and a little blood shed. Once you have the entire assembly out of the car you can remove the shell from the radiator. I would suggest that you loosen the side panel bolts and the wing cross brace bolts, as they will be squeezing the radiator assembly. It will make the installation much easier.
2) "Unscrew and remove the nuts below the radiator securing it to the front cross-member" Again this might just be possible but they are close to the rack.
3) " the shell and raditor block will then come away together"
In my case all the bolts mentioned above are newly replaced and should come out without difficulty.
If the Radiator comes out without the shell presumably I can gain enough access to refix the slats....?
Anyone done this ? can it be done or not????
Eddie
Attachments:
chassis1-1-768x702.jpg 62.8 KB
 Cleveland, TN, USA
Sign in to contact
|
Sep 30, 2016 05:00 AM
Top Contributor
Joined 9 years ago
894 Posts
|
Done it several times. Two bolts to captive nuts on that go through the front wings and side panels, tow nuts on the bottom , through the frame cross member (much easier to access these with horns removed, and two bolts securing the steading rods to the top of the radiator. After removing these, the radiator and shell can be lifted up and out.
Archie (Scott) McAllister
1955 MG TF1500
1968 Austin Healey Sprite
1963 Austin Healey 3000
Archie (Scott) McAllister
1955 MG TF1500
1968 Austin Healey Sprite
1963 Austin Healey 3000
|
Cleveland, TN, USA
Sign in to contact
|
Sep 30, 2016 05:18 AM
Top Contributor
Joined 9 years ago
894 Posts
|
Forgot to mention that I unbolt the thermostat housing at the block, leaving connected to hose and radiator. My engine was moved forward a bit when I installed the 5spd transmission kit, so the top hose is almost impossible to install. This makes it much easier.
Archie (Scott) McAllister
1955 MG TF1500
1968 Austin Healey Sprite
1963 Austin Healey 3000
Archie (Scott) McAllister
1955 MG TF1500
1968 Austin Healey Sprite
1963 Austin Healey 3000
|
Cleveland, TN, USA
Sign in to contact
|
Sep 30, 2016 07:47 AM
Top Contributor
Joined 9 years ago
894 Posts
|
Just looked at mine again and realized there are two more bolts to take off - one on each side that attaches the front of the side panel to the top of the radiator. Also forgot to mention that I cut my side panels at the fender line (lots of other folks have also done this), which allows easy removal of just the top portion of the panel and much better access to the engine bay.
Archie (Scott) McAllister
1955 MG TF1500
1968 Austin Healey Sprite
1963 Austin Healey 3000
Archie (Scott) McAllister
1955 MG TF1500
1968 Austin Healey Sprite
1963 Austin Healey 3000
Attachments:
DSCF1828.JPG 40.6 KB
|
|
Topic Creator (OP)
Sep 30, 2016 10:28 AM
Joined 8 years ago
399 Posts
|
Archie, its a completely different exercise if you have previously split your side sheets.. I recently had a thread on the splitting operation
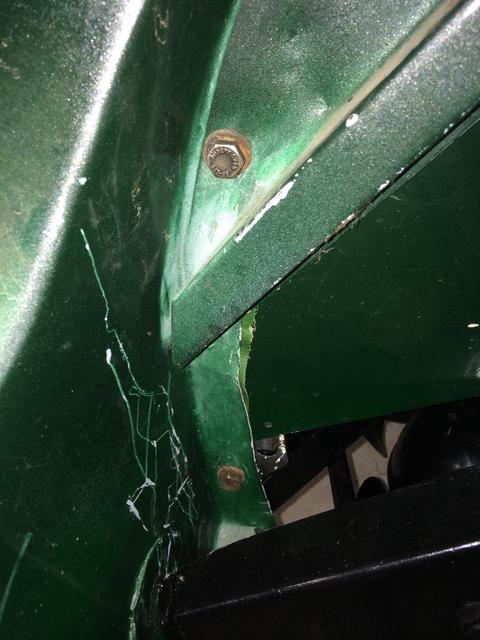
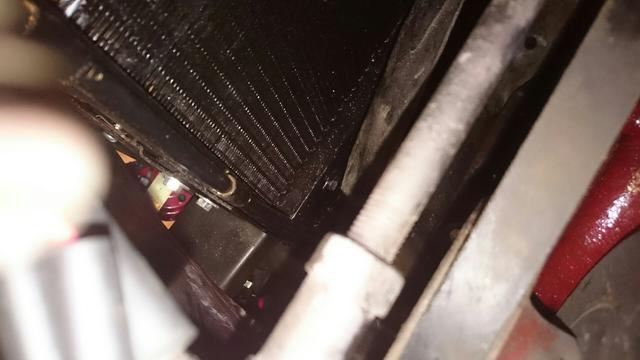
But apart from that i 'm confused. there are absolutely no bolts in my car that hold the Rad in place and that are accessible under the wings.
The picture under the wing confirms that. The other picture shows the 2 new plated bolts that hold the bottom bracket into the radiator surround. however I would have expected to take them out thereby leaving items 144 and145 in the car.... after I have taken out the 2 bolts on the top of the crossmember
Or am I missing something
Eddie
|
|
Sep 30, 2016 12:02 PM
Top Contributor
Joined 16 years ago
15,543 Posts
|
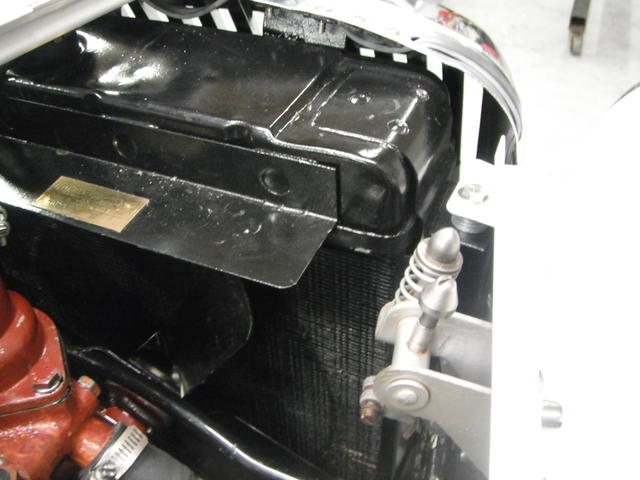
I can only suspect that you are trying to remove the radiator and leave pieces 144,145 and 146 in place? I just don't see that as a possibility if thats where you were headed. I went out and took a few pictures that may or may not help. The first three show the position of the two bolt holes on the wing that I and others have been talking about. I see that I was mistaken as the lower bolt only passes through the wing while the upper one passes through both the wing and the side panel. The last photo shows what the entire assembly would look like when removed....just as it presently is on my TF.
Attachments:
IMG_6972.JPG 43.7 KB
|
Cleveland, TN, USA
Sign in to contact
|
Sep 30, 2016 02:08 PM
Top Contributor
Joined 9 years ago
894 Posts
|
X2 on LaVerne's comment. Parts 144, 145. 146 come out with the radiator and shell. In Laverne's last photo, the front splash pan is still attached to the radiator and shroud assembly. I took the pan off prior to removing the radiator. If you plan to leave in place on the car, there are two more 1/4" bolts to remove. These go through the splash pan and into part 146. There are two more bolts and nuts on each side of the pan (seen in the photo) that go into the very front of the front wings. These do not have to be removed if the pan is staying on the car. May seem like a lot, but a lot less hassle than removing the wings, in my opinion.
Archie (Scott) McAllister
1955 MG TF1500
1968 Austin Healey Sprite
1963 Austin Healey 3000
Archie (Scott) McAllister
1955 MG TF1500
1968 Austin Healey Sprite
1963 Austin Healey 3000
|
|
Topic Creator (OP)
Oct 1, 2016 05:47 AM
Joined 8 years ago
399 Posts
|
Sorry about the absence of photos.... finger trouble.
is it not the case that the radiator can be removed on its own by removing the 4 side bolts as shown on my pics, the 2 bolts that go through the cross member and various hoses and supports at the top of the radiator.
Is the workshop manual wrong. I can see the difficulty in reaching the 4 side bolts. If it can be done surely is much less trouble/effort/time/risk of damage to loose wings, runningboards etc
Eddie thanks for your continued input
|
Cleveland, TN, USA
Sign in to contact
|
Oct 1, 2016 06:36 AM
Top Contributor
Joined 9 years ago
894 Posts
|
The two times I did this, I took the entire assembly out as one unit. Once out, it is much easier to remove and front chrome shell and access the slats. My situation is definitely a bit easier now that I have removable upper side panels, but once you remove all of the fasteners the entire assembly will rock fore and aft a good bit and you should be able to clear the tabs where the side panels bolt to the radiator. If you cannot tilt the radiator assembly far enough forward to clear the tabs, the side panels may deflect far enough to the side to clear. It is certainly worth a try, prior to removing the front wings.
Archie (Scott) McAllister
1955 MG TF1500
1968 Austin Healey Sprite
1963 Austin Healey 3000
Archie (Scott) McAllister
1955 MG TF1500
1968 Austin Healey Sprite
1963 Austin Healey 3000

Charles94
Chip Long
|
Oct 4, 2016 06:58 AM
Top Contributor
Joined 11 years ago
1,185 Posts
|
|
Cleveland, TN, USA
Sign in to contact
|
Oct 4, 2016 08:25 AM
Top Contributor
Joined 9 years ago
894 Posts
|
Forums 
Having trouble posting or changing forum settings?
Read the Forum Help (FAQ) or contact the webmaster
