
MG Magnette Forum
Help on installing the choke cable on a ZB Magnette
Posted by mcquaid


mcquaid
James Jans
|
Topic Creator (OP)
Dec 13, 2017 12:29 AM
Top Contributor
Joined 12 years ago
570 Posts
|
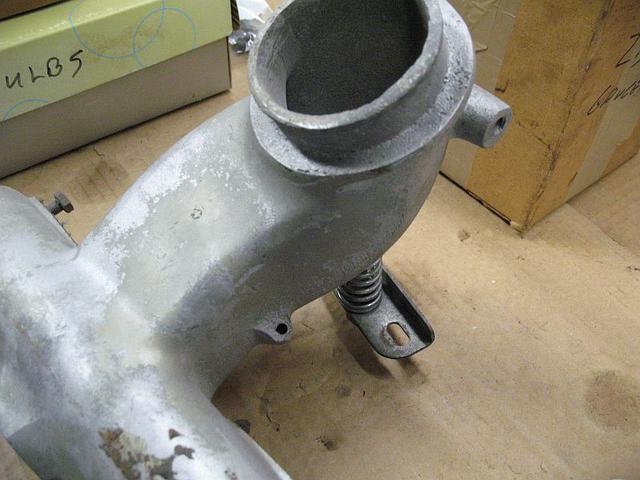
Help ! I can't figure out how and where the choke cable gets attached to the intake manifold on a 1958 ZB. There is a small boss on the side of the manifold in front of the rear SU carburetor that the cable housing fits into? But there is no hole for the cable to go in and attach to the linkage down below. Do I drill it out or am I in the wrong spot?
Thanks
Jim Jans
'58 ZB
Hood River, OR
Edited 1 time(s). Last edit at 2017-12-18 02:26 PM by mcquaid.
Thanks
Jim Jans
'58 ZB
Hood River, OR
Edited 1 time(s). Last edit at 2017-12-18 02:26 PM by mcquaid.
 |
Dec 13, 2017 10:03 AM
Top Contributor
Joined 22 years ago
17,550 Posts
|
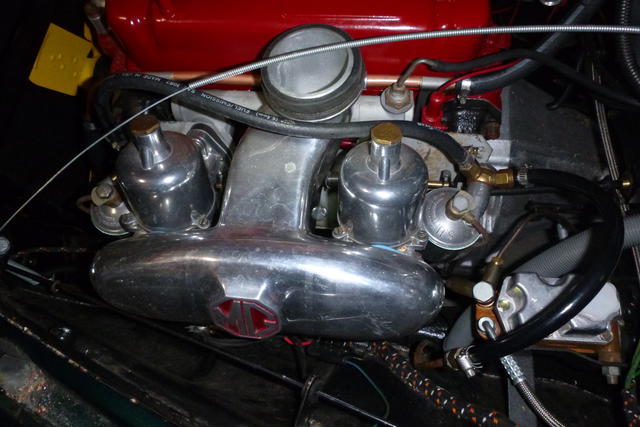
Jim, I have one of those rare plenums with the MG embossed on it. Most ZBs did not come with that MG on them. Here's what mine looks like. The cable sheath lands in the boss and the cable itself continues on down to the choke linkage. If the boss is there then maybe the hole is plugged up.
 Verdigris, OK, USA
Sign in to contact
|
Dec 13, 2017 11:16 AM
Top Contributor
Joined 18 years ago
1,237 Posts
|
the Magnette is buried in stuff right now, so I can't take a look.
But.
If I remember correctly, the outer sheath of the choke cable butts up against the tab on the air plenum, the inner cable goes thru the hole and attached to the brass links between the carbs (in the lower left corner of you picture.) There should be a trunnion there to attache the cable.
Lann
Lann Mauck
Three Main LLC
Desktop Badge Bars and other odds and ends
www.ThreeMainLLC.com
Member Services:
Desk Top Badge Bars, GT Spare Tire Cover Strut Kits, Dipstick Toppers and other odds and ends.
58ZBMITCH thanked LannM for this post
|
mcquaid
James Jans
|
Topic Creator (OP)
Dec 13, 2017 12:35 PM
Top Contributor
Joined 12 years ago
570 Posts
|
Wray: Thank you for the photo, it helped out a lot. I was able to ream out the plugged hole and not worry about screwing something up. The cable is now installed correctly, on to the next little project.
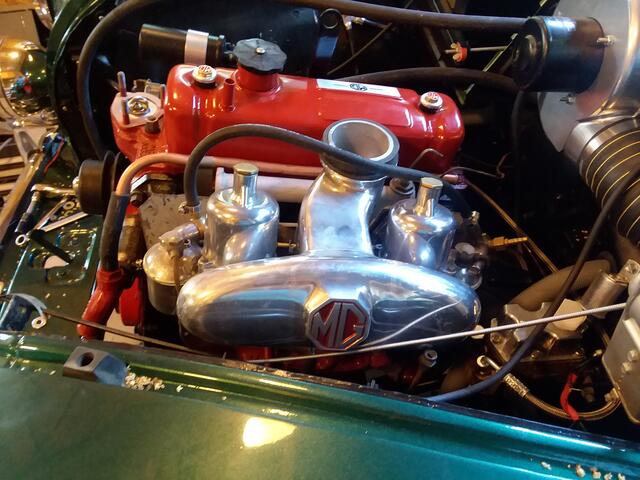
My original plenum did not have the MG logo on it. I took a ZA plenum and cut the MG logo out and welded it to the ZB plenum and then buffed it to its shiny finish.
Lann: I had miss placed the trunnion / stop assy cable w/nut & washer, so I ordered the missing parts from Moss Motors.
Thanks for all your help, I am slowly getting all the loose ends tied up.
Jim Jans
'58 ZB
Hood River, OR
Edited 1 time(s). Last edit at 2017-12-13 12:45 PM by mcquaid.
|
|
Dec 13, 2017 01:09 PM
Top Contributor
Joined 22 years ago
17,550 Posts
|
Jim, I would have never thought that looking at your plenum. I knew the ones for H4 carbs existed but finally ran across one years ago. It's been sitting in the bead blast cabinet for a long time. I might put it on the car when I pull the carbs to put a gasket kit in and the Teflon O-rings on the jets.
 |
Dec 13, 2017 03:32 PM
Joined 10 years ago
1,224 Posts
|
Wray and Lann, XactaMundo. You are Correct. GraciaZ Wray, for the Pictures!!
I See You Used Your Early XMAS Find as a Prop for the Plenum.
I Purchased Mine thru Kelvin, Years ago.
I Just spoke w/Jimmy, Trunnion ordered.
I had the Same Difficulty, I Replaced the 5/16" Bolts, Securing the Plenum w/Studs.......
And the Trunnion is STILL a Bugger to Hook-Up.
Michael/Kemosabe.
PS: That Trunnion is (Similar) Purchase able at NAPA Auto Parts Store,
I Believe it is Used on VW's, Called a Cable Stop.
|
|
Dec 13, 2017 05:13 PM
Top Contributor
Joined 22 years ago
17,550 Posts
|
 |
Dec 15, 2017 01:41 PM
Top Contributor
Joined 17 years ago
20,008 Posts
|
If you don't want to stay original, you could always steal one from an MGB. Moss part 372-340. Air cleaner bracket with choke cable arm.
jeff@advanceddistributors.com
jeff@advanceddistributors.com
about 5 years and 1 month later...

Wizard32
Tony Schapendonk
|
Jan 17, 2023 03:07 AM
Joined 7 years ago
18 Posts
|
Hi Guys,
Could someone point me in the right direction please.
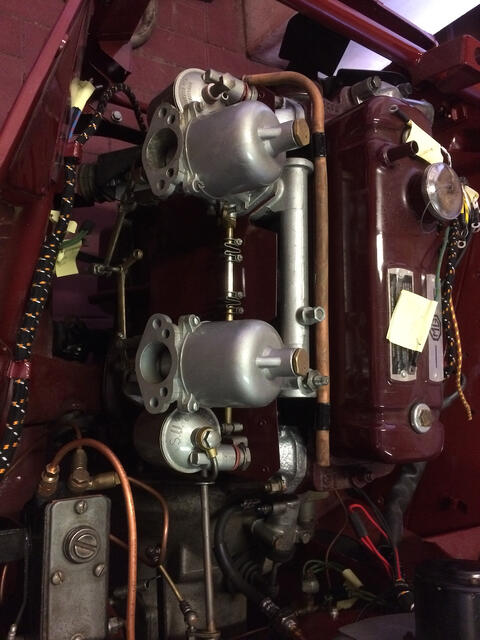
The brass levers that enable the choke to work (see photo P1020057 above) work in such a way that when you pull the choke knob, the cable through the plenum pulls up the centre of the 2 levers, and pivots at a fixed point, and can then then pull down the jet.
As I understand it, the adjustment should be that when warmed up, no pull down of the jet is required.
I am having problems sorting out the holes in the levers.
The holes on mine are elongated, and I do not know if this is through wear, or if it is supposed to be like that.
Am I correct in saying that on a cold start, the levers pull out the needle slightly, and once warmed up and the gradually choke pushed in, the needle does not move again, but the butterfly takes over, hence no need for slotted holes.
I cannot find any posts or videos of how to do this, but hopefully you can point me in the right direction.
From Australia that's probably straight up (sorry)
Tony Schapendonk
Could someone point me in the right direction please.
The brass levers that enable the choke to work (see photo P1020057 above) work in such a way that when you pull the choke knob, the cable through the plenum pulls up the centre of the 2 levers, and pivots at a fixed point, and can then then pull down the jet.
As I understand it, the adjustment should be that when warmed up, no pull down of the jet is required.
I am having problems sorting out the holes in the levers.
The holes on mine are elongated, and I do not know if this is through wear, or if it is supposed to be like that.
Am I correct in saying that on a cold start, the levers pull out the needle slightly, and once warmed up and the gradually choke pushed in, the needle does not move again, but the butterfly takes over, hence no need for slotted holes.
I cannot find any posts or videos of how to do this, but hopefully you can point me in the right direction.
From Australia that's probably straight up (sorry)
Tony Schapendonk
|
|
Jan 17, 2023 09:32 AM
Top Contributor
Joined 22 years ago
17,550 Posts
|
Tony, the elongated holes are by design in the linkage so nothing wrong there. The choke works pretty much as you describe, but, the cable pulls the jet down, not the needle, enriching the mixture. When the engine is warmed up the choke is pushed back in, the jet tube goes up and everything is good to go.
I've always fought leaks through the jet bearing and have never gotten the cork seals to work well. I ended up replacing that assembly with the Superdry jet bearing kit and that was the last of messing with cork seals and leaking jet bearings.
I've always fought leaks through the jet bearing and have never gotten the cork seals to work well. I ended up replacing that assembly with the Superdry jet bearing kit and that was the last of messing with cork seals and leaking jet bearings.
 |
Jan 17, 2023 11:21 AM
Top Contributor
Joined 6 years ago
889 Posts
|
Tony,
As Wray says, some of the joints are bigger than needed. Not all. You need to adjust the linkage between both levers so that both jets are pulled equally when you pull the cable. I check this by pulling the piece were the cable connects by hand and watch.
First you pull out the free play and doing so the cam for the fast idle should open the throttle plates. The jets should not move yet! Only after few mm the jets should start to be pulled down equally.
Also check that they go fully bak in when you release the chocke. Then check that the fast idle screw is free from the cam. Thus only your throttle adjustment screw define idle.
Simon
Edit: the free play is in the hole(s) were the short bracket(s) attaches to on either side, the others should have not too much slack. Unfortunately both pics don´t show the fast idle attached yet...
Edited 2 time(s). Last edit at 2023-01-17 11:50 AM by simon8.

Ian Williams
Ian W
Chipping Longjourney, Toofarupnorth, UK
Sign in to contact
|
Jan 18, 2023 12:12 PM
Top Contributor
Joined 8 years ago
4,076 Posts
|
|
mcquaid
James Jans
|
Topic Creator (OP)
Jan 18, 2023 05:25 PM
Top Contributor
Joined 12 years ago
570 Posts
|
Wray: I did not notice your remark from post #2 on Dec 13, 2017 about the MG on the manifold. And yes the hole was plugged.
I had both a ZA with “MG” logo with the smaller SU manifold inlet and the original ZB larger manifold without the “MG” logo. So my brother who owns a machine shop cut the “MG” off the ZA manifold and TIG welded it on to the ZB manifold and then we buffed it. If you look very close you can see some swirl marks. At the time I did not know that some ZBs had the MG logo and most did not. After seeing the ZA manifold with the "MG" I thought I needed one, so John helped out his little brother.
Jim
'58 ZB
Hood River, OR
Edited 2 time(s). Last edit at 2023-01-18 05:45 PM by mcquaid.
Attachments:
20170825_160036 (1).jpg 58.9 KB
|
|
Jan 18, 2023 08:33 PM
Top Contributor
Joined 22 years ago
17,550 Posts
|
Forums 
Having trouble posting or changing forum settings?
Read the Forum Help (FAQ) or contact the webmaster
