
MGB & GT Forum
GT Carpet Set and interior - where do pieces go?
Posted by AGlass0fMilk


AGlass0fMilk
Don Beckstein
|
Topic Creator (OP)
Jul 3, 2015 12:08 PM
Joined 11 years ago
416 Posts
|
Hello!
I'm currently installing a Moss Motors carpet set (unmolded) in my 1973 MGB GT. I have gotten most of the front pieces installed successfully but there are some pieces I have no idea where they go!
I received the car with the interior stripped down and I've never disassembled a GT before so the hatch area and all the headliner panels are a mystery to me.
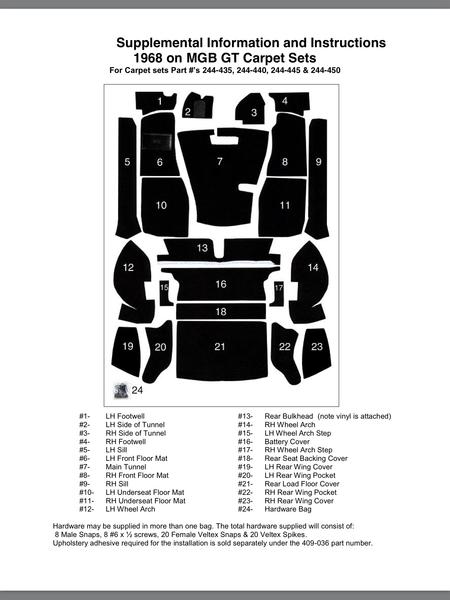
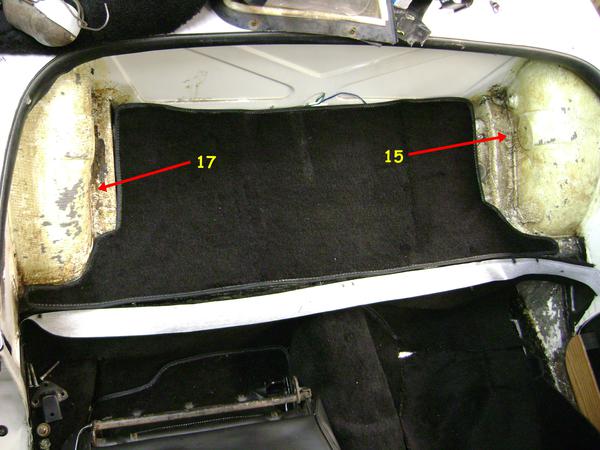
Anyone know/can describe/has pictures of where numbers 15 and 17 through 23 in the attached picture should be installed? Does the big rear deck piece (21) go on top of the rear deck lid or on the metal floor? Should it be glued or snapped?
Also, if anyone has detailed pictures showing original configurations of the GT rear seat and the hatch area, how those are secured/mounted, along with how seat belts are mounted and how all the headliner panels fit together, please post those as well!
I'll probably be using this thread to get more information about little vinyl pieces and other GT interior parts that I have no idea where they are supposed to be.
Thanks for any information!
Happy Fourth of July! Enjoy the weekend.
1980 MGB Limited Edition (Car No. 2744)
"If anything's gonna happen it's gonna happen out there!"
I'm currently installing a Moss Motors carpet set (unmolded) in my 1973 MGB GT. I have gotten most of the front pieces installed successfully but there are some pieces I have no idea where they go!
I received the car with the interior stripped down and I've never disassembled a GT before so the hatch area and all the headliner panels are a mystery to me.
Anyone know/can describe/has pictures of where numbers 15 and 17 through 23 in the attached picture should be installed? Does the big rear deck piece (21) go on top of the rear deck lid or on the metal floor? Should it be glued or snapped?
Also, if anyone has detailed pictures showing original configurations of the GT rear seat and the hatch area, how those are secured/mounted, along with how seat belts are mounted and how all the headliner panels fit together, please post those as well!
I'll probably be using this thread to get more information about little vinyl pieces and other GT interior parts that I have no idea where they are supposed to be.
Thanks for any information!
Happy Fourth of July! Enjoy the weekend.
1980 MGB Limited Edition (Car No. 2744)
"If anything's gonna happen it's gonna happen out there!"
Attachments:
image.jpg 36.1 KB

|
AGlass0fMilk
Don Beckstein
|
Topic Creator (OP)
Jul 3, 2015 12:53 PM
Joined 11 years ago
416 Posts
|

curtis7420
Curtis Wright
University City, MO, USA
Sign in to contact
|
Jul 3, 2015 03:57 PM
Joined 12 years ago
4,032 Posts
|

leapfrog
Mark Smith
|
Jul 3, 2015 10:45 PM
Joined 16 years ago
508 Posts
|
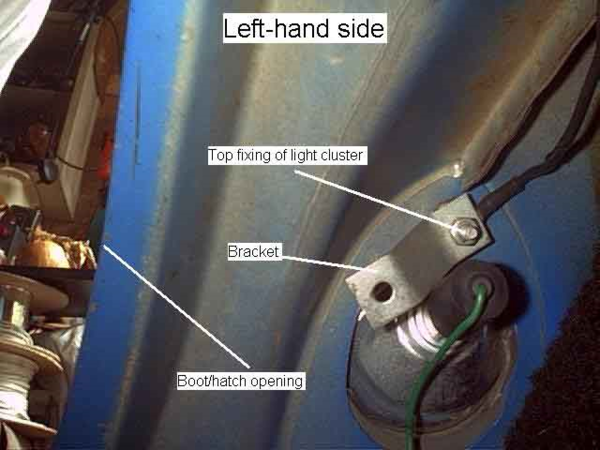
For #20 and #22 they use a bracket and a push-in plastic snap on the tail lamp housing to hold the carpet up. #21 has two snaps only, up by the rear seat back.
Edited 1 time(s). Last edit at 2015-07-03 10:49 PM by leapfrog.
Edited 1 time(s). Last edit at 2015-07-03 10:49 PM by leapfrog.
Attachments:
Attaching bracket.png 326.6 KB
|
AGlass0fMilk
Don Beckstein
|
Topic Creator (OP)
Jul 6, 2015 12:42 PM
Joined 11 years ago
416 Posts
|
One more question.
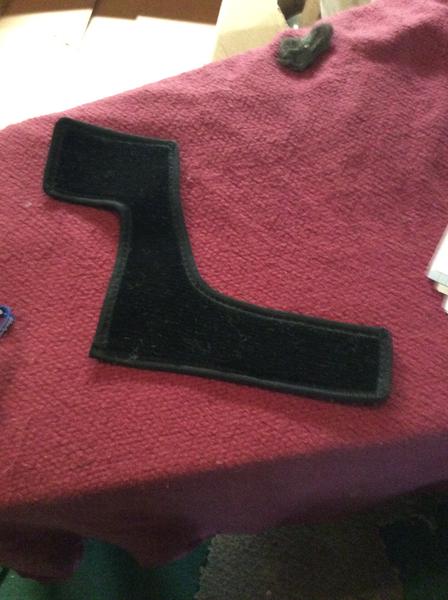
I found an unlisted piece among the contents of my kit.
I have attached a picture of it.
Where does it go?
1980 MGB Limited Edition (Car No. 2744)
"If anything's gonna happen it's gonna happen out there!"
I found an unlisted piece among the contents of my kit.
I have attached a picture of it.
Where does it go?
1980 MGB Limited Edition (Car No. 2744)
"If anything's gonna happen it's gonna happen out there!"
Attachments:
image.jpg 35.9 KB
 |
Jul 6, 2015 01:32 PM
Joined 9 years ago
434 Posts
|
In reply to # 3030775 by AGlass0fMilk
I found an unlisted piece among the contents of my kit.
I have attached a picture of it.
Where does it go?
If you applied parts 1-4, you don't need the extra part.
I have attached a picture of it.
Where does it go?
The older cars originally had rubber mats on the floor and glued to the tunnel.
If you kept the rubber glued to the tunnel, this fit around it as "finishing" piece.
|
AGlass0fMilk
Don Beckstein
|
Topic Creator (OP)
Jul 7, 2015 03:21 PM
Joined 11 years ago
416 Posts
|
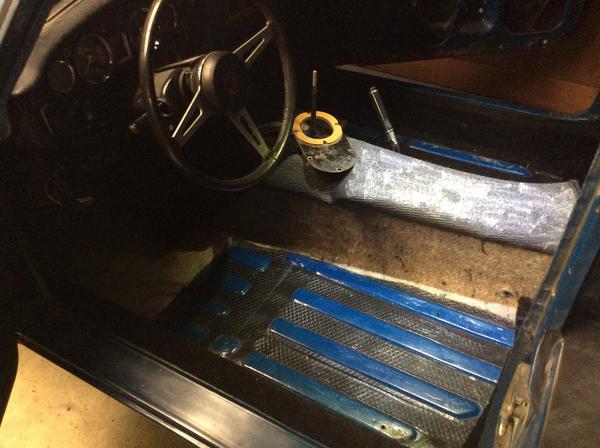
I'm done with the front carpet for the most part!
I first installed the sound deadening boards that came from British Motor Heritage. They don't look OE, but they felt better and the set was complete, very easy to install with its own adhesive backing, and the interior is definitely starting to not sound like a tin can when you close the door!
They looked good all by themselves but the car causes less scratches and bruising with carpets. I included a picture of them. I'll post more pictures of the front carpet later
Installing snaps wasn't as hard as I thought it'd be, the front floor mats went down nicely.
Wheel arches were a PITA but they look decent on parts that will be exposed. The back seat should help hide any minor wrinkles I didn't get out. Once these are done the rest is very easy
The felt backing that came with the carpet set is very thick and should kill some noise and keep a bit of heat out from the drivetrain.
I installed rubber grommets on the wiring harness where they come through the body, just look at a local hardware store and you should find suitable grommets.
The tunnel carpet required some cutting, it looks good with the plastic center console on it. My assistant put their side (passenger side) on a little cocked so the handbrake opening is a bit off, but it will be mostly hidden by the seat anyway and there are no wrinkles so it should be fine. Have to blame someone else
The under seat carpet was surprisingly easy to install. I laid it out where I wanted it, dry fitted all the other parts in front of it and then punched an awl through the seat mounting holes. I used a bit of auto masking tape so it would stand out a bit better. I then carefully pulled it back and glued one side on, then the other half. Stuck he awl through the marked holes again and then cut out the holes for them.
I found this method the easiest to cut holes in the carpet for seat belt bolts, bolts, wiring holes, and even the battery cutoff switch:
Get a few short pieces of copper tubing in various sizes from 3/8" to 1". Secure the pipe in a pair of vice grips. Use a propane torch to heat the pipe up until it's very hot and then carefully use the hot copper pipe to burn a hole in the carpet where the bolt hole is. Make sure it's as centered as possible for a good finished look. This keeps the carpet from fraying and is much easier and faster than cutting with scissors or a razor.
I don't know if I have to cut slots for the rails so I just burnt holes for the seat bolts right now. Maybe a hot metal pizza cutter would be good for the slots
All that's left is the passenger footwell side panels. I don't know how the one piece on the tunnel is supposed to go. Doesn't seem to fit anywhere because of the footwell light.
And the rear carpet is still going to be a pain. I have to retouch and trim the wheel arches and then install the rest of the rear carpet.
Since I didn't disassemble the GT, can anyone provide me with pictures of how the rear seat and the rear deck are mounted to the car? And also the seatbelts! How many seatbelts are there?
I have the original Kangol Reflex belts and they are in decent shape, they just won't rewind themselves and they are constantly locked. I'm thinking about rebuilding them (I saw a thread on another forum detailing this process, but if they aren't gonna be safe I'll replace them. Might as well try)
And one more question: does anyone have experience with vinyl and fabric paint? I like the all black interior so far and I'm using all the original trim for now as a lot of it is in decent condition. The interior was originally Ochre so I'm thinking about painting the yellow bits black with this stuff. Let me know your experiences with it and what you suggest. I'll probably run with it yellow until I get tired of that combination. It's a very 70s color scheme and I like originality
Anyone interested in trading interior parts? My ochre for your black? I'd hate to ruin stuff that might be unique and NLA.
1980 MGB Limited Edition (Car No. 2744)
"If anything's gonna happen it's gonna happen out there!"
Attachments:
image.jpg 40.4 KB
|
AGlass0fMilk
Don Beckstein
|
Topic Creator (OP)
Jul 8, 2015 04:50 PM
Joined 11 years ago
416 Posts
|
Bump.
Can anyone answer these questions?
I'll keep searching.
Thanks
1980 MGB Limited Edition (Car No. 2744)
"If anything's gonna happen it's gonna happen out there!"
Can anyone answer these questions?
In reply to # 3031795 by AGlass0fMilk
Since I didn't disassemble the GT, can anyone provide me with pictures of how the rear seat and the rear deck are mounted to the car? And also the seatbelts! How many seatbelts are there?
does anyone have experience with vinyl and fabric paint?
Anyone interested in trading interior parts? My ochre for your black? I'd hate to ruin stuff that might be unique and NLA.
does anyone have experience with vinyl and fabric paint?
Anyone interested in trading interior parts? My ochre for your black? I'd hate to ruin stuff that might be unique and NLA.
I'll keep searching.
Thanks
1980 MGB Limited Edition (Car No. 2744)
"If anything's gonna happen it's gonna happen out there!"
|
AGlass0fMilk
Don Beckstein
|
Topic Creator (OP)
Jul 8, 2015 07:38 PM
Joined 11 years ago
416 Posts
|
I figured out how seatbelts go in. I forgot to make a hole for the threaded hole near the inner sill rail.
I'd still like a few pictures that detail how the headliner panels go in and how the front/back seats are mounted as well as the rear deck! Thanks guys!
1980 MGB Limited Edition (Car No. 2744)
"If anything's gonna happen it's gonna happen out there!"
I'd still like a few pictures that detail how the headliner panels go in and how the front/back seats are mounted as well as the rear deck! Thanks guys!
1980 MGB Limited Edition (Car No. 2744)
"If anything's gonna happen it's gonna happen out there!"
Forums 
Having trouble posting or changing forum settings?
Read the Forum Help (FAQ) or contact the webmaster
