
T-Series & Prewar Forum
Door Adjustment on TD
Posted by parkerg1


parkerg1
Gary Parker
|
Topic Creator (OP)
Aug 20, 2014 01:24 PM
Joined 11 years ago
138 Posts
|
I have just finished adjusting the door latches on my TD to fit into the striker holes, as per Dave Dubois post that that is how they are supposed to work. They now work correctly. The problem now is my right door sags just a little, so I have to lift it just a bit to close correctly. I read in an earlier post that the door can be adjusted by shimming the body mounts. I think that a shim on the mount behind the door may raise the door post enough to help. The problem I am running into, is I cant find the head of the bolt. Is it under the plywood floor? If so it will be a ***** to get to. Any suggestions? I have put the brace, with a turnbuckle in the door. That did bring the front bottom corner in so it fits the opening, but did not raise the door any. There seems to be just a small amount of movement in the hinge pins. May have to work on them.
Gary
Gary
 |
Aug 20, 2014 11:24 PM
Joined 13 years ago
21 Posts
|
I think you have your geometry incorrect if you raise the back of the tub you lower the leading upper corner of the door. I hope I am on the final fitment of my doors after getting some bargain basement hinges on "Fleabay" that are in pristine condition.
Some of the things that I have learn t from others and my own experiences are;
Loose fitting hinge pins will never provide a good outcome,
When assembled ensure the hinges fully close without applying force,
Manufacture frame backing plates with the screw nuts welded to it, material should be at minimum 10#,
Purchase a length of rod the same diameter as your hinge pins of a length longer than the distance between the top and bottom hinges,
Commence by aligning the hinge sections on the door first using the rod inserted in the hinge pin holes, the result required is for the rod to finish parallel to both the door edge and exterior face with no binding when the hinge screws are fully tightened. You may have to use flat and tapered shims under the hinges to achieve this,
On the door hinge pillar you will observe that it is not a flat surface where the hinges are screwed onto, to overcome this issue I made packings so the hinges dont tilt when their fixing screws are tightened,
When aligning the hinge sections on the tub insert the rod thru both sections, there should be no binding and the rod should be parallel to to the hinge pillar with the screws fully tightened,
Try to minimize bending the hinges, brass is easily fatigued and will break if put under sufficient stress,
Dont rush think carefully about the effects every adjustment will make,
If the tub is aligned correctly this should result in a good door fit.
|
parkerg1
Gary Parker
|
Topic Creator (OP)
Aug 23, 2014 10:12 AM
Joined 11 years ago
138 Posts
|
Thanks for the reply Graeme. Will double check the hinges, but don't know if the movement on mine is beyond what new ones would have. Still no input on the location of the bolt on the body mounts. I did get his off of a different forum.
You can add packers to the body mount directly below the hinge pillar, or remove packers at the rear body mount by the fuel tank. Or use a combination of both. This will lift the front of the door up the pillar.
I do have enough packers on the rear mount, that I could remove one, and try that. I only need to raise the front of the door less than an 1/8".
Gary
about 5 years and 7 months later...

old lady Louise
Francis Pouzenc
|
Mar 26, 2020 11:18 AM
Joined 7 years ago
25 Posts
|
Hello
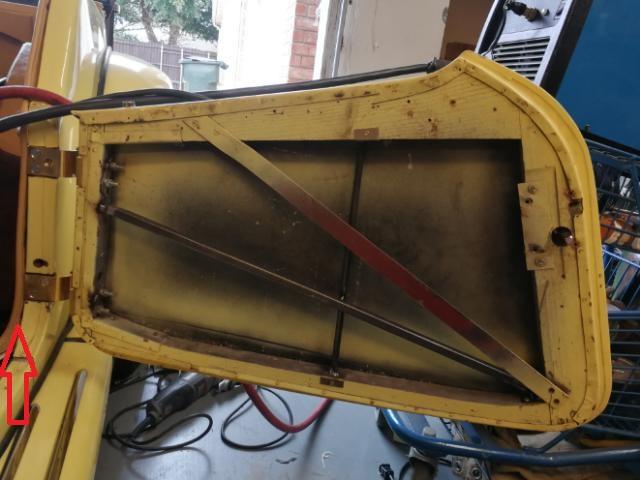
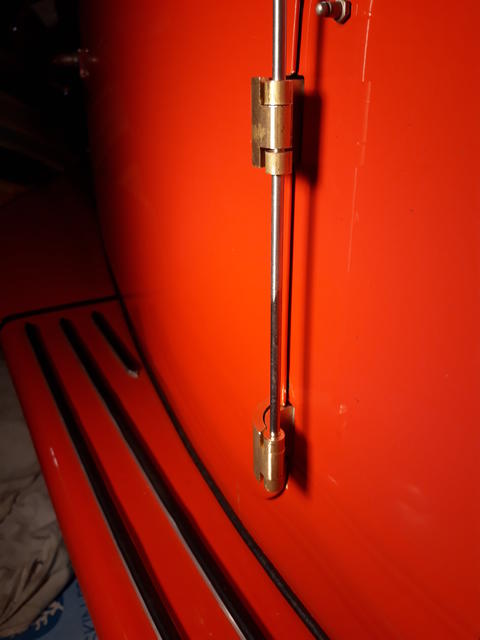
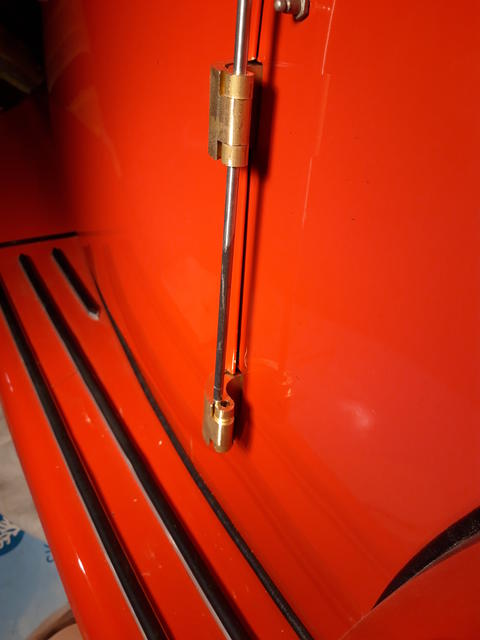
Yestarday I took advantage of the confinment to try to adjust the doors of my TD ( "Louise" ) . On both doors there were a too big gap at the front bottom. I first tried to twist the bottom of the door inwards with a cable stretched by means of a turnbuckle (file 1) . I started by the right side door but this way it was impossible to have a good result. So I thought if it didn't work by closing the bottom I should try by spreading the top, so I did as on file 2 . And it was good (file 3). For the left door, it is the first solution that gave the best result.
Anyway one day I will be forced to change the hinge pins.
Thanks to all the contributors of this forum.
Francis
Attachments:
20200321_184303.jpg 50.2 KB


AZTD
Mike Grogan
|
Mar 26, 2020 11:49 AM
Joined 8 years ago
1,159 Posts
|
 |
Mar 26, 2020 04:33 PM
Joined 16 years ago
295 Posts
|
about 1 month and 19 hours later...
|
old lady Louise
Francis Pouzenc
|
Apr 26, 2020 12:29 PM
Joined 7 years ago
25 Posts
|
|
old lady Louise
Francis Pouzenc
|
Apr 26, 2020 12:54 PM
Joined 7 years ago
25 Posts
|
I got a very good result on the right door by pushing to spread out the upper front ( see previous message ) but on the driver side no method worked.
Encouraged by the kind comment of "Johnsfolly" I decided to take care of tha door, thanks John (and sorry for your pants ! )
The axes of the two hinges were very worn and oval and one of them was twisted, so I ordered for two new hinges ( same colour and price as gold ...) . To be able to have the two hinges aligned , which was not the case before, I had to remove some material on the upper half hinge, door side, the spacing between the position of the two hinges was not the same on the door and on the body ( ! ) . I also had to place some small shims here or there under the hinges yo allow them to stay aligned and the door to swing smoothly without rubbing at the bottom, which was the case before . At the end the result is good for me but I confirm that setting the doors on a TD is a real challenge, that it is very hard to keep calm during the process, and do, undo, , start again the next day , stop before regretting to have brought such a car . And when finally you have managed to get the door a good fit , then comes a new challenge with the two parts of the lock ...you know, where the screws move by themselves in the wood...
Attachments:
20200414_221059.jpg 23.5 KB
chasloew thanked old lady Louise for this post

chasloew
Charles Loew
|
Apr 26, 2020 03:40 PM
Joined 12 years ago
842 Posts
|
Francis,
I'm really impressed with the way you aligned the two hinge barrels! I'm sure that the care you have taken will pay off in the future by not having things move under stress every time the door is opened.
Mine were way off and I was able to improve things slightly just by sighting them by eye. I'm not done yet and posts like yours help motivate me and give all of us useful ideas. Thanks for sharing.
Chas
|
old lady Louise
Francis Pouzenc
|
Apr 26, 2020 04:52 PM
Joined 7 years ago
25 Posts
|
Thanks Chas,
It can be seen during the first assembly that the two hinges are not aligned, neither face of the hole, nor in two parallel planes. See also the condition of the bottom hinge, twisted and too worn to enlarge the diameter for a new pin.
I find also abnormal that the hinges are sold with blocked pins, which requires to force to remove them if one wants to use such a method of alignment , and after to manufacture new pins, in my case stainless steel, stopped at the bottom by means of a little pin which leaves the door quickly removable. Not in accordance with the origin, but much more practical.
Attachments:
20200414_162606.jpg 27.1 KB
chasloew thanked old lady Louise for this post
 |
Apr 26, 2020 05:30 PM
Top Contributor
Joined 10 years ago
966 Posts
|

MGTF1500 Ardeche France
Thierry SUCHIER
|
Apr 27, 2020 12:03 AM
Top Contributor
Joined 7 years ago
5,563 Posts
|
|
old lady Louise
Francis Pouzenc
|
Apr 27, 2020 08:44 AM
Joined 7 years ago
25 Posts
|
Hello Lonnie,
I did not try to discard the pins by pushing them from the bottom. It is very hard because of the two punch marks who open the pin's head . And it would hurt the brass.
How I did : by means of an electric disc grinder blocked in a vise I gently approached the pin head to grind it taking care never touch the bras, acting at the end with a small diameter disc (better if you have a "Demel" tool).
I was then able to push down the headless pin without effort. Of course the pin is lost, but the hinge is not damaged. I'm not saying it's the best way to do, but it's the way I used.
Moss should be told not to punch the pins before selling. I had my new pins by Angloparts UK but I guess they are from the same source as Moss.
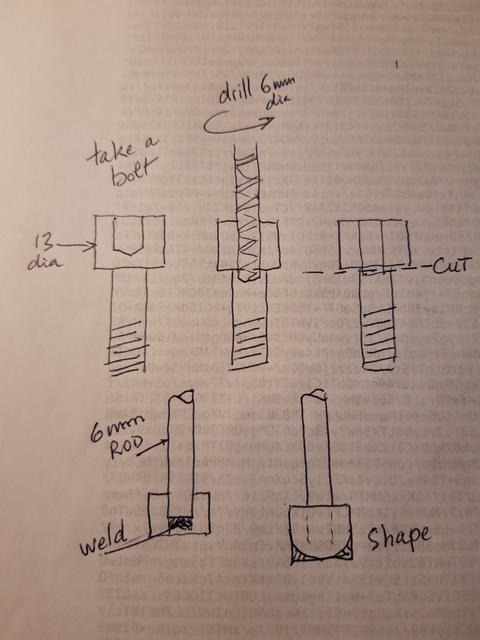
I had seen somewhere on the forum how to make new pins : by welding an hexacave bolt head to some 6mm stainless steel rod and shape . Look at my little drawing, it's easier for me to speak with a pen !
I hope my contribution to the subject helps you , but if anyone has better ideas, I'm a taker !
Sorry for my english...and thanks to Reverso translation
Francis
I did not try to discard the pins by pushing them from the bottom. It is very hard because of the two punch marks who open the pin's head . And it would hurt the brass.
How I did : by means of an electric disc grinder blocked in a vise I gently approached the pin head to grind it taking care never touch the bras, acting at the end with a small diameter disc (better if you have a "Demel" tool).
I was then able to push down the headless pin without effort. Of course the pin is lost, but the hinge is not damaged. I'm not saying it's the best way to do, but it's the way I used.
Moss should be told not to punch the pins before selling. I had my new pins by Angloparts UK but I guess they are from the same source as Moss.
I had seen somewhere on the forum how to make new pins : by welding an hexacave bolt head to some 6mm stainless steel rod and shape . Look at my little drawing, it's easier for me to speak with a pen !
I hope my contribution to the subject helps you , but if anyone has better ideas, I'm a taker !
Sorry for my english...and thanks to Reverso translation
Francis
Attachments:
20200427_150754.jpg 31.1 KB
|
|
Apr 27, 2020 11:15 AM
Top Contributor
Joined 10 years ago
966 Posts
|
Francis -
Your English and Reverso translation are perfect.
Thanks for explaining how you removed the hinge pins. I agree with you, Moss should offer hinges with removable pins.
Bud Kreuger's TTalk site has an article by Roy Challberg about refurbishing TD/TF door hinges. Roy explains another way to make new hinge pins. Read the entire article for full details.
http://www.ttalk.info/DoorHingeRefurbishing.htm
Key points:
"A 0.250" diameter shoulder bolt is used as the new pin. The 18-8 stainless steel precision shoulder bolt is used instead of a common S.S. bolt because of the closer tolerances and machined surface." "...round off the top to resemble the old steel pin. You can fill in the Phillips head slots by TIG welding or some other type of permanent filler (e.g., J-B Weld)."
https://www.mcmaster.com/cadinlnord%2f94045a546
Lonnie
TF7211
OLD STUFF ... houses, furniture, cars, wine ... I love it all
|
old lady Louise
Francis Pouzenc
|
Apr 28, 2020 05:01 AM
Joined 7 years ago
25 Posts
|
Lonnie,
Thanks for your very helpful answer.
My hinges were too worn to be repaired, and one was twisted, so I preferred to install new ones.
This TTalk is the one I saw a few months ago. I think I shall try to order the referenced bolts to get a more aesthetic mounting, especially since the 6mm rod I used
to make new pins in reality is only 5.8mm diameter.
Is it a good solution to mount these bolts directly into new hinges, that is to say without self-lubricating rings ?
Thanks and sorry for the "s" missing in "brass" in my previous message !
Francis
Forums 
Having trouble posting or changing forum settings?
Read the Forum Help (FAQ) or contact the webmaster
