
MG Engine Swaps Forum
13B Mazda rotary going into a Midget (build thread)
Posted by GySgtFrank


GySgtFrank
Kevin Frank
|
Topic Creator (OP)
Jul 3, 2015 04:51 PM
Joined 9 years ago
154 Posts
|
There seems to be some interest in rotary swaps so I thought that I would share my solutions over here. The folks on the rotary forums rather like the idea, but everyone knows that they're not quite right in the head. I'll be downloading my posts that were made in the past so please bear with me.
 lowered by Kevin Frank, on Flickr
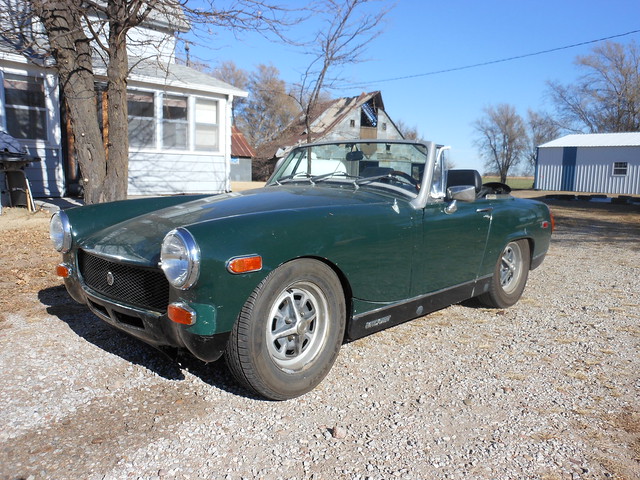
1975 MG Midget - 1500cc; 4 speed. 1640lbs. (rubber bumpers removed, those are about 150 lbs., heavy little things) with the cast iron engine and trans.
For those of you that don't know what kind of an idiot I am, I will give a brief explanation. I bought the above green hair removal tool to get around with until I could get my 79 SA RX7 back up. The Midget seemed to only need a few things and I could either do a swap on it later, drive it as is.
No dice. Every time I fixed one thing something was broken, and or improperly done, that had been hidden away by the previous owners, or broke in the process of fixing something else. After about a year of fighting with it non-stop, and putting far too much money in it, (2 engines, 2 transmissions, carb, manifold, ignition, switches, wiring fixes, radiator, lights, etc etc. ad nauseum). I have had enough with the 55hp engine, weak transmission, and worse wiring. Time for something better.
I have put quite a bit of work into suspension/interior/exterior so not all the money dumped into it will be wasted.
I will be cleaning up the '87 S4 NA 13B and 5 speed that I have and transplant the whole shebang into it. Hopefully I'll be able to retain the fuel injection, but we'll see as I go along. In addition all the wiring will be stripped out of it and either tossed in the trash, or burned in a black Sabbath bonfire to help it on it's way. I will be using the 1984 - 1985 RX7 GSL-SE front cover and pan to utilize the front engine mounts. The trickiest part (other than wiring) is going to be building a header, as there isn't a lot of room.
More pictures to come as I get stuff done.
My 13B Midge build thread: http://www.mgexp.com/phorum/read.php?40,3028771
lowered by Kevin Frank, on Flickr
1975 MG Midget - 1500cc; 4 speed. 1640lbs. (rubber bumpers removed, those are about 150 lbs., heavy little things) with the cast iron engine and trans.
For those of you that don't know what kind of an idiot I am, I will give a brief explanation. I bought the above green hair removal tool to get around with until I could get my 79 SA RX7 back up. The Midget seemed to only need a few things and I could either do a swap on it later, drive it as is.
No dice. Every time I fixed one thing something was broken, and or improperly done, that had been hidden away by the previous owners, or broke in the process of fixing something else. After about a year of fighting with it non-stop, and putting far too much money in it, (2 engines, 2 transmissions, carb, manifold, ignition, switches, wiring fixes, radiator, lights, etc etc. ad nauseum). I have had enough with the 55hp engine, weak transmission, and worse wiring. Time for something better.
I have put quite a bit of work into suspension/interior/exterior so not all the money dumped into it will be wasted.
I will be cleaning up the '87 S4 NA 13B and 5 speed that I have and transplant the whole shebang into it. Hopefully I'll be able to retain the fuel injection, but we'll see as I go along. In addition all the wiring will be stripped out of it and either tossed in the trash, or burned in a black Sabbath bonfire to help it on it's way. I will be using the 1984 - 1985 RX7 GSL-SE front cover and pan to utilize the front engine mounts. The trickiest part (other than wiring) is going to be building a header, as there isn't a lot of room.
More pictures to come as I get stuff done.
My 13B Midge build thread: http://www.mgexp.com/phorum/read.php?40,3028771
|
GySgtFrank
Kevin Frank
|
Topic Creator (OP)
Jul 3, 2015 04:57 PM
Joined 9 years ago
154 Posts
|
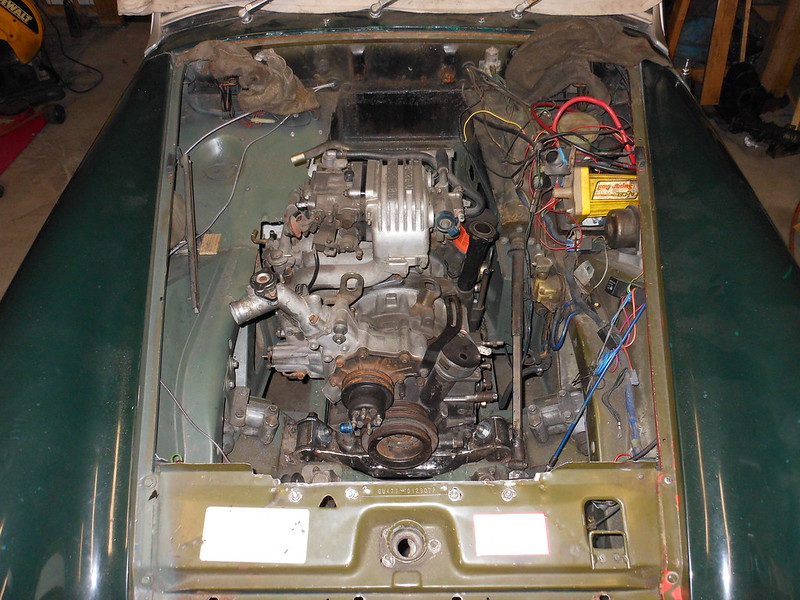
 engine2 by Kevin Frank, on Flickr
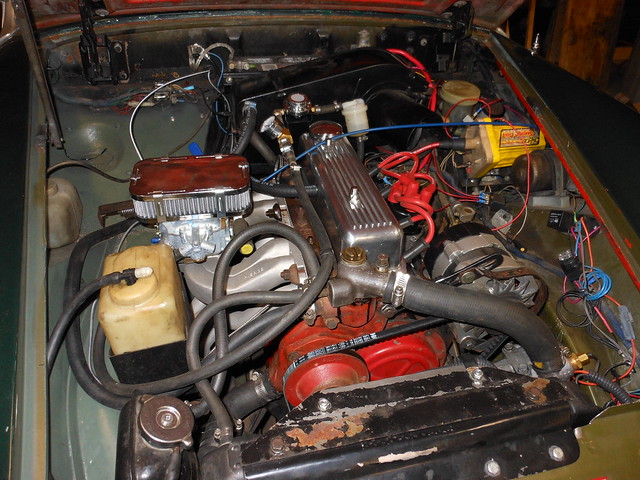
The engine and mods that I had done before I got utterly frustrated , pretty, but the never ending litany of broken parts was too much for me.
My 13B Midge build thread: http://www.mgexp.com/phorum/read.php?40,3028771
|
GySgtFrank
Kevin Frank
|
Topic Creator (OP)
Jul 3, 2015 05:09 PM
Joined 9 years ago
154 Posts
|
Note: I am not a professional welder by any means, just a hobbyist, so my welds generally are not overly pretty. I do get full penetration and they are strong however. Typically I have to do some grinding to smooth things out enough for paint, which makes me a grinder not a welder I guess.
Doing the trial fitting. I'll try to document what I ended up doing as thoroughly as I can, in case anyone else ever wants to give this swap a go. I haven't been able to find any build threads on this swap that were very complete. Lots of questions on how others did it, but they didn't share.
Things are even tighter than I thought. I needed some room up front as the front of the rotary is more squared off and wider than the 1500. I also wanted to push the engine as far forward as possible to address the front to rear weight balance issue with the lighter engine.
1. original front cross member:
 1. original crossmember by Kevin Frank, on Flickr
2. sliced, hammered down, and re-welded:
 2. sliced and welded by Kevin Frank, on Flickr
3. Trimmed and completed front cross member:
 3. completed crossmember by Kevin Frank, on Flickr
Gained 2.25 inches of room up front so I can set the engine down between the frame rails and forward. It looks like I'm going to have to do some clearancing on the rails and the heater box area to the back of the engine as well.
late edit: I ended up having to notch the cross member another 1/2 inch to clear the mounting bolts for the engine mounting plate.
My 13B Midge build thread: http://www.mgexp.com/phorum/read.php?40,3028771
Doing the trial fitting. I'll try to document what I ended up doing as thoroughly as I can, in case anyone else ever wants to give this swap a go. I haven't been able to find any build threads on this swap that were very complete. Lots of questions on how others did it, but they didn't share.
Things are even tighter than I thought. I needed some room up front as the front of the rotary is more squared off and wider than the 1500. I also wanted to push the engine as far forward as possible to address the front to rear weight balance issue with the lighter engine.
1. original front cross member:
1. original crossmember by Kevin Frank, on Flickr
2. sliced, hammered down, and re-welded:
2. sliced and welded by Kevin Frank, on Flickr
3. Trimmed and completed front cross member:
3. completed crossmember by Kevin Frank, on Flickr
Gained 2.25 inches of room up front so I can set the engine down between the frame rails and forward. It looks like I'm going to have to do some clearancing on the rails and the heater box area to the back of the engine as well.
late edit: I ended up having to notch the cross member another 1/2 inch to clear the mounting bolts for the engine mounting plate.
My 13B Midge build thread: http://www.mgexp.com/phorum/read.php?40,3028771
|
GySgtFrank
Kevin Frank
|
Topic Creator (OP)
Jul 3, 2015 05:13 PM
Joined 9 years ago
154 Posts
|
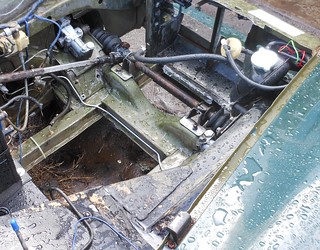
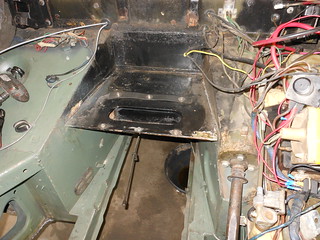
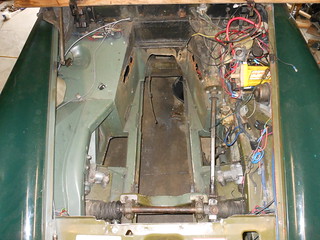
After more trial fitting, it has become apparent that the engine will not go in there without removing the shelf for the heater box and the ducting underneath it (The back of the engine block hits the ducting. I was hoping I would be low enough, but there is no way it will work). I went ahead and took the battery tray out as well. This provides a lot of room to the rear. It should also make taking the engine and transmission in and out a WHOLE lot easier.
original heater/battery tray:
 heater box and battery tray - original by Kevin Frank, on Flickr
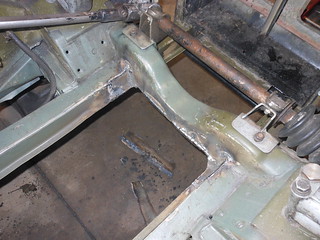
heater/battery tray removed:
 heater box and battery tray - removed by Kevin Frank, on Flickr
Once I have the engine where it needs to be I'll look at rebuilding a spot for the heater. I can do without A/C if I have to, but a heater is important, even if it's only to defog the windshield. The battery will be relocated elsewhere.
Getting that shelf out wasn't easy. I had to drill out a bunch of spot welds, make cuts with the plasma cutter, and do the fine cutting with a cut-off wheel so that I didn't damage something I needed.
My 13B Midge build thread: http://www.mgexp.com/phorum/read.php?40,3028771
original heater/battery tray:
heater box and battery tray - original by Kevin Frank, on Flickr
heater/battery tray removed:
heater box and battery tray - removed by Kevin Frank, on Flickr
Once I have the engine where it needs to be I'll look at rebuilding a spot for the heater. I can do without A/C if I have to, but a heater is important, even if it's only to defog the windshield. The battery will be relocated elsewhere.
Getting that shelf out wasn't easy. I had to drill out a bunch of spot welds, make cuts with the plasma cutter, and do the fine cutting with a cut-off wheel so that I didn't damage something I needed.
My 13B Midge build thread: http://www.mgexp.com/phorum/read.php?40,3028771
|
GySgtFrank
Kevin Frank
|
Topic Creator (OP)
Jul 3, 2015 05:16 PM
Joined 9 years ago
154 Posts
|
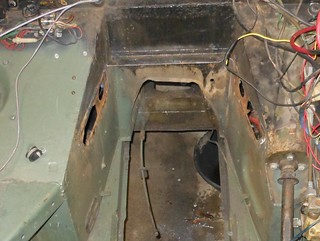
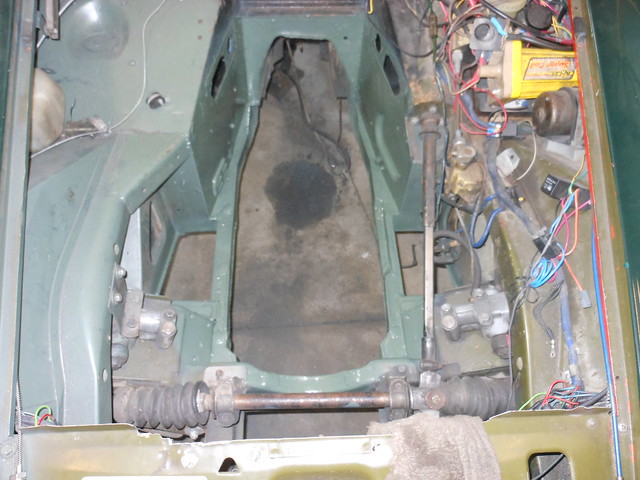
Another necessary modification. The permanent transmission crossmember is too high to slide the transmission into the tunnel. Technically all it really needed was to be notched so the transmission would clear. However a non-removable crossmember makes it a royal pain if you need to drop the transmission. I went ahead and removed the center section of the crossmember and will fabricate some plates for the ends and bolt the modified section back in so that I don't compromise structural integrity.
original:
 trans crossmember - original by Kevin Frank, on Flickr
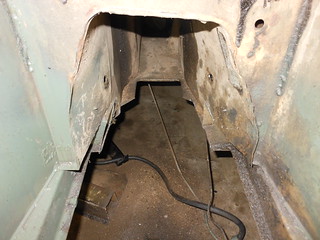
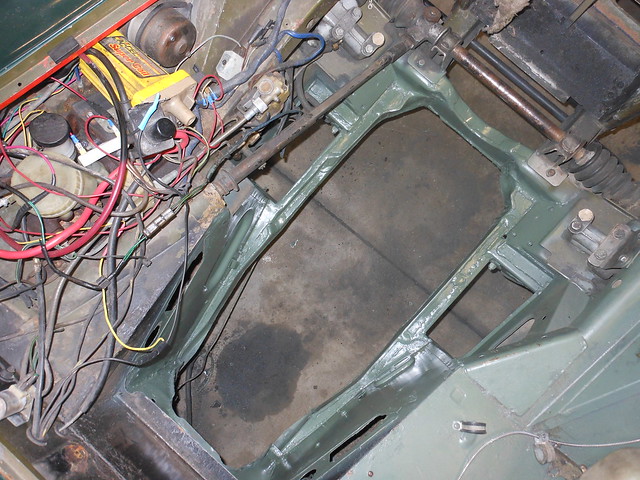
removed:
 trans crossmember - removed by Kevin Frank, on Flickr
Now to try fitting it back in there. It doesn't appear that the transmission tunnel is going to require much modification to fit the naturally aspirated rotary transmission. I would imagine that the turbo transmission would be a different story as the NA trans barely fits.
My 13B Midge build thread: http://www.mgexp.com/phorum/read.php?40,3028771
original:
trans crossmember - original by Kevin Frank, on Flickr
removed:
trans crossmember - removed by Kevin Frank, on Flickr
Now to try fitting it back in there. It doesn't appear that the transmission tunnel is going to require much modification to fit the naturally aspirated rotary transmission. I would imagine that the turbo transmission would be a different story as the NA trans barely fits.
My 13B Midge build thread: http://www.mgexp.com/phorum/read.php?40,3028771
|
GySgtFrank
Kevin Frank
|
Topic Creator (OP)
Jul 3, 2015 05:20 PM
Joined 9 years ago
154 Posts
|
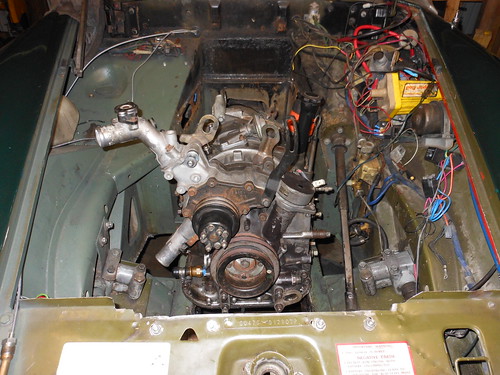
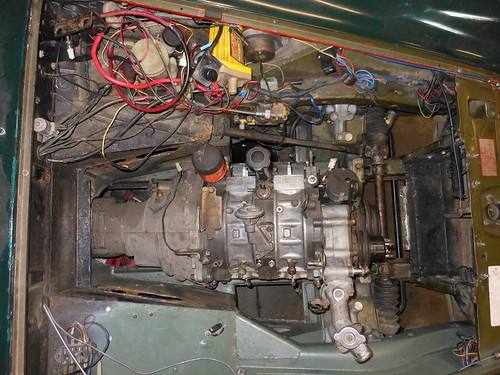
... and engine/trans in place about where it has to sit. I still need to notch the lower rails a little bit to allow the engine to sit a little lower, not as much as I was afraid that I would though. About 1/2 an inch on the passenger side rail should do it.
 engine placement 1 by Kevin Frank, on Flickr
 engine placement 2 by Kevin Frank, on Flickr
 engine placement 3 by Kevin Frank, on Flickr
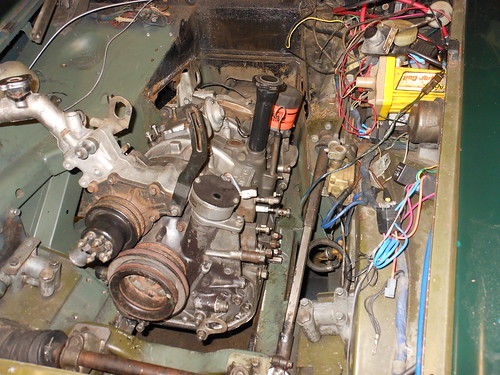
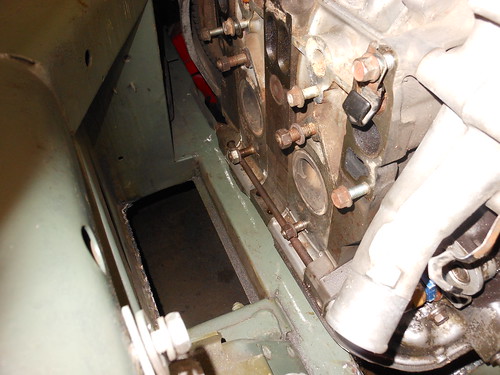
The reason I say that it has to sit here is that it lines my exhaust ports up with the small opening for the exhaust to work it's way under the car. The engine is offset to the right (passenger side) by about an inch to line up with the differential input for a straight line shot with the driveshaft.
 engine placement 4 by Kevin Frank, on Flickr
I will need to cut and box the upper part of the passenger foot well to allow me to use the stock lower intake manifold. Just not enough room without doing it that way. Shouldn't be a problem as nobody has their feet or legs in that spot anyway. It's just wasted space, and space is at a premium with this swap.
The shifter definitely has to be moved forward about 8.5 inches, or more. (edit: engine back out, measurement made - 9 3/8" would be about ideal)
Good news is that the end of the transmission tail shaft is only about 3.5 - 4 inches further back than the original 1500 transmission. That shouldn't cause too many problems, I hope.
My 13B Midge build thread: http://www.mgexp.com/phorum/read.php?40,3028771
engine placement 1 by Kevin Frank, on Flickr
engine placement 2 by Kevin Frank, on Flickr
engine placement 3 by Kevin Frank, on Flickr
The reason I say that it has to sit here is that it lines my exhaust ports up with the small opening for the exhaust to work it's way under the car. The engine is offset to the right (passenger side) by about an inch to line up with the differential input for a straight line shot with the driveshaft.
engine placement 4 by Kevin Frank, on Flickr
I will need to cut and box the upper part of the passenger foot well to allow me to use the stock lower intake manifold. Just not enough room without doing it that way. Shouldn't be a problem as nobody has their feet or legs in that spot anyway. It's just wasted space, and space is at a premium with this swap.
The shifter definitely has to be moved forward about 8.5 inches, or more. (edit: engine back out, measurement made - 9 3/8" would be about ideal)
Good news is that the end of the transmission tail shaft is only about 3.5 - 4 inches further back than the original 1500 transmission. That shouldn't cause too many problems, I hope.
My 13B Midge build thread: http://www.mgexp.com/phorum/read.php?40,3028771
|
GySgtFrank
Kevin Frank
|
Topic Creator (OP)
Jul 3, 2015 05:26 PM
Joined 9 years ago
154 Posts
|
Here's my solution to a really short shifter. The first picture I had to steal off the internet as I forgot to take a "before" picture. The FB box (1983 - 1985 RX7) in the rear is very similar to the series 4 FC box (1986 -1987 RX7) that I have. The shifter box actually sits behind the tail shaft. This is a no go in my application.

So I moved the box forward 9 inches to put it in the stock MG shifter location.
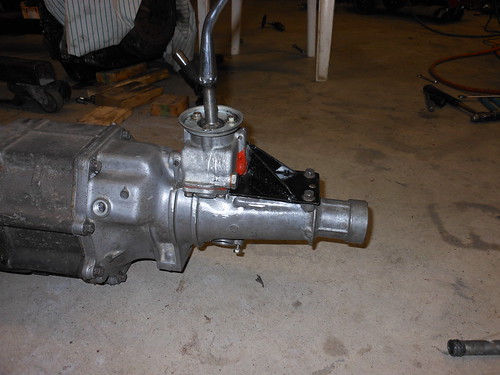 short shifter 2 by Kevin Frank, on Flickr
 short shifter 1 by Kevin Frank, on Flickr
I've seen prettier renditions of this, but this is how I did it.
The mount was cut off right next to the box and I used the side cover plate to attach a mount using the original rear bolts, one side bolt, and the locator pins. The shaft for the shifter was cut 9 inches and the roll pin hole re-drilled. (I had a machine shop do this for me as I always get the hole off center when I try to drill a round rod). The shaft is not hardened toward the rear so drilling it wasn't a problem. I also had to do a little "massaging" with a grinder on the tail shaft housing. This was necessary to get the box to sit all the way forward against the opening that the shifter shaft exits the case.
It works, but it seems a little stiff right now. Could be that the shaft is binding a little bit, or it may be that the RTV I used between the box and the case is pushed up against the shaft. It could also be I messed up reassembling the box. I'll pull it back apart later and check it out. It does go in and out of all the gears just fine, just stiff.
Right now I'm working on notching the lower frame rails to give me enough room to drop the engine a little lower in the frame.
My 13B Midge build thread: http://www.mgexp.com/phorum/read.php?40,3028771
So I moved the box forward 9 inches to put it in the stock MG shifter location.
short shifter 2 by Kevin Frank, on Flickr
short shifter 1 by Kevin Frank, on Flickr
I've seen prettier renditions of this, but this is how I did it.
The mount was cut off right next to the box and I used the side cover plate to attach a mount using the original rear bolts, one side bolt, and the locator pins. The shaft for the shifter was cut 9 inches and the roll pin hole re-drilled. (I had a machine shop do this for me as I always get the hole off center when I try to drill a round rod). The shaft is not hardened toward the rear so drilling it wasn't a problem. I also had to do a little "massaging" with a grinder on the tail shaft housing. This was necessary to get the box to sit all the way forward against the opening that the shifter shaft exits the case.
It works, but it seems a little stiff right now. Could be that the shaft is binding a little bit, or it may be that the RTV I used between the box and the case is pushed up against the shaft. It could also be I messed up reassembling the box. I'll pull it back apart later and check it out. It does go in and out of all the gears just fine, just stiff.
Right now I'm working on notching the lower frame rails to give me enough room to drop the engine a little lower in the frame.
My 13B Midge build thread: http://www.mgexp.com/phorum/read.php?40,3028771
|
GySgtFrank
Kevin Frank
|
Topic Creator (OP)
Jul 3, 2015 05:31 PM
Joined 9 years ago
154 Posts
|
After about five days of work I finally have the frame modifications finished to make the engine fit in there the way I want it to. It took a while as the mods were more extensive than I thought they would be at first.
You can see the original frame in the original crossmember picture above. (as usual I forgot to take a before picture)
modified:
 Frame mods 1 by Kevin Frank, on Flickr
 frame mods 2 by Kevin Frank, on Flickr
The rotary is a lot wider at the bottom and made it necessary to widen the rails to set it down low. All the other threads I've seen on this set the engine above the frame rails, with attendant problems of the oil pan rails occasionally hitting. Not to mention what it does to the center of gravity.
I welded in two 1/2 thick plates to the outside of each rail between the body tub and the suspension points. Excessive, but it covered the existing flange on the bottom of the rail perfectly. I then trimmed one inch from the inside of each rail and welded 1/8th inch plate to close off the inside. I had to notch the driver's side rail another inch or so for the oil cooler line and the oil bypass sticking out the side of the bottom middle iron. This ended up being the entire width of the rail except for the outer layer on this small top portion of the upper rail. The front crossmember had to be further trimmed to give me enough room to push the engine a little further forward. After taking part of it off I closed it in with more 1/8th inch plate. I then welded in 8 studs and crush tubes along the sides and front for a skid plate/ frame stiffener. It will bolt underneath to tie the entire front suspension together. It will be considerably stronger and stiffer than the original.
Most people don't go this far for the swap, but I'm kind of obsessive about chassis stiffness and a low center of gravity.
My 13B Midge build thread: http://www.mgexp.com/phorum/read.php?40,3028771
You can see the original frame in the original crossmember picture above. (as usual I forgot to take a before picture)
modified:
Frame mods 1 by Kevin Frank, on Flickr
frame mods 2 by Kevin Frank, on Flickr
The rotary is a lot wider at the bottom and made it necessary to widen the rails to set it down low. All the other threads I've seen on this set the engine above the frame rails, with attendant problems of the oil pan rails occasionally hitting. Not to mention what it does to the center of gravity.
I welded in two 1/2 thick plates to the outside of each rail between the body tub and the suspension points. Excessive, but it covered the existing flange on the bottom of the rail perfectly. I then trimmed one inch from the inside of each rail and welded 1/8th inch plate to close off the inside. I had to notch the driver's side rail another inch or so for the oil cooler line and the oil bypass sticking out the side of the bottom middle iron. This ended up being the entire width of the rail except for the outer layer on this small top portion of the upper rail. The front crossmember had to be further trimmed to give me enough room to push the engine a little further forward. After taking part of it off I closed it in with more 1/8th inch plate. I then welded in 8 studs and crush tubes along the sides and front for a skid plate/ frame stiffener. It will bolt underneath to tie the entire front suspension together. It will be considerably stronger and stiffer than the original.
Most people don't go this far for the swap, but I'm kind of obsessive about chassis stiffness and a low center of gravity.
My 13B Midge build thread: http://www.mgexp.com/phorum/read.php?40,3028771
|
GySgtFrank
Kevin Frank
|
Topic Creator (OP)
Jul 3, 2015 05:36 PM
Joined 9 years ago
154 Posts
|
The fruits of my weekend.
After much trial fitting and head scratching, by Jove! I think I've got it. Engine mounts that is. There wasn't enough room to use the FB or FC stock pads so I improvised with polyurethane captured mounts originally intended for use in rear suspension lower swing arms.
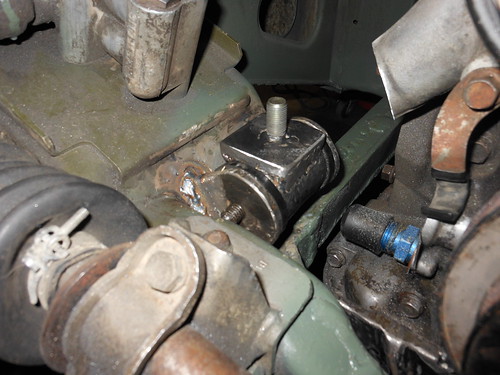 engine mounts 3 by Kevin Frank, on Flickr
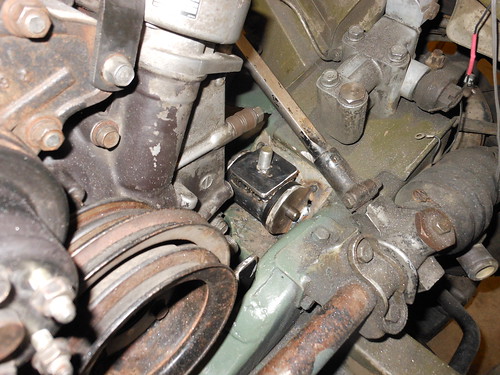 engine mounts 2 by Kevin Frank, on Flickr
I will extend the front mounting plate over to each and bolt it to the top of each polyurethane mount. There's not a lot of give in this setup so engine placement is going to have to be pretty exact as far as engine angle vs. pinion angle before I weld it up. I used the bolt on approach (support plate bolted to the urethane mounts) because if I had simply welded the front support plate to the urethane mounts, interference from the tabs would have made it nearly impossible to pull the engine without removing the front plate from the engine. Yes I thought about it and decided that it would be a bad idea.
My 13B Midge build thread: http://www.mgexp.com/phorum/read.php?40,3028771
After much trial fitting and head scratching, by Jove! I think I've got it. Engine mounts that is. There wasn't enough room to use the FB or FC stock pads so I improvised with polyurethane captured mounts originally intended for use in rear suspension lower swing arms.
engine mounts 3 by Kevin Frank, on Flickr
engine mounts 2 by Kevin Frank, on Flickr
I will extend the front mounting plate over to each and bolt it to the top of each polyurethane mount. There's not a lot of give in this setup so engine placement is going to have to be pretty exact as far as engine angle vs. pinion angle before I weld it up. I used the bolt on approach (support plate bolted to the urethane mounts) because if I had simply welded the front support plate to the urethane mounts, interference from the tabs would have made it nearly impossible to pull the engine without removing the front plate from the engine. Yes I thought about it and decided that it would be a bad idea.
My 13B Midge build thread: http://www.mgexp.com/phorum/read.php?40,3028771
|
GySgtFrank
Kevin Frank
|
Topic Creator (OP)
Jul 3, 2015 05:40 PM
Joined 9 years ago
154 Posts
|
Engine support bar done and the engine is mounted. Lots of fiddling to get bracing in there without interference. As you can see, not a lot of room to work with. This was as low and right as I dared to go. I plan to modify the oil pan/pickup to make the sump shallower and longer. I have full access to the bottom of the pan, but it does hang pretty low with the engine this far down. It is slightly higher than my aftermarket sway bar mounts though.
 engine crossbar 2 by Kevin Frank, on Flickr
 engine crossbar 1 by Kevin Frank, on Flickr
My 13B Midge build thread: http://www.mgexp.com/phorum/read.php?40,3028771
engine crossbar 2 by Kevin Frank, on Flickr
engine crossbar 1 by Kevin Frank, on FlickrMy 13B Midge build thread: http://www.mgexp.com/phorum/read.php?40,3028771
|
GySgtFrank
Kevin Frank
|
Topic Creator (OP)
Jul 3, 2015 05:43 PM
Joined 9 years ago
154 Posts
|
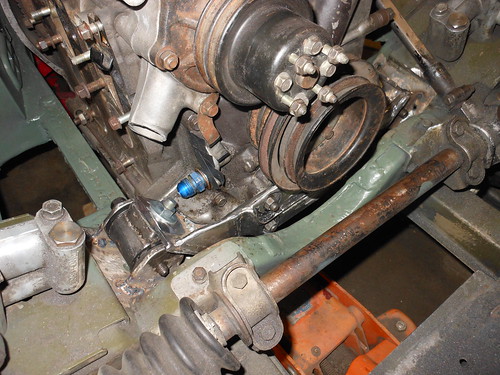
Working on transmission mount.
I cut out the original fixed transmission crossmember as it makes getting the engine in and out not so fun. The problem with cutting it out is that there is nothing to bolt a replacement to. The crossmember is only boxed light sheet metal and is insufficient for bolting a heavier gauge center section to. My solution was to use 2 3/8ths inch outside square tubing, which slid into the stubs nice and snug. Finding that size tubing is a bit of a bother, but it works perfectly. I then used 1/2" bolts to fasten it within the frame rails. Capped off the ends with some 3/8ths inch plate and welded nuts inside for both the facing plate and the frame fasteners.
 trans cross member attachment point 2 by Kevin Frank, on Flickr
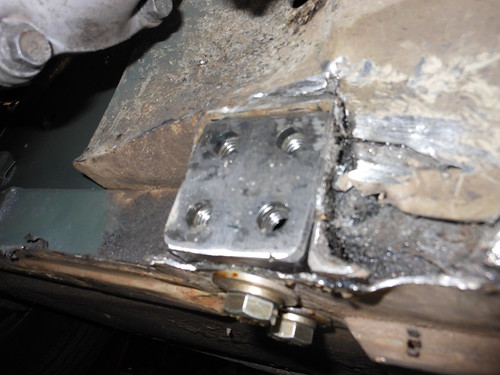 trans cross member attachment point 1 by Kevin Frank, on Flickr
There will be a 2" wide (1/4" plate) strip bolted underneath, as part of the center section, with the rest of the center section bolted both below and to the sides. I planned it like this so that I wouldn't be hanging the mount from something that the bolts were in shear.
more pics when I get that done.
My 13B Midge build thread: http://www.mgexp.com/phorum/read.php?40,3028771
I cut out the original fixed transmission crossmember as it makes getting the engine in and out not so fun. The problem with cutting it out is that there is nothing to bolt a replacement to. The crossmember is only boxed light sheet metal and is insufficient for bolting a heavier gauge center section to. My solution was to use 2 3/8ths inch outside square tubing, which slid into the stubs nice and snug. Finding that size tubing is a bit of a bother, but it works perfectly. I then used 1/2" bolts to fasten it within the frame rails. Capped off the ends with some 3/8ths inch plate and welded nuts inside for both the facing plate and the frame fasteners.
trans cross member attachment point 2 by Kevin Frank, on Flickr
trans cross member attachment point 1 by Kevin Frank, on Flickr
There will be a 2" wide (1/4" plate) strip bolted underneath, as part of the center section, with the rest of the center section bolted both below and to the sides. I planned it like this so that I wouldn't be hanging the mount from something that the bolts were in shear.
more pics when I get that done.
My 13B Midge build thread: http://www.mgexp.com/phorum/read.php?40,3028771
|
GySgtFrank
Kevin Frank
|
Topic Creator (OP)
Jul 3, 2015 05:45 PM
Joined 9 years ago
154 Posts
|
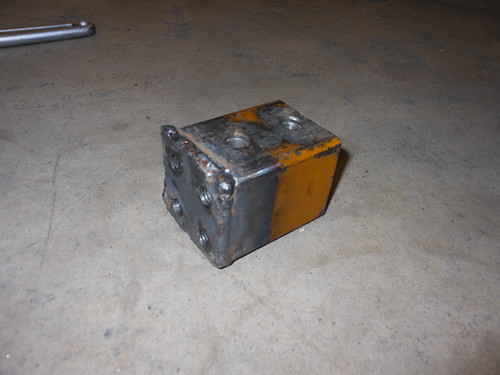
One transmission crossmember; done.
I have to wait for the paint to dry then I can re-install it and post a picture of it installed, with the transmission sitting on it, tomorrow.
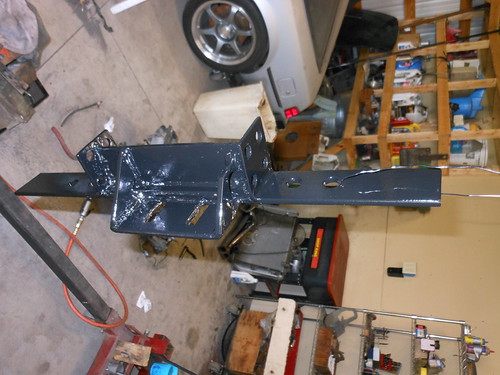 new transmission crossmember by Kevin Frank, on Flickr
My 13B Midge build thread: http://www.mgexp.com/phorum/read.php?40,3028771
I have to wait for the paint to dry then I can re-install it and post a picture of it installed, with the transmission sitting on it, tomorrow.
new transmission crossmember by Kevin Frank, on FlickrMy 13B Midge build thread: http://www.mgexp.com/phorum/read.php?40,3028771
|
GySgtFrank
Kevin Frank
|
Topic Creator (OP)
Jul 3, 2015 05:47 PM
Joined 9 years ago
154 Posts
|
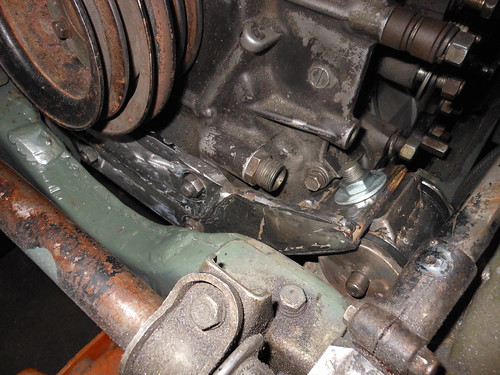
As promised. Pictures of the finished transmission crossmember installed.
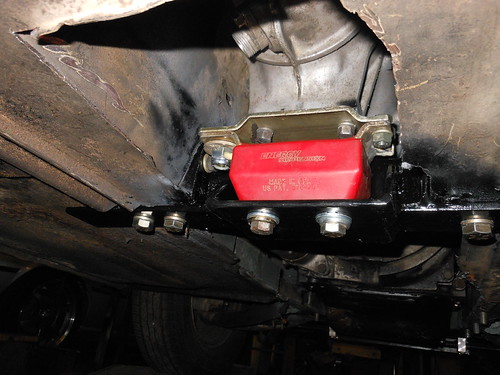 trans crossmember - new - installed by Kevin Frank, on Flickr
I couldn't get the bottom rear side bolts in, there just isn't enough room to get a wrench in the limited space to tighten them. It should be fine with three 7/16ths bolts per side though. Quite often things don't quite work out the way I intended.
While under the car I took a shot of the frame modification I did for the starter. The starter had me worried, but it fit fine. The only problem was having enough room to get it out without having to pull the engine to do it. I considered that to be what you would call a "bad" thing. So I laid the frame rail back a bit and plan to bend and weld in a piece of 1/8th inch plate to reinforce that spot while leaving me enough room to service the starter when it needs it.
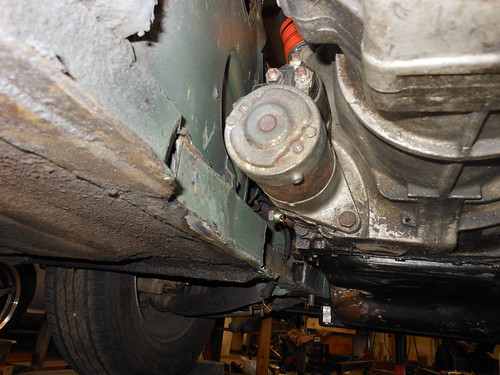 starter frame relief by Kevin Frank, on Flickr
My 13B Midge build thread: http://www.mgexp.com/phorum/read.php?40,3028771
trans crossmember - new - installed by Kevin Frank, on Flickr
I couldn't get the bottom rear side bolts in, there just isn't enough room to get a wrench in the limited space to tighten them. It should be fine with three 7/16ths bolts per side though. Quite often things don't quite work out the way I intended.
While under the car I took a shot of the frame modification I did for the starter. The starter had me worried, but it fit fine. The only problem was having enough room to get it out without having to pull the engine to do it. I considered that to be what you would call a "bad" thing. So I laid the frame rail back a bit and plan to bend and weld in a piece of 1/8th inch plate to reinforce that spot while leaving me enough room to service the starter when it needs it.
starter frame relief by Kevin Frank, on FlickrMy 13B Midge build thread: http://www.mgexp.com/phorum/read.php?40,3028771
|
GySgtFrank
Kevin Frank
|
Topic Creator (OP)
Jul 3, 2015 05:50 PM
Joined 9 years ago
154 Posts
|
It fits!!!! :snoopy happy dance:
 13B final position by Kevin Frank, on Flickr
The hood closes with the EFI manifold on the engine.
I have about 1/2" of clearance at the closest point from the top front edge of the manifold to the underside of the hood. Even the filler neck for the coolant fits with plenty of clearance. This is rather astonishing to me. I figured and measured and planned it out to get the engine low enough for it to go in there. I'm actually about two inches lower than I have seen anyone else set the engine in one of these. That two inches was a LOT of work to get though. When you're juggling as many variables as there are in locating an engine in a space this small I've come to expect things not to quite work out right. I's a happy camper right now.
I did have to trim a little more than I expected from the passenger foot well though. I don't think that it will be a problem with where it's at.
My 13B Midge build thread: http://www.mgexp.com/phorum/read.php?40,3028771
13B final position by Kevin Frank, on Flickr
The hood closes with the EFI manifold on the engine.
I have about 1/2" of clearance at the closest point from the top front edge of the manifold to the underside of the hood. Even the filler neck for the coolant fits with plenty of clearance. This is rather astonishing to me. I figured and measured and planned it out to get the engine low enough for it to go in there. I'm actually about two inches lower than I have seen anyone else set the engine in one of these. That two inches was a LOT of work to get though. When you're juggling as many variables as there are in locating an engine in a space this small I've come to expect things not to quite work out right. I's a happy camper right now.
I did have to trim a little more than I expected from the passenger foot well though. I don't think that it will be a problem with where it's at.
My 13B Midge build thread: http://www.mgexp.com/phorum/read.php?40,3028771
|
GySgtFrank
Kevin Frank
|
Topic Creator (OP)
Jul 3, 2015 05:53 PM
Joined 9 years ago
154 Posts
|
So this is what I spent an entire day doing. Just one little piece of tube, that's all. Right!
 13B header 1 by [url=https://www.flickr.com/photos
[url=https://flic.kr/p/tqRtLC][img]https://c1.staticflickr.com/1/302/18002882544_c428fb8af5.jpg[/img][/url][url=https://flic.kr/p/tqRtLC]13B header 2[/url] by [url=https://www.flickr.com/photos/gysgtfrank/]Kevin Frank[/url], on Flickr
well besides the tube, I did get the O2 sensor bung welded in, so that's two things I guess.
I am modifying the Racing Beat 6 port header that I already had to fit in the midget. It will have to be a two piece design if I am to have any hope of ever getting it in and out of the car. This is the upper portion mating to a road race outlet flange. It will be mated to a lower section using the same type of flange and making an immediate 90 straight back. Needless to say there was lots of fiddling to get it just right so that everything would go where it needs to. Now that I have a better idea of what I will need, I ordered some more flanges, bends, and straight tube from Racing Beat to finish part of the exhaust system.
My 13B Midge build thread: [url]http://www.mgexp.com/phorum/read.php?40,3028771[/url]
13B header 1 by [url=https://www.flickr.com/photos
[url=https://flic.kr/p/tqRtLC][img]https://c1.staticflickr.com/1/302/18002882544_c428fb8af5.jpg[/img][/url][url=https://flic.kr/p/tqRtLC]13B header 2[/url] by [url=https://www.flickr.com/photos/gysgtfrank/]Kevin Frank[/url], on Flickr
well besides the tube, I did get the O2 sensor bung welded in, so that's two things I guess.
I am modifying the Racing Beat 6 port header that I already had to fit in the midget. It will have to be a two piece design if I am to have any hope of ever getting it in and out of the car. This is the upper portion mating to a road race outlet flange. It will be mated to a lower section using the same type of flange and making an immediate 90 straight back. Needless to say there was lots of fiddling to get it just right so that everything would go where it needs to. Now that I have a better idea of what I will need, I ordered some more flanges, bends, and straight tube from Racing Beat to finish part of the exhaust system.
My 13B Midge build thread: [url]http://www.mgexp.com/phorum/read.php?40,3028771[/url]
Forums 
Having trouble posting or changing forum settings?
Read the Forum Help (FAQ) or contact the webmaster
